Too Long; Didn’t Read
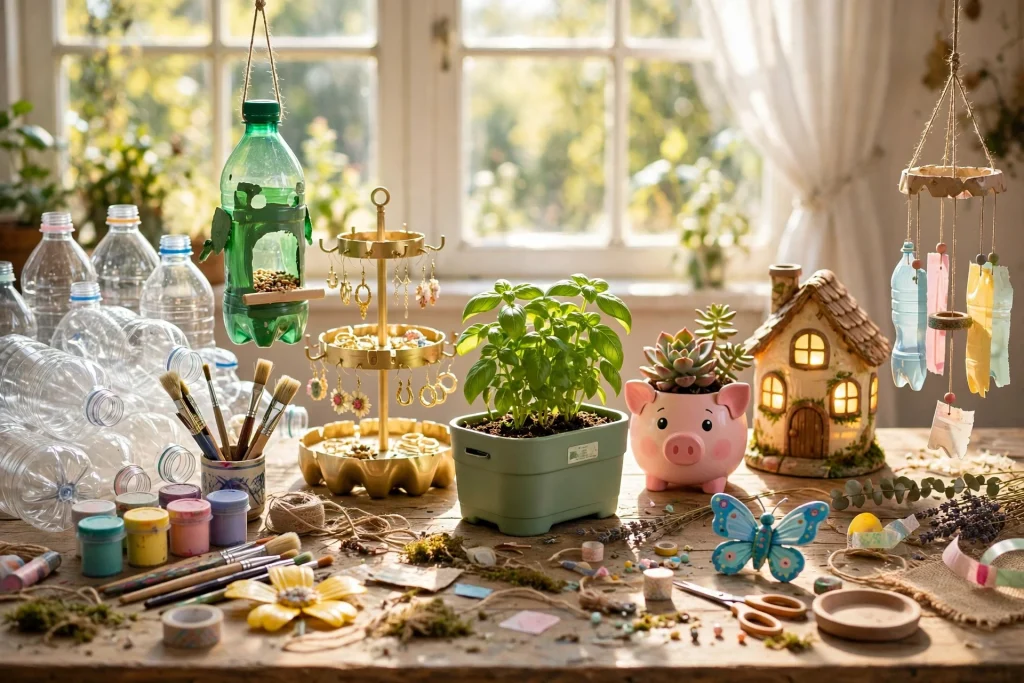
You do not need a craft store run to make something worth keeping. The bottles in your recycling bin are free, waterproof, and already shaped like planters, lanterns, bird feeders, and piggy banks. These 24 plastic bottle crafts cover the garden, the birds, the desk, and rainy afternoon play, and almost all of them use paint, scissors, and glue you already own. Most take under an hour, most cost nothing, and the 1-2-3 Bottle Craft Method near the start shows you how to run a whole craft afternoon with your kids without the table ending up covered in wet paint and cut plastic.
The Recycling Bin That Turned Into a Craft Box
The first time I made a craft out of a plastic bottle, I was not trying to be clever or green. It was a rainy Saturday, my kid was bored, and the recycling bin was full. I cut the bottom off a soda bottle, handed over the paint, and said, “Make it into something.” Twenty minutes later we had a lopsided blue planter with a crooked face on it, and a basil seedling sitting in it like it owned the place.
That planter lived on our windowsill for two years. It outlasted three shop-bought pots. Every time I watered the basil, I thought about how the thing that grew it cost nothing and came out of the bin. That is when I stopped seeing empty bottles as rubbish. They are craft material that arrives at your house for free, already washed, already shaped, and already the right size for small hands.
That is the whole point of this guide. A plastic bottle craft is not about saving the planet in one afternoon, though it does keep a bottle out of the bin for a while. It is about a project you can start right now, with what you already have, and finish before anyone loses interest. These 24 plastic bottle crafts follow that rule. Pick the ones that fit your bottles and your kids. Leave the rest for the next rainy Saturday.
What’s Inside This Guide
- The 3 Things That Make a Bottle Craft Actually Work
- The 1-2-3 Bottle Craft Method: How to Run a Craft Afternoon Without the Mess Taking Over
- The 24 Ideas, Grouped by What They Do
- At a Glance: Every Idea, Its Cost, and Its Time
- Do This, Not That
- Your Craft Weekend
- Take It Further
- Crafter’s Cheat Sheet
- Questions People Ask
The 3 Things That Make a Bottle Craft Actually Work
Before you cut a single bottle, it helps to know what you are actually aiming for. After a lot of Saturdays that ended with paint on the table and a craft nobody wanted to keep, I have landed on three things. Every one of the plastic bottle crafts in this list comes back to these three things. If a project has all three, it gets finished and it gets kept. If it is missing one, it ends up back in the bin, and that is a shame, because the bottle was already there once.
The adult does the cutting
This is the rule that makes everything else possible. Plastic bottles are tougher than they look, and craft scissors are not strong enough for them. An adult scores the bottle with a craft knife, then finishes the cut with strong scissors. Kids do the painting, the gluing, the decorating, and the choosing. That split keeps small fingers safe and keeps the project moving, because nobody is stuck wrestling with a bottle that will not cut. It also means the adult is part of the craft instead of just watching it, which is half the point of making things together.
It has a job when it is done
A craft that just sits on a shelf gets forgotten by Tuesday. A craft that holds a plant, feeds a bird, lights up a bedroom, or keeps pencils tidy gets used every day, and every time it gets used, your kid remembers making it. That is why the best plastic bottle crafts in this guide are useful things. A planter waters a plant. A bird feeder brings birds to the window. A piggy bank holds real coins. Pick projects that earn their place in the house and they will stay there.
It is finished in one sitting
Kids run out of steam fast. A project that needs three coats of paint with drying time between them is a project that never gets finished. The crafts in this list are built to be done in one sitting, usually under an hour. If a project needs paint to dry, the drying happens while you do the fun part, like adding the face or the seeds, and the whole thing is done before lunch. One sitting, one finished thing, one happy kid. That is the deal.
Neuman’s Note: The first time I ignored the one-sitting rule, I tried a bottle chandelier that needed a whole afternoon of cutting and gluing. My kid painted two petals, got bored, and went to watch cartoons. I finished it alone at midnight and it looked fine, but nobody cared about it, because nobody had made it together. Now I pick projects we can finish before the paint dries on our hands. The small finished thing always beats the big unfinished one.
The 1-2-3 Bottle Craft Method: How to Run a Craft Afternoon Without the Mess Taking Over
Here is the part most plastic bottle craft lists skip. A list of 24 ideas is not a plan. It is a wish list. If you try to do all 24 in one weekend, you will spend the whole Saturday cutting plastic and the whole Sunday cleaning paint off the table, and nobody will want to craft again. So here is the simple ratio I use when we craft, and it works every time.
The 1-2-3 Bottle Craft Method
1 Bin of Bottles — Save 1 bin of clean bottles before craft day. Wash them, peel the labels off, and let them dry. A small bag or a box is enough, about ten to fifteen bottles in a few sizes. That is the whole supply run, and it costs nothing. When the bin is ready, the crafting can start the minute the kids sit down, instead of starting with twenty minutes of washing bottles while everyone loses interest.
2 Projects per Sitting — Pick 2 projects per sitting, not five. One quick one that takes twenty minutes, and one longer one that takes about an hour. The quick win gets everyone excited, and the longer project gets the real attention. Two finished crafts in one afternoon feels like a triumph. Five half-finished ones feels like a chore. Stop at two, put the tools away, and put the finished crafts where everyone can see them.
3 Jobs for the Kids — Give the kids 3 jobs each. They choose the colours, they paint, and they name the finished craft. Choosing, painting, and naming are the three jobs that make a craft feel like theirs. The adult handles the cutting, the hot glue, and the sharp edges. When kids own the choices, they own the result, and they will show it to everyone who walks through the door.
That is it. 1 bin of bottles, 2 projects per sitting, 3 jobs for the kids. No craft afternoon needs more than that to feel like a win.
Before the 1-2-3 Bottle Craft Method
- A table covered in wet paint, cut plastic, and half-finished projects.
- Kids bored after twenty minutes because the cutting took too long.
- Crafts that sit on a shelf and get forgotten by Tuesday.
- A whole afternoon lost to one project that never got finished.
- Bottles piling up in the bin because nobody knows what to do with them.
After the 1-2-3 Bottle Craft Method
- 1 bin of clean bottles, ready before anyone sits down.
- 2 finished projects per sitting, one quick and one longer.
- 3 jobs for the kids, so the craft feels like theirs.
- A table that is cleared and wiped in ten minutes.
- Useful crafts that stay in the house and get used every day.
- A craft afternoon worth repeating next weekend.
Pick your 1, your 2, and your 3 from the 24 plastic bottle crafts below. Write them down. Then stop. The afternoon is planned.
The 24 Ideas
I have grouped these by what they do, because that is how you actually plan a craft afternoon. You start with the garden, then the lights, then the birds, then the useful things for the house, and then the pure fun. Work through one group at a time, and stop when you have two finished crafts. It will feel like enough sooner than you think.
Planters and the Garden
The garden is the best place to start with plastic bottle crafts, because a planter is useful the same day you make it. These five ideas turn bottles into homes for herbs, flowers, and seedlings, and they all cost nothing but soil and seeds. Start here if it is your first craft afternoon.
1. Make a Self-Watering Herb Planter
This is the single most useful of all the plastic bottle crafts in this guide, and it takes about twenty minutes. Cut a large soda bottle in half. Flip the top half upside down into the bottom half, so the neck points down into the water. Thread a strip of cotton fabric or a piece of old shoelace through the neck so it dips into the water below. Fill the top half with soil and plant a herb like basil or mint. The fabric pulls water up into the soil, so the plant waters itself for days. It is a real piece of garden kit, made from a bottle that was going in the bin.
Best for: Kitchen windowsills, first-time crafters, and anyone who forgets to water plants.
Cost: Free, plus soil and seeds for about 2 to 3 dollars. Time: About 20 minutes.
Use a 2 litre bottle for a good size, and cut it about a third of the way down from the top. Let the kids paint the outside of the bottom half before you put the soil in, because painting a planted pot is much harder. And put a small stone in the bottom so the bottle does not tip over when the plant grows tall.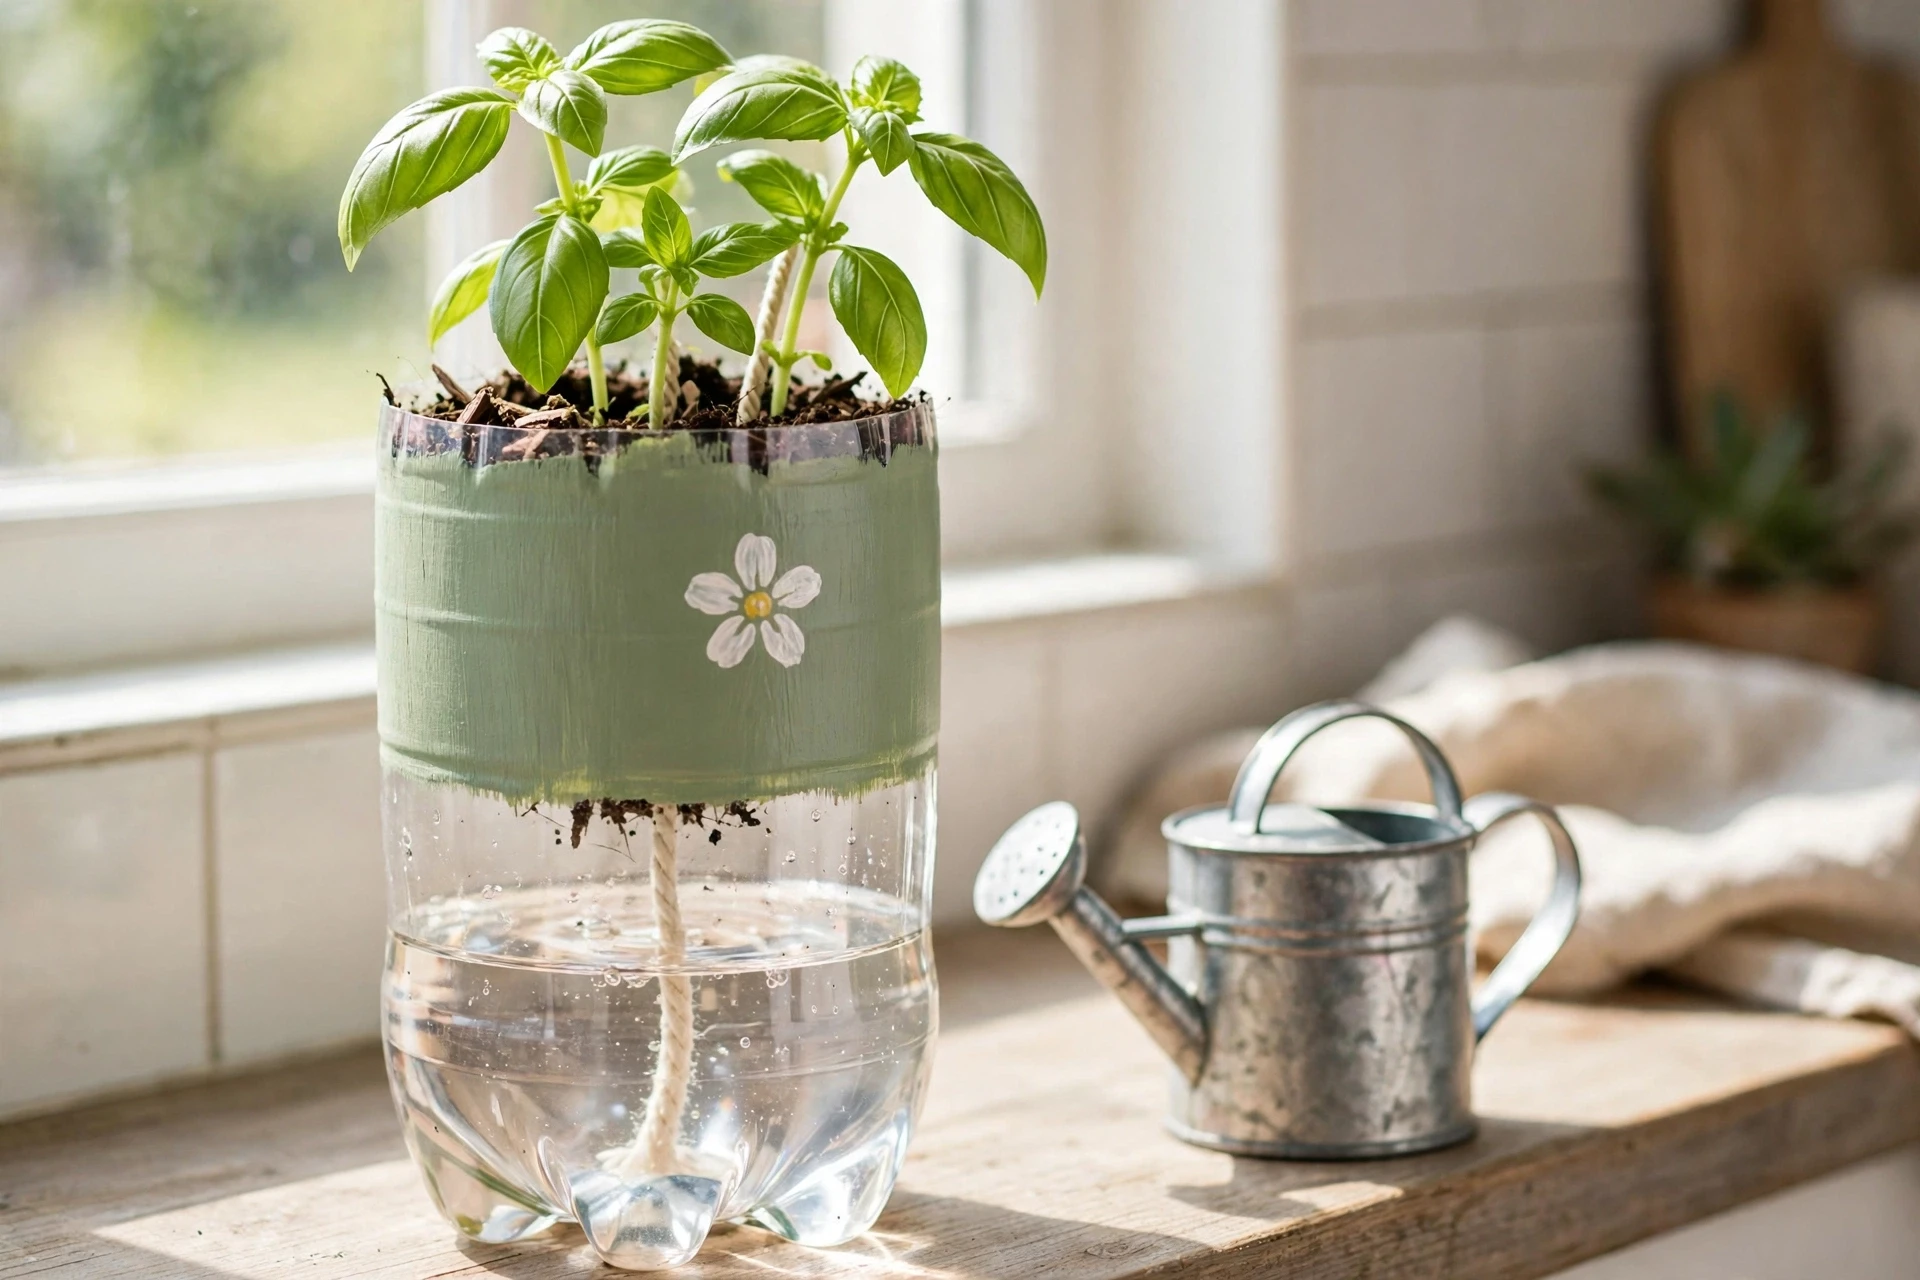
You may also like: 22 Driftwood Decor Ideas That Make Your Home Feel So Calm
2. Hang a Bottle Planter by the Window
Cut the side out of a bottle to make a long opening, punch two holes near the top, and thread twine through them to hang it. Fill it with soil and a trailing plant like a spider plant or a pothos, and hang it by a sunny window. The plant spills out of the opening and down the side of the bottle, which looks far better than it sounds. Make three or four and hang them at different heights, and you have a hanging garden that cost nothing and took an afternoon.
Best for: Small flats, sunny windows, and anyone with no garden space.
Cost: Free, plus soil, plants, and twine for about 3 to 5 dollars. Time: About 15 minutes per planter.
Cut the opening with a craft knife, then smooth the edge with sandpaper or cover it with tape before a child touches it. Hang the bottle with the opening facing the room, not the window, so you see the plant and not the plastic. And use clear bottles if you can, because you can see the soil and the roots, which kids love.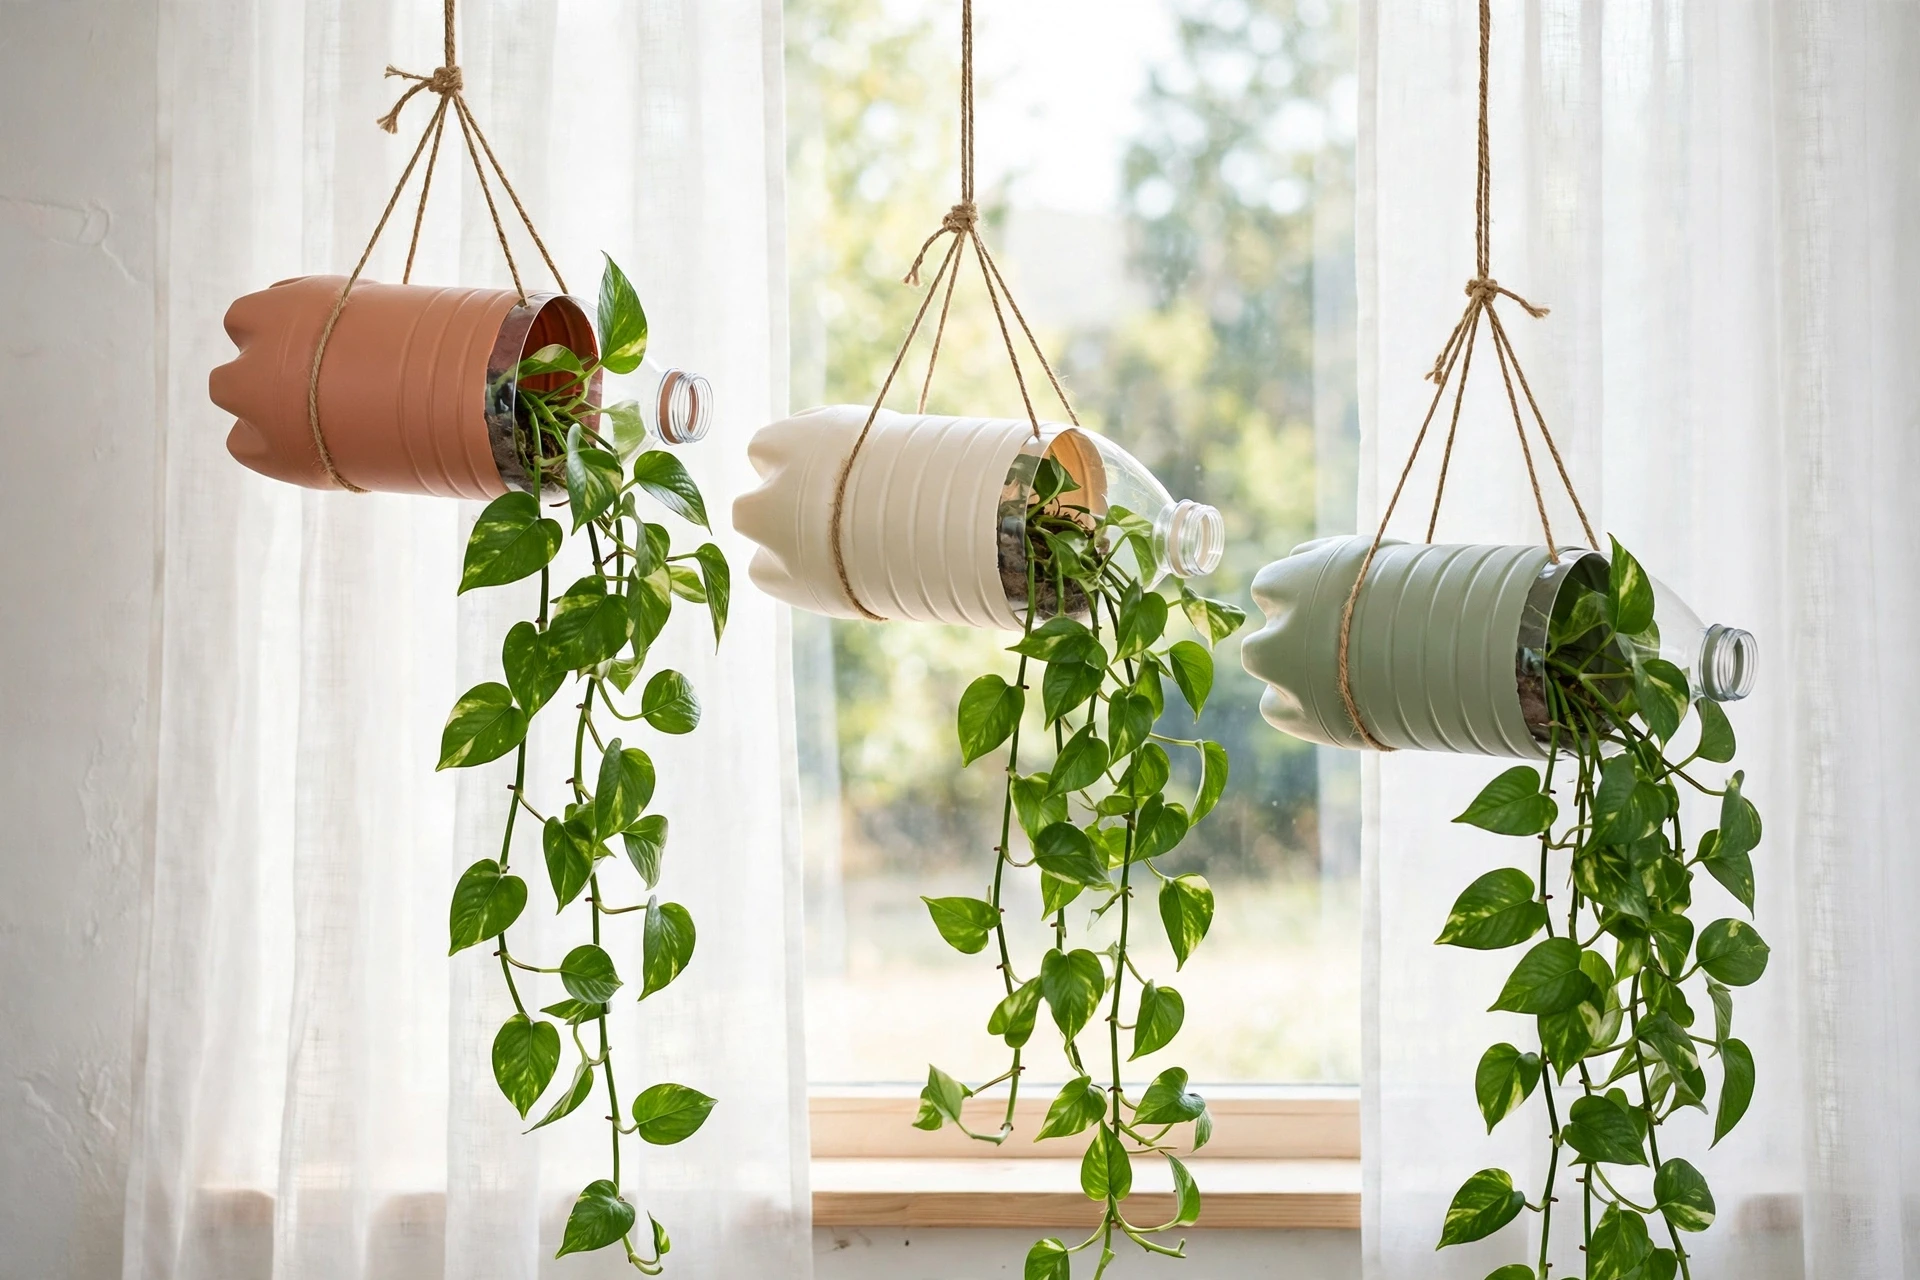
You may also like: 22 Thanksgiving Decor Ideas That Make Your Home Feel So Warm
3. Paint an Animal Face Planter
Cut a bottle in half and turn the bottom half into an animal. Two ears cut from the top half, glued on, and a face painted on the front, and you have a cat, a pig, a bunny, or a frog. Fill it with soil and a small plant, and the plant becomes the animal’s hair. Kids love this one more than any other planter, because the plant grows out of the animal’s head and they get to choose the animal, the colours, and the name. It is silly, it is simple, and it is the planter that actually gets watered, because a kid will not let their cat planter go thirsty.
Best for: Younger kids, rainy afternoons, and anyone who wants a planter with a personality.
Cost: Free, plus soil and a small plant for about 2 to 4 dollars. Time: About 30 minutes, plus drying time for the paint.
Cut the ears from the smooth part of the bottle, not the ridged part, or they will be hard to shape. Paint the bottle with two coats of acrylic paint and let the first coat dry fully, or the face will smear. And use a permanent marker for the eyes and whiskers after the paint dries, because marker on wet paint bleeds.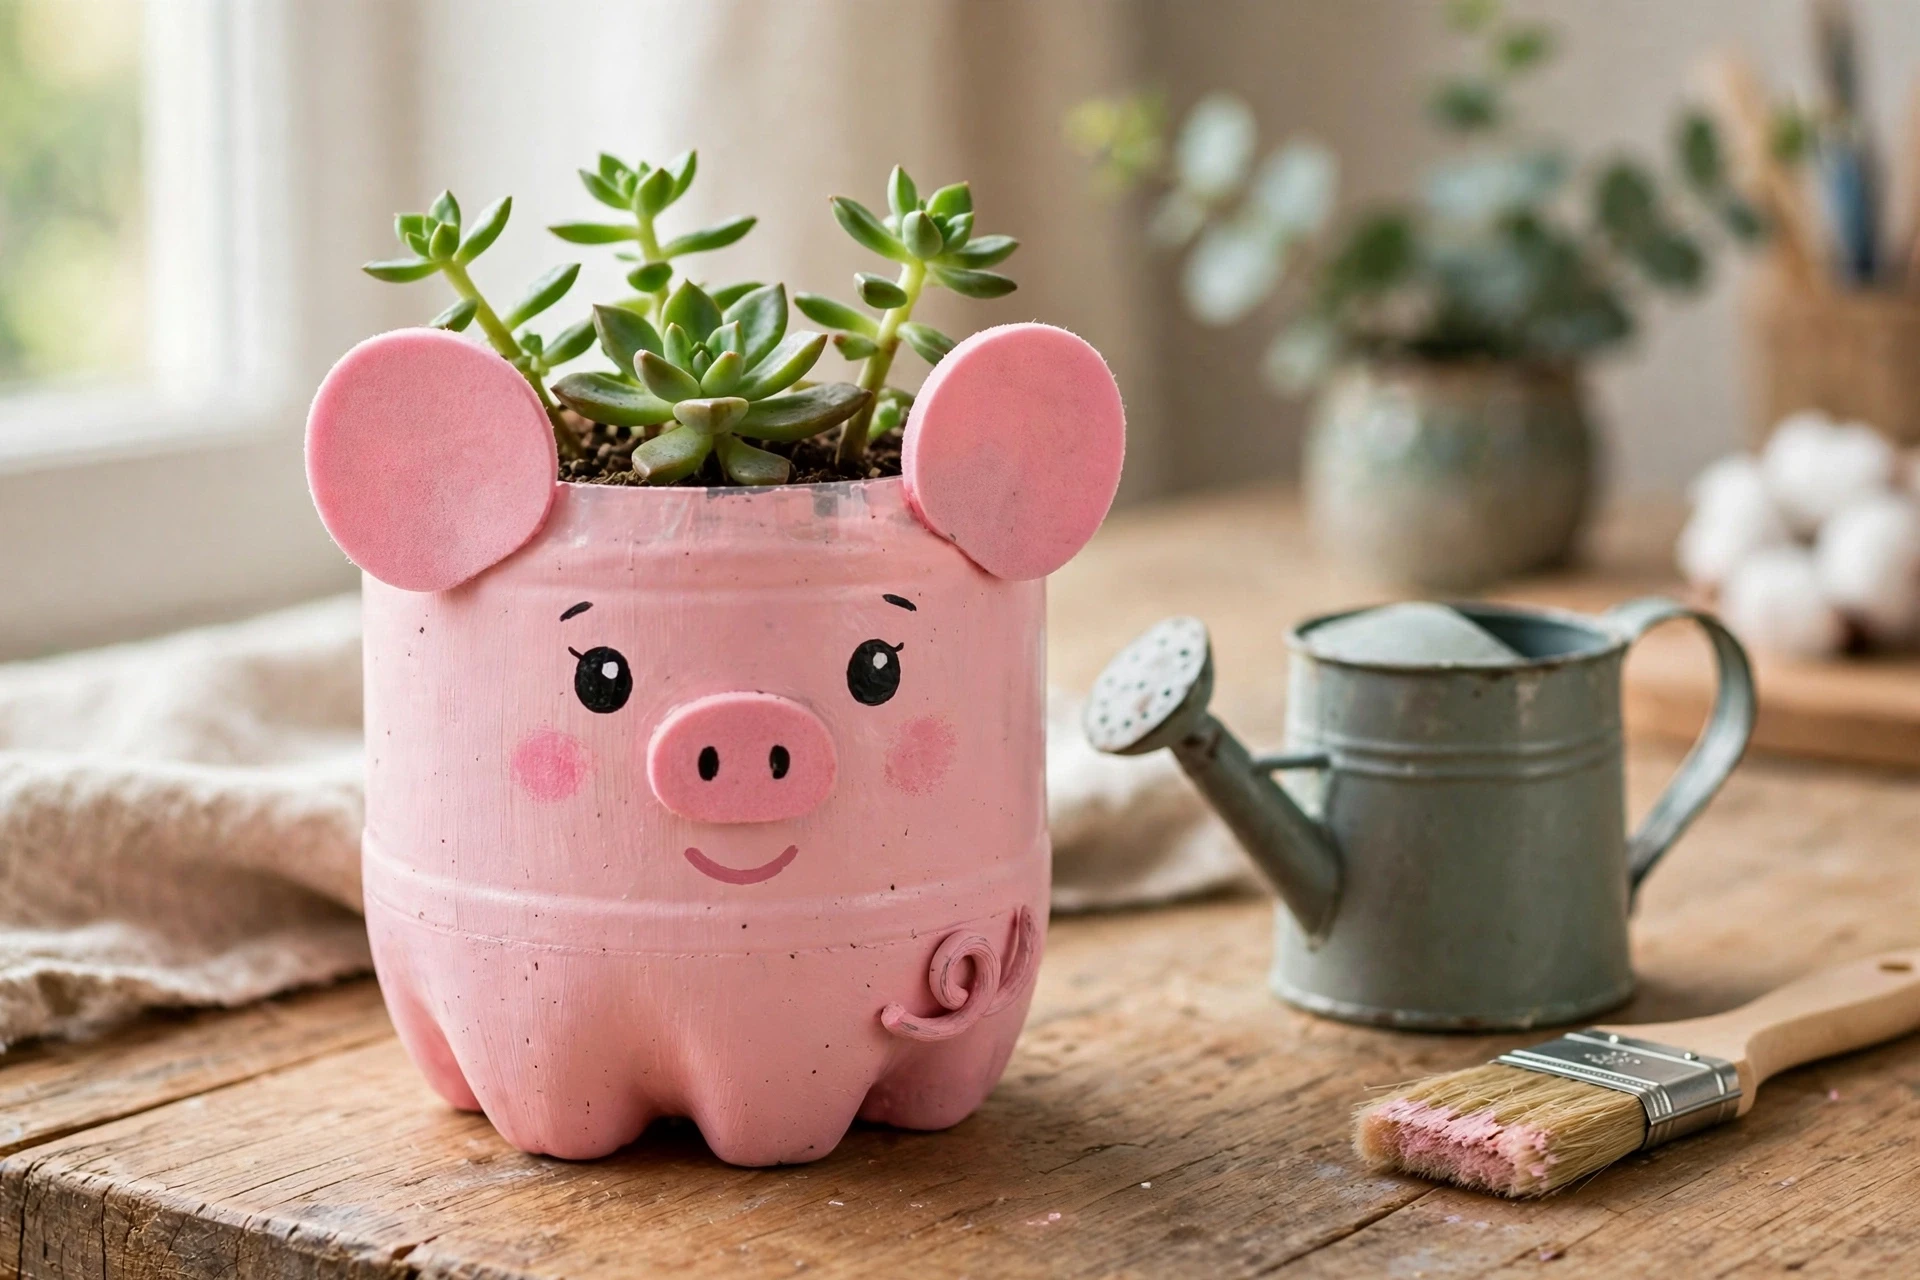
You may also like: 22 Kid Friendly Dinner Ideas for Picky Eaters Who Say No
4. Build a Vertical Hanging Garden Wall
This is the big garden project, and it is the one that turns a bare balcony wall or a fence into a real garden. Take six to eight bottles, cut a long opening in the side of each one, and thread them onto two lengths of twine or rope, one near the top and one near the bottom, so they hang in a row. Fill each one with soil and a herb or a flower, and hang the whole row on a wall, a fence, or a balcony rail. It is a garden that grows upwards instead of outwards, which makes it perfect for small spaces, and it is built from bottles that were going to be thrown away.
Best for: Balconies, small gardens, and families who want a real project to build together.
Cost: Free, plus soil, plants, and rope for about 8 to 12 dollars. Time: About 1 hour for a row of six.
Make all the cuts first, then let the kids paint each bottle a different colour while you thread the rope. Hang the row low enough for kids to water it, or it will dry out and nobody will reach it. And poke a few small drainage holes in the bottom of each bottle, because a planter with no drainage drowns the plant in the first rain.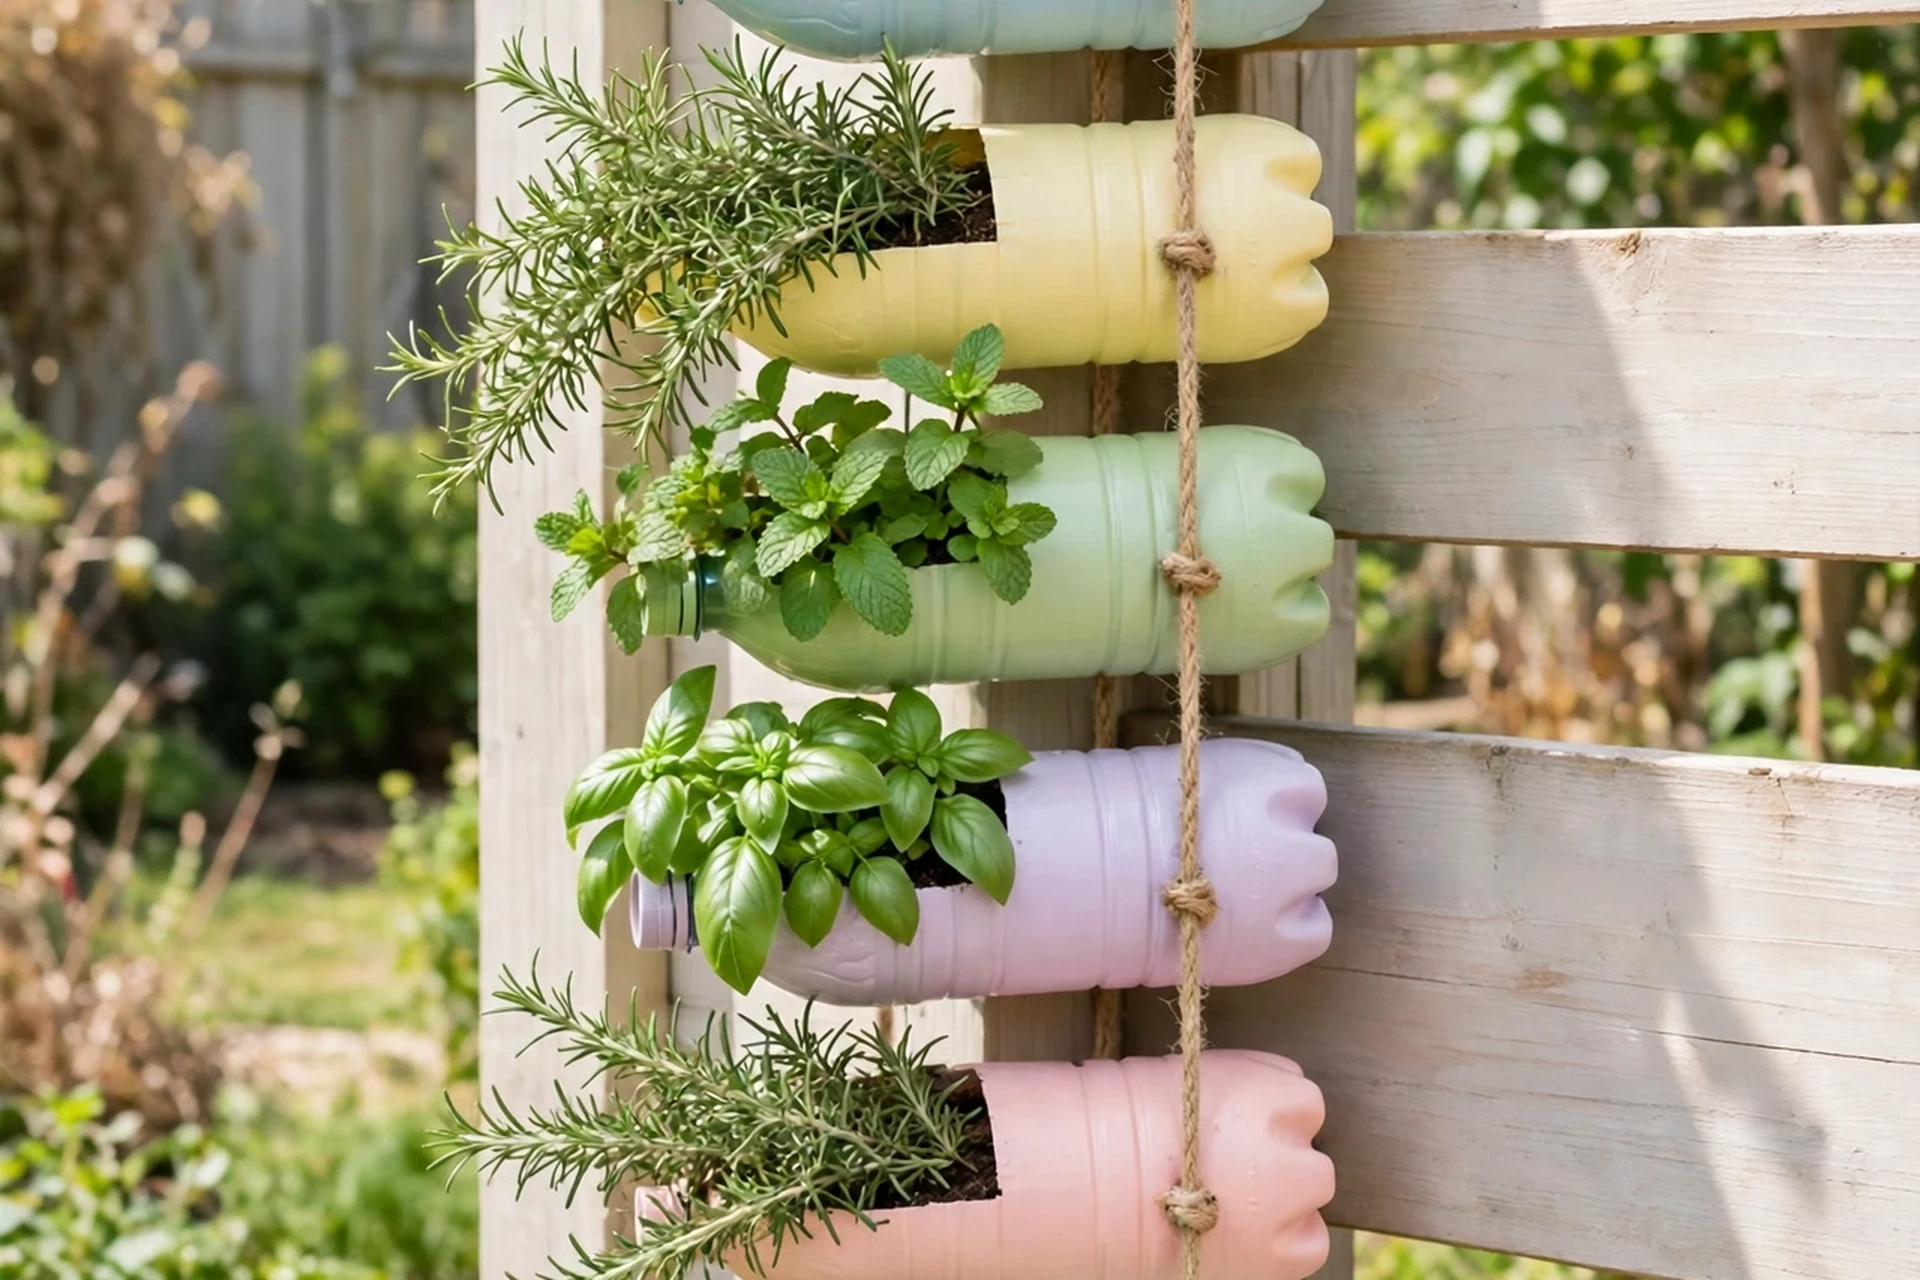
You may also like: 22 Cozy Christmas Apartment Decor Ideas for Small Spaces
5. Turn a Bottle Into a Mini Greenhouse
Cut the bottom off a large bottle and push it over a seedling in the garden or in a pot. That is the whole idea, and it works better than it sounds. The bottle traps warmth and moisture around the young plant, keeps slugs and wind off it, and acts like a tiny greenhouse. Take the cap off on warm days so the plant can breathe, and put it back on at night. It is the simplest of all the plastic bottle crafts in this guide, and it is the one that teaches kids the most about how plants grow, because they can watch the seedling through the clear plastic every single day.
Best for: Spring planting, curious kids, and anyone starting seeds early.
Cost: Free. Time: About 5 minutes per bottle.
Use clear bottles, not coloured ones, so the light gets through. Push the bottle about an inch into the soil so it does not blow away, and remember to take it off once the plant outgrows it. And label each one with a marker so you know what is growing under it.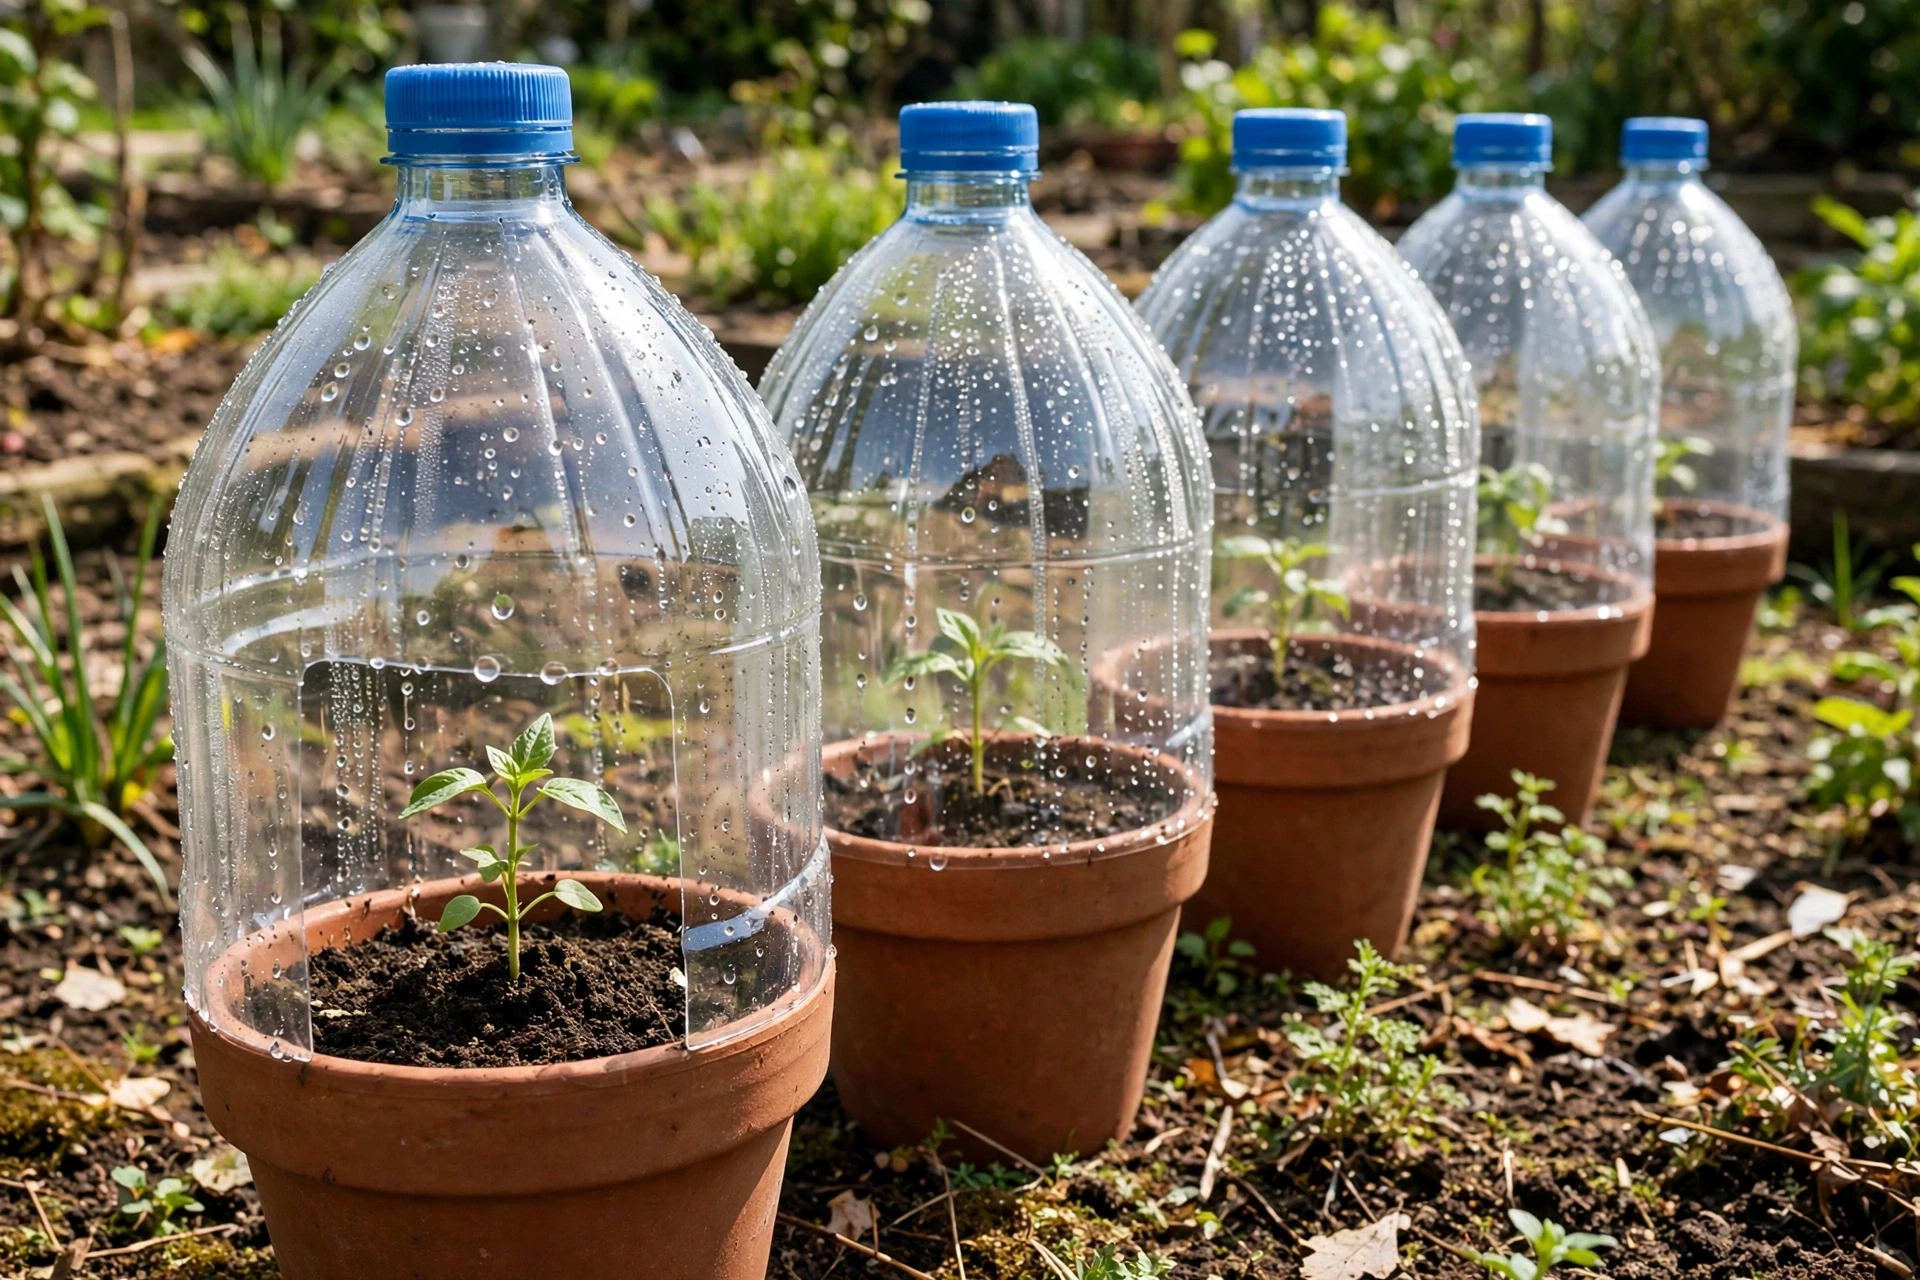
You may also like: 22 One Pot Recipes for Busy Weeknights That Actually Work
Light and Glow
Bottles and light go together well, because clear plastic glows when you put a light inside it. These four ideas turn bottles into lanterns and lamps, and every one of them uses battery lights only. Never put a real candle in a plastic bottle, because the plastic will melt. LED tea lights and fairy lights are cheap, safe, and they make the glow look magical.
6. Build a Fairy House Lantern
Cut a small door and two windows into a bottle, paint the outside to look like a little cottage, and add a roof made from the top half of another bottle, cut into strips and bent outward like shingles. Glue on some moss and a few silk flowers, pop a battery tea light inside, and the windows glow. It looks like a tiny house with someone home. Kids love this one because it feels like a story, not a craft, and it is the lantern that gets switched on every single night.
Best for: Bedrooms, bedtime, and kids who love stories about fairies.
Cost: A battery tea light and a few craft bits, about 3 to 5 dollars. Time: About 45 minutes.
Cut the door and windows before you paint, because cutting painted plastic chips the paint. Use multi-surface acrylic paint and give it two coats, or the light will show through the thin spots. And use LED tea lights only, never a real flame, because a real flame will melt the house around it.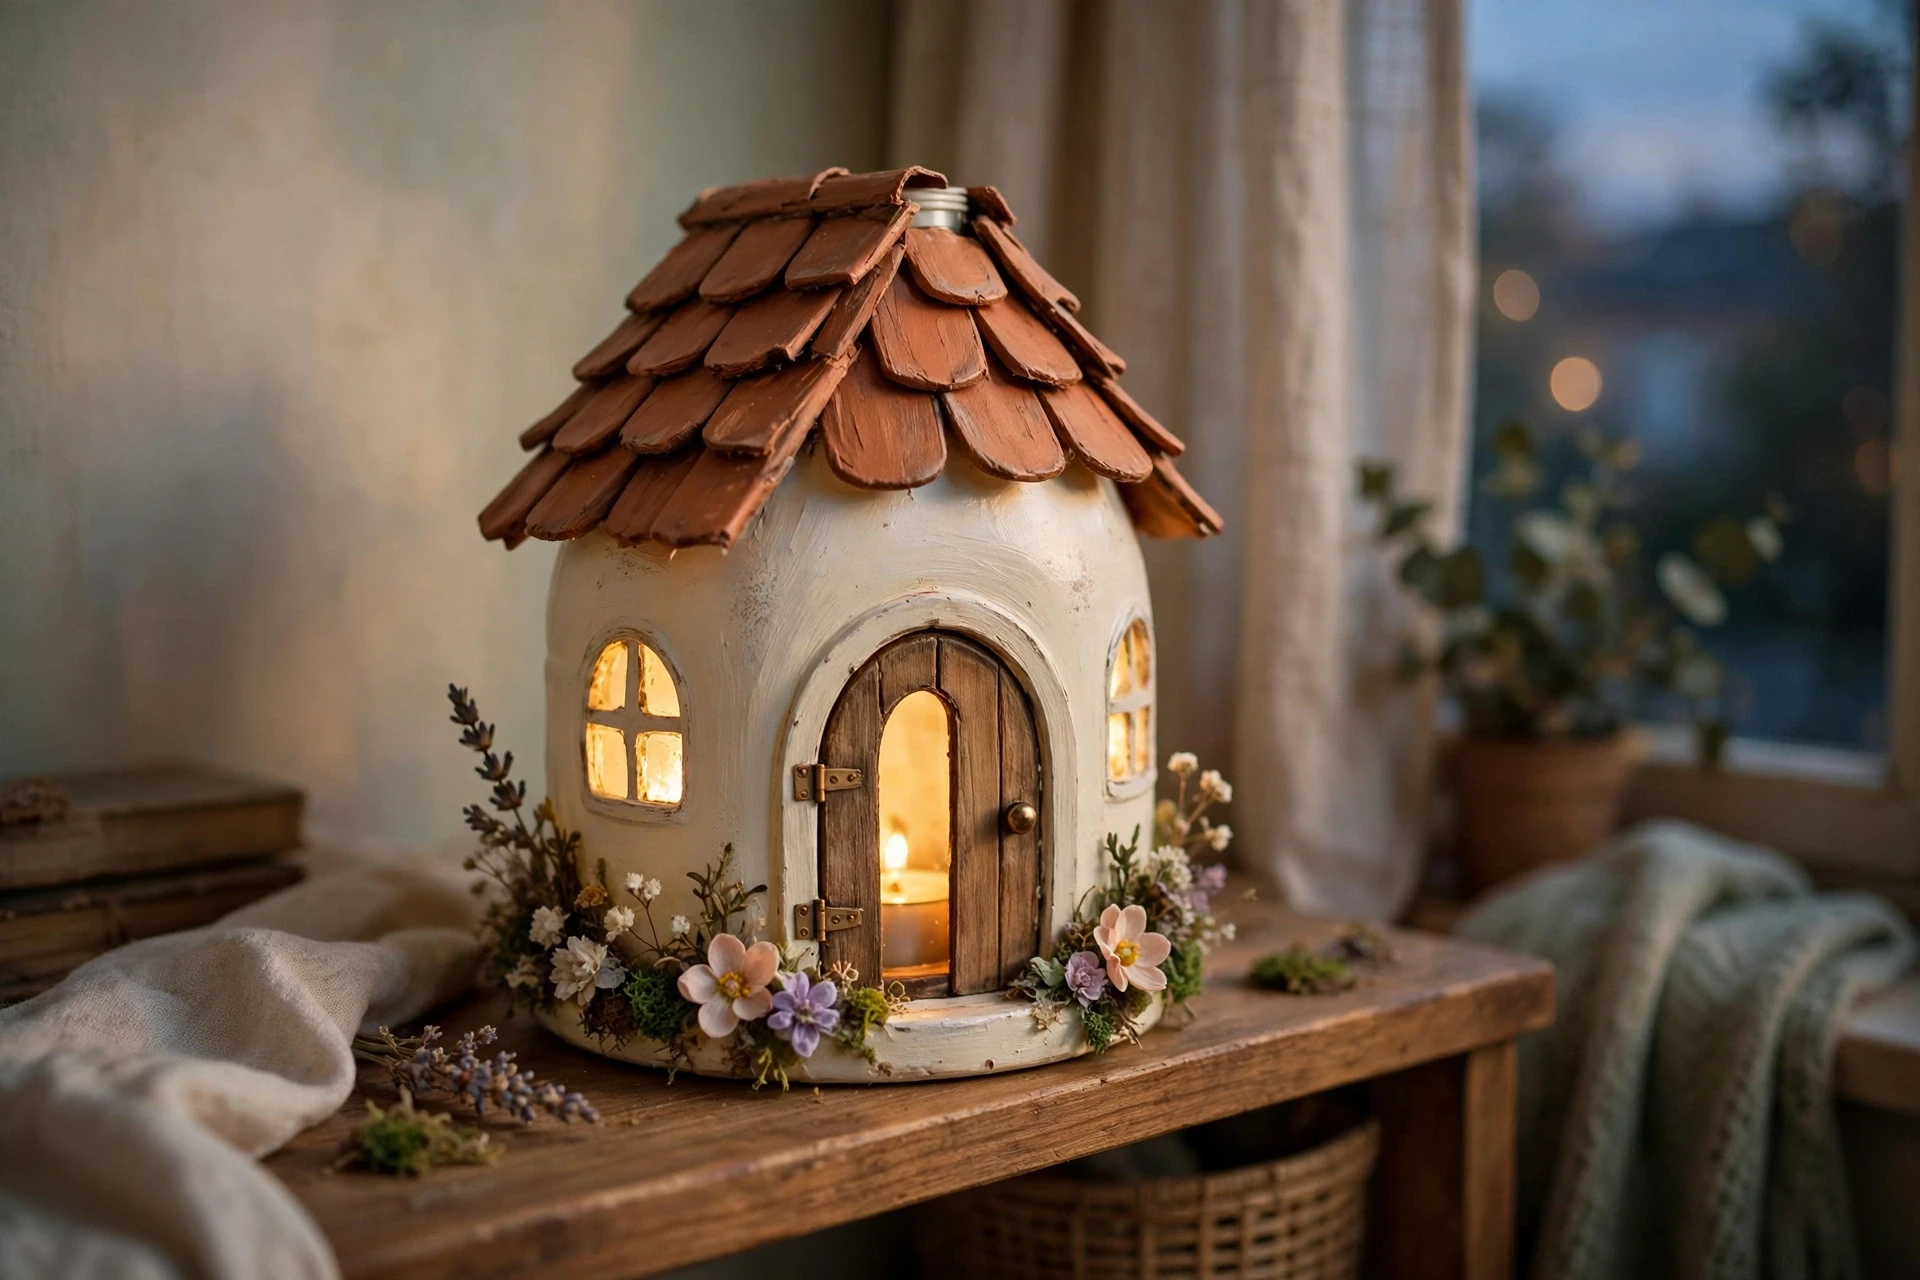
You may also like: 22 DIY Candles That Make Fall Feel Warm and Truly Special
7. Cut a Patterned Tealight Lantern
Draw a simple pattern on a clear bottle with a permanent marker, stars, dots, leaves, or a row of little windows, then cut the shapes out carefully with a craft knife. Pop a battery tea light inside and the light shines out through the cut-outs, throwing the pattern onto the wall. It looks far fancier than it is, because the light does all the work. This is a good project for older kids who can handle a careful cutting job with an adult beside them, and it is the lantern that looks best in a dark room.
Best for: Older kids, evening light, and anyone who likes a bit of patience in a craft.
Cost: A battery tea light, about 1 to 2 dollars. Time: About 30 minutes.
Keep the pattern simple and the shapes big, because tiny cut-outs are hard to cut cleanly and they let out less light. Smooth every cut edge with sandpaper so nobody catches a finger. And try it in a dark room before you call it done, because the pattern on the wall is the real result.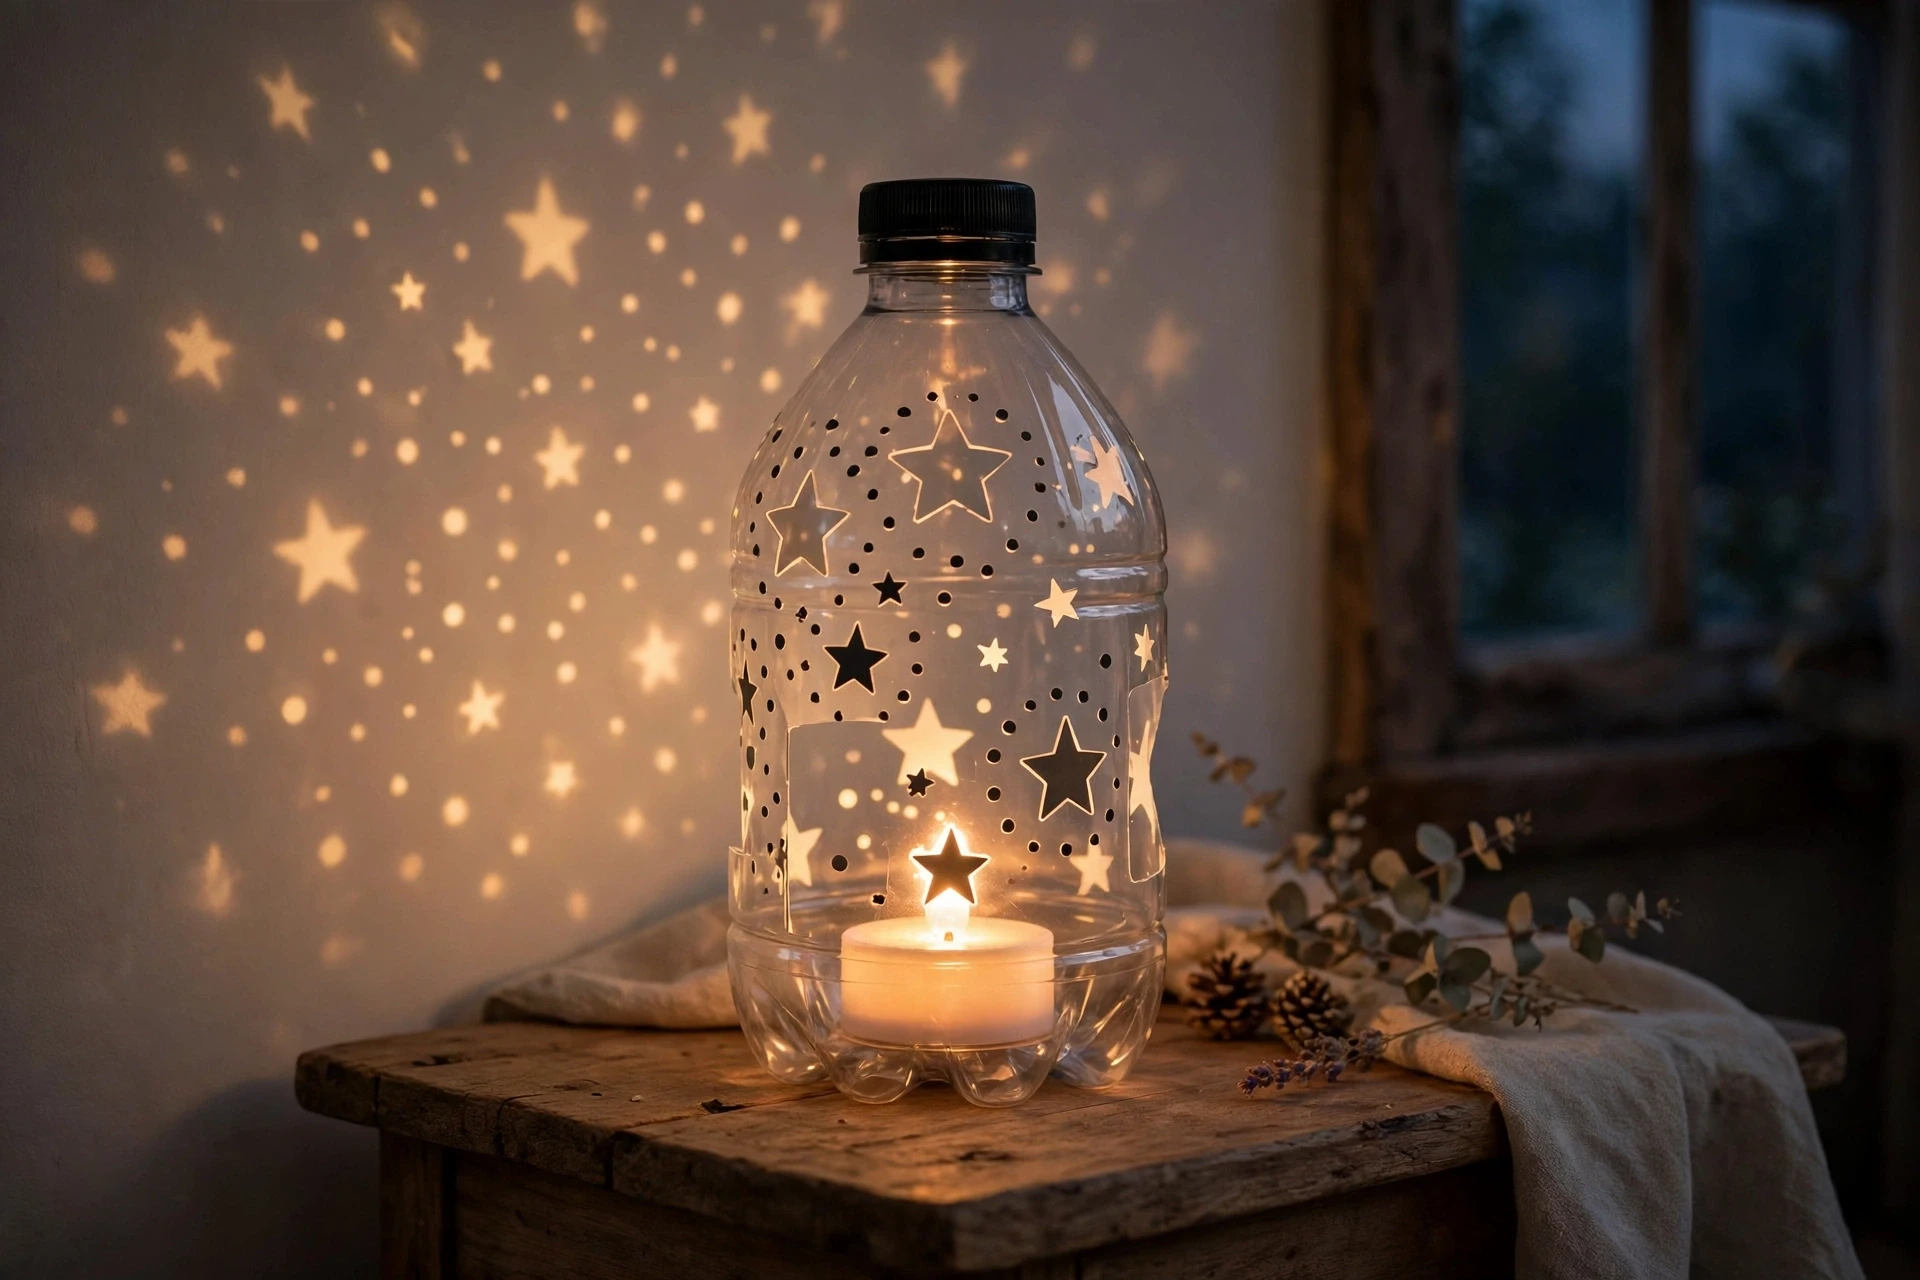
You may also like: 21 Christmas Window Painting Ideas to Brighten Your Home
8. Make a Floating Lotus Flower Light
Cut the top cone off three bottles and cut each cone into petals, then layer the three petal rings on top of each other and glue them together so they open like a lotus flower. Pop a battery tea light into the middle and the flower glows. It floats, too, so you can set it in a bowl of water, a bird bath, or a paddling pool, and it drifts around like a real flower. It is the prettiest of all the plastic bottle crafts in this list, and it is made from three bottles that were going in the bin.
Best for: Summer evenings, garden parties, and anyone who loves a pretty result.
Cost: A battery tea light, about 1 to 2 dollars. Time: About 30 minutes.
Cut the petals long and pointed, and curl them outward slightly with your fingers so the flower opens up. Use waterproof battery tea lights if the flower is going in water, and take it out of the water when you are done, because leaving painted plastic in water is littering, not decorating.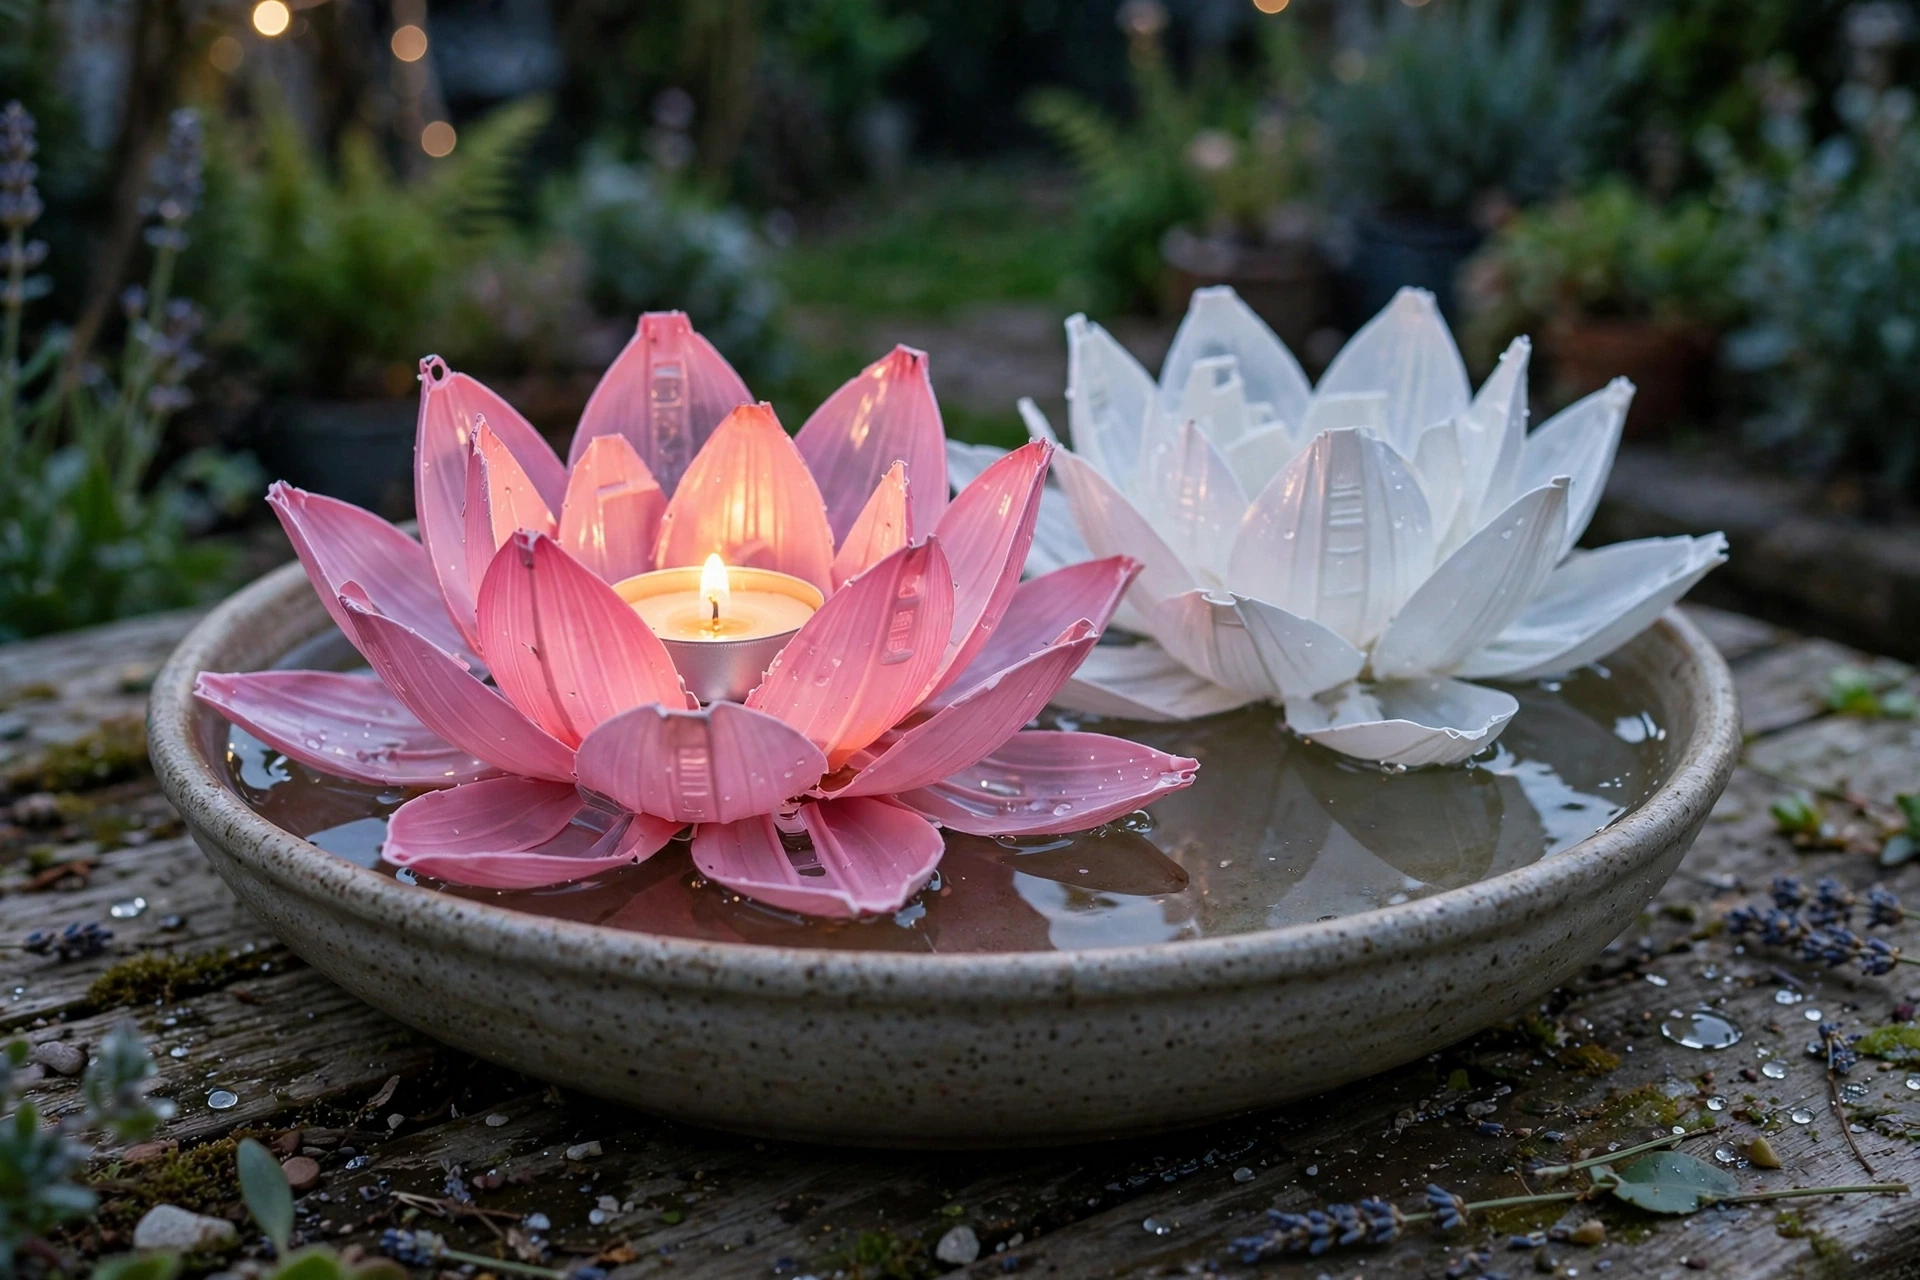
You may also like: 22 Fireplace Mantel Ideas for Fall and Christmas That Work
9. Turn a Bottle Into a String Light Lamp
Take a clear bottle, drop a short string of battery fairy lights inside through the neck, and let the lights coil at the bottom. Put the bottle on a shelf or a bedside table and switch the lights on. The whole bottle glows softly, and the plastic bends the light in a way that looks much warmer than a bare bulb. Paint the outside lightly with frosted glass paint or wrap it in twine for a softer glow. It is the easiest lantern in this guide, it takes five minutes, and it is the one that stays on the shelf the longest.
Best for: Bedrooms, cosy corners, and anyone who wants a five-minute win.
Cost: A short string of battery fairy lights, about 2 to 4 dollars. Time: About 5 minutes.
Use battery lights with a small battery pack that fits inside the bottle or tucks behind it. Keep the lights cool to the touch, and never use mains-powered lights in a plastic bottle. And pick a bottle with a wide neck if you can, because threading lights through a narrow neck is fiddly.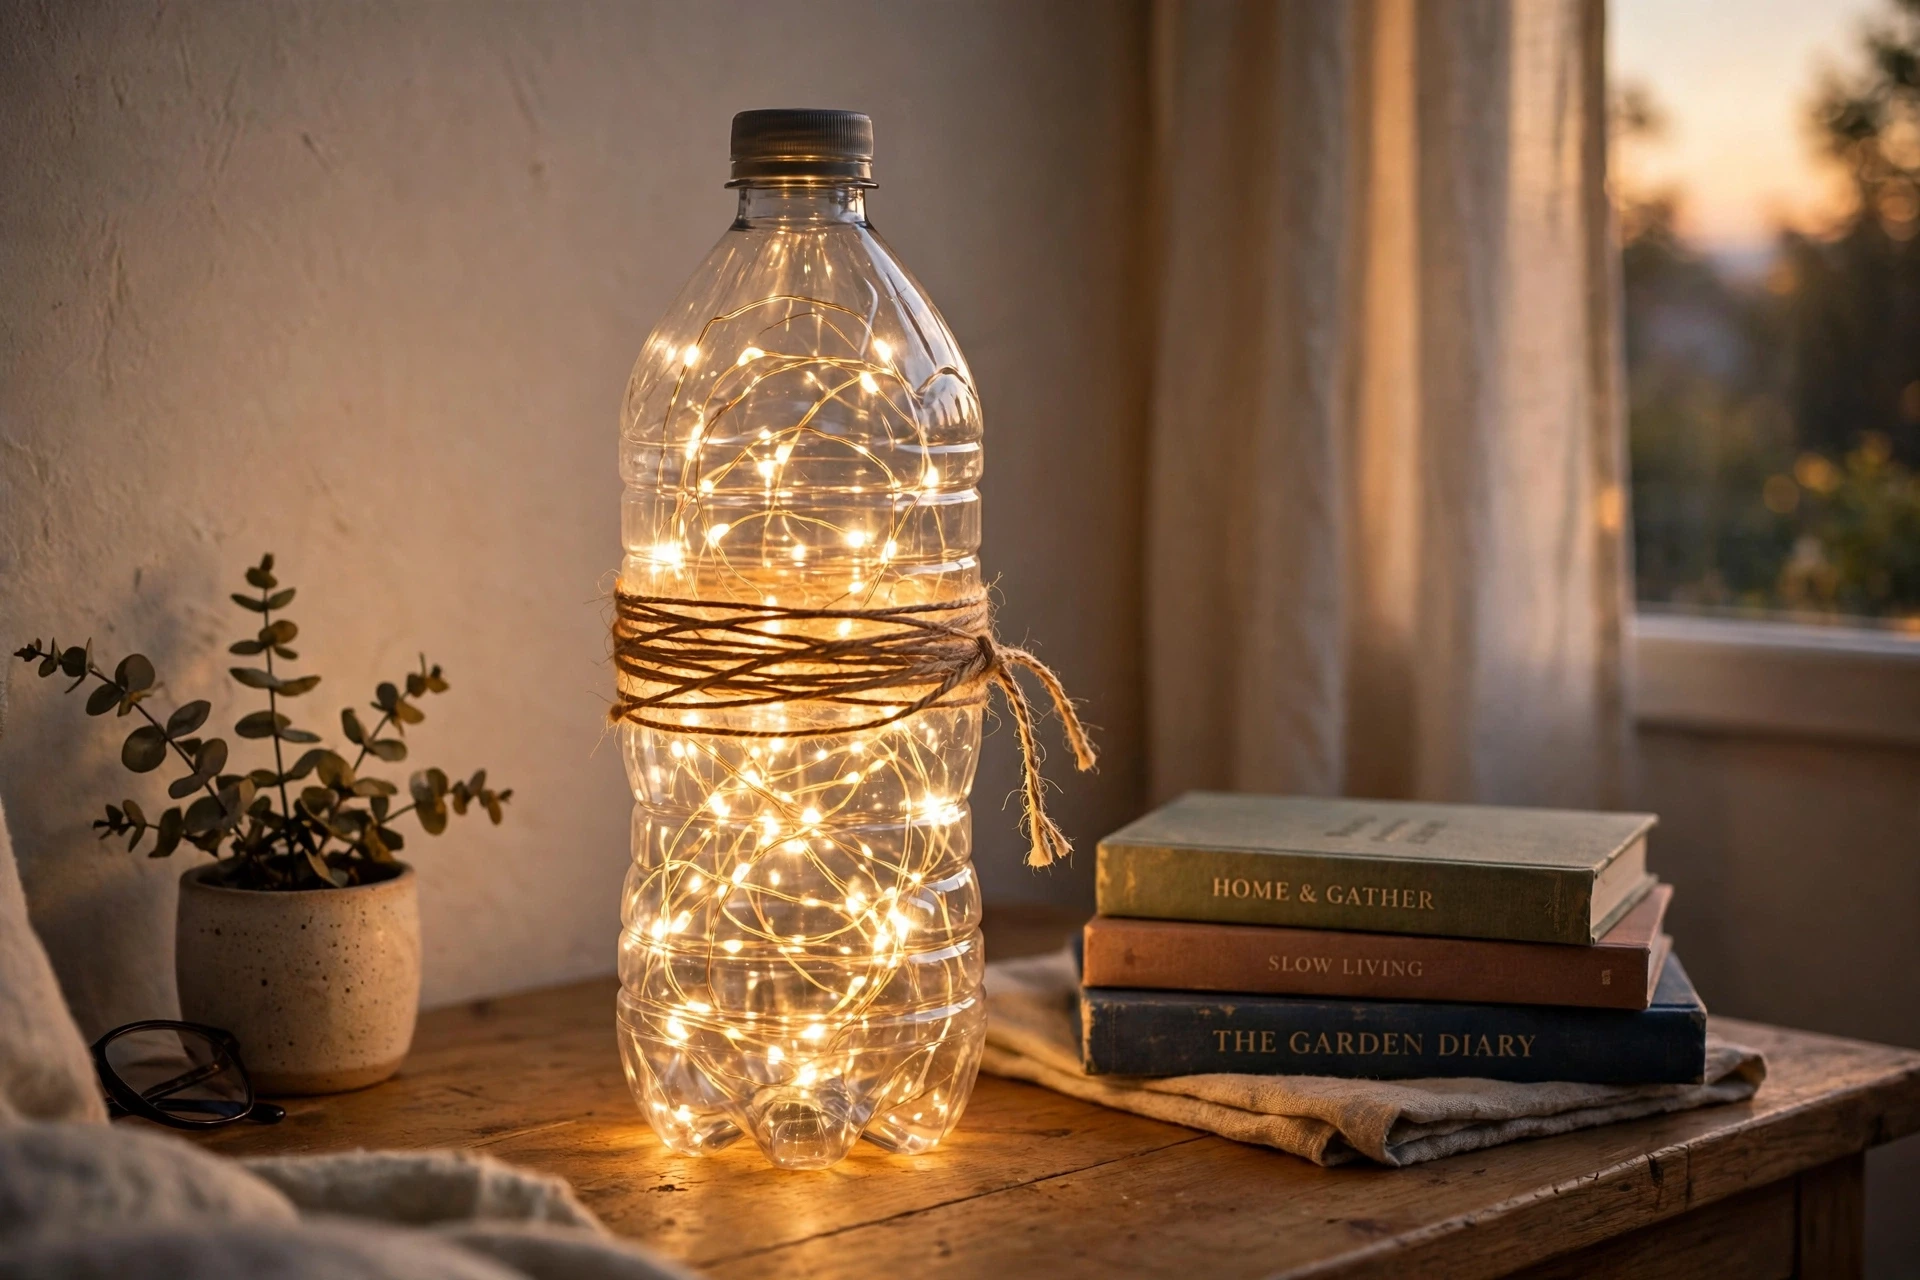
You may also like: 21 Cozy Christmas Living Room Decor Ideas That Make Your Home Feel Magical
For the Birds
A bird feeder made from a bottle is one of the oldest plastic bottle crafts there is, and it is still one of the best. Birds do not care what the feeder looks like, they care that it holds seed and stays dry. These three ideas do that, and they all hang from a branch where you can watch the birds from the window.
10. Hang a Classic Bottle Bird Feeder
Cut two small holes on opposite sides of a bottle, push a wooden spoon or a stick through them so it sticks out on both sides, and fill the bottle with birdseed. The birds land on the spoon and eat from the holes. Punch a hole in the cap, thread twine through it, and hang the feeder from a branch. It takes fifteen minutes, it costs nothing, and the first bird usually shows up the same day. This is the plastic bottle craft that gives back the most, because you get to watch wild birds from your window all winter.
Best for: Winter, bird lovers, and anyone with a tree near a window.
Cost: Free, plus birdseed for about 3 to 5 dollars. Time: About 15 minutes.
Cut the holes just above the spoon, not level with it, so the seed flows down to where the birds can reach it. Use black oil sunflower seeds, because most garden birds love them. And hang the feeder where cats cannot reach it, high up and away from fences and thick bushes.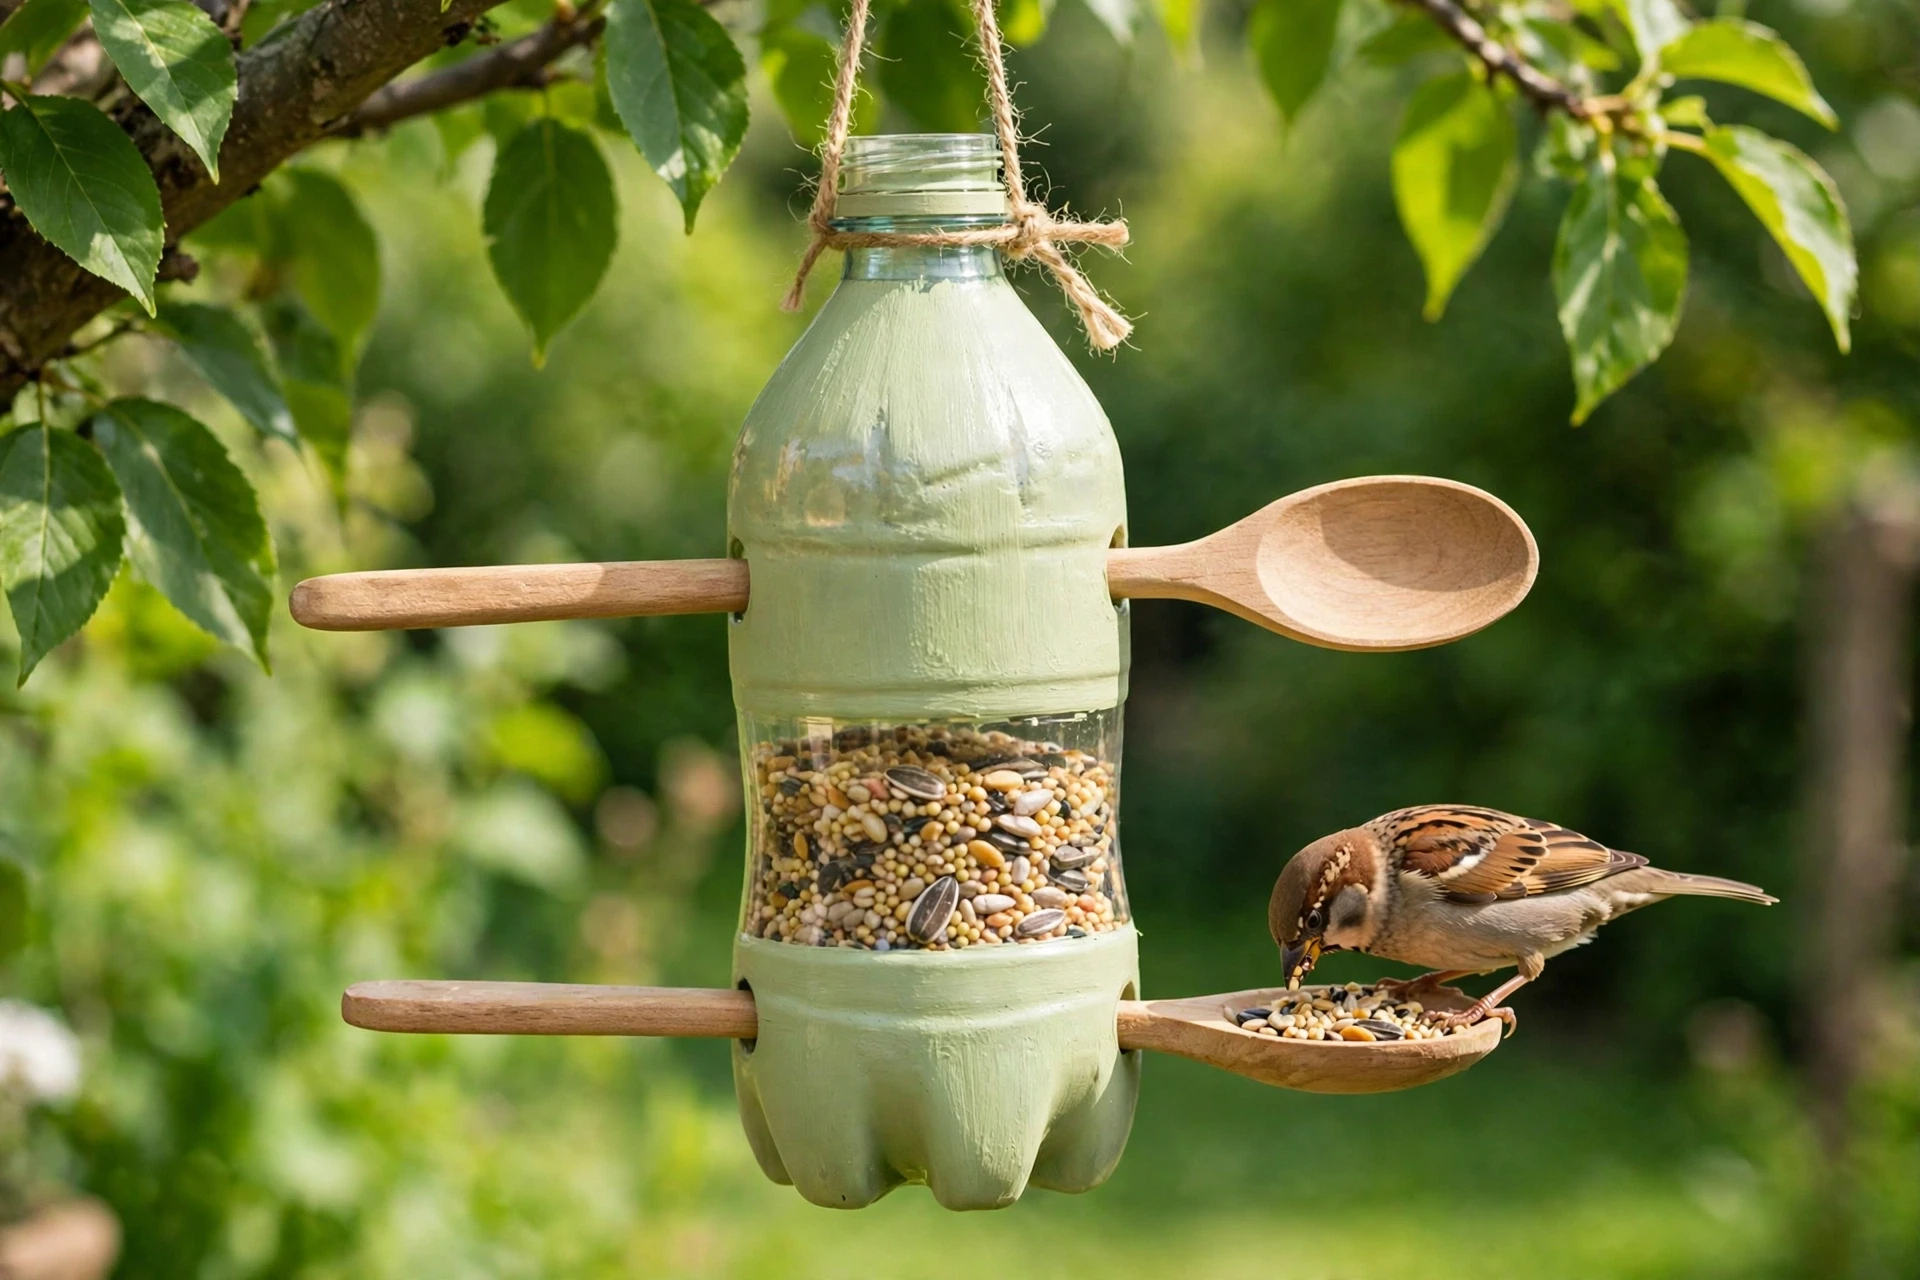
You may also like: 22 Thanksgiving Table Decor Ideas for a Cozy Holiday Feast
11. Build a Bottle Birdhouse
Cut a round entrance hole in the side of a large bottle or a milk jug, paint the outside to look like a little house, and add a small wooden perch below the hole and a roof made from the top of another bottle. Hang it from a branch or fix it to a fence post, and a small bird may move in for the season. It will not suit every bird, but wrens and chickadees like a small dark space, and they are not fussy about the decor. It is a lovely project to build with kids, because it teaches them that a home for a bird does not need to be bought.
Best for: Spring, garden watchers, and kids who love animals.
Cost: Free, plus a small wooden dowel for about 1 dollar. Time: About 30 minutes.
Cut the entrance hole about an inch and a half wide, which is big enough for small birds and too small for bigger ones that might take over. Do not put a perch inside, because birds do not need one and it helps predators. And hang it facing away from the wind and the midday sun.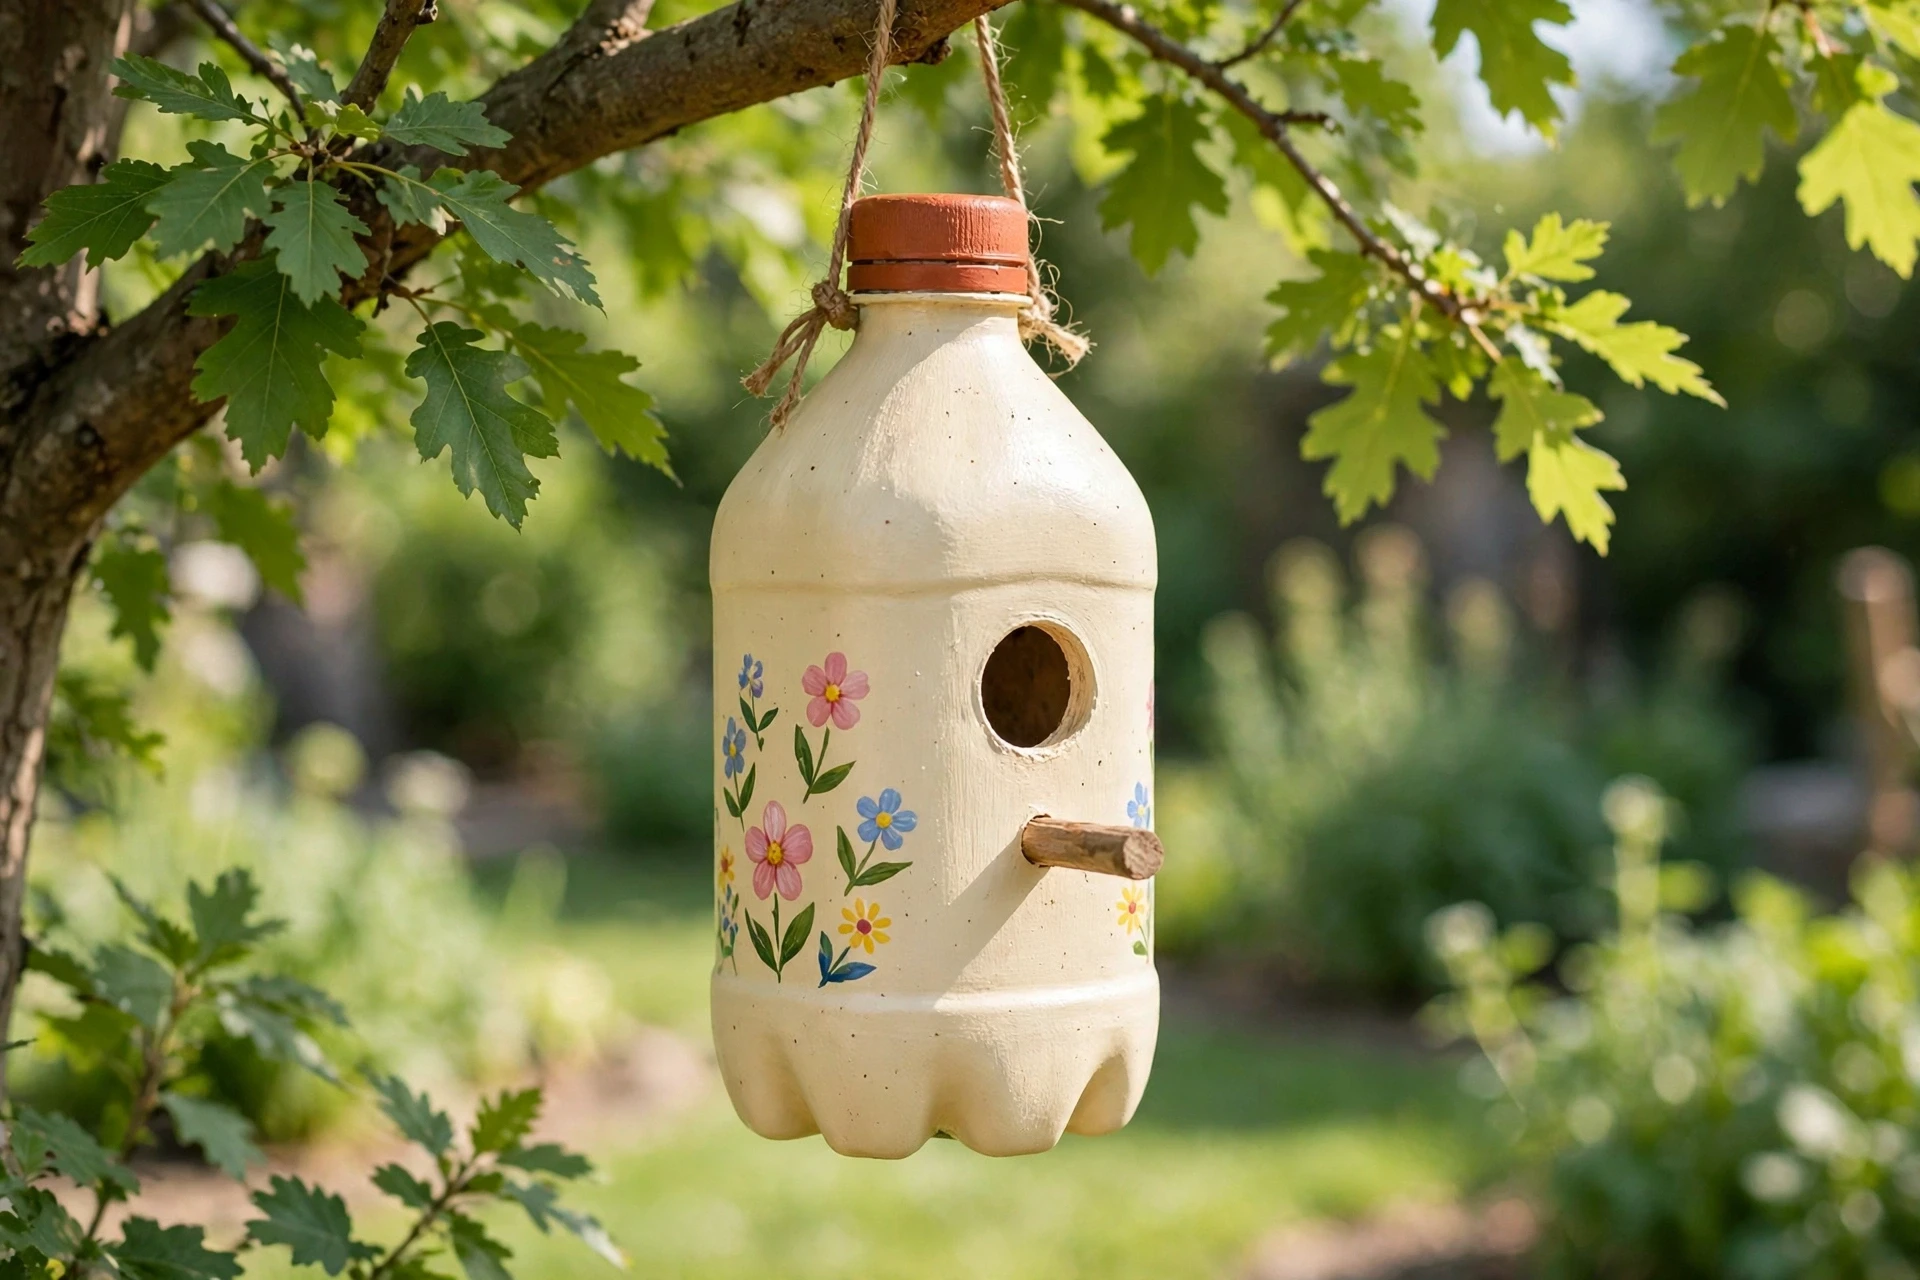
You may also like: 22 Driftwood Decor Ideas That Make Your Home Feel So Calm
12. Make a Hummingbird Feeder
Hummingbirds drink sugar water, and a bottle feeder is perfect for it. Take a small clear bottle, poke a hole in the cap, and push a short piece of red plastic tubing or a red flower shape through it so the birds can see where to drink. Fill the bottle with sugar water, four parts water to one part sugar, boiled and cooled, and hang it by twine near flowers. The red colour is what brings them in, so paint a few red flowers on the bottle or tie a red ribbon around the neck. Never use honey, and never add red food colouring, because both can harm the birds. Plain sugar water is all they need.
Best for: Summer, warm climates, and anyone with flowers near the house.
Cost: Free, plus sugar for about 1 dollar. Time: About 20 minutes.
Change the sugar water every few days in hot weather, because old sugar water ferments and can make birds sick. Wash the bottle out each time you refill it. And hang the feeder in the shade, because sugar water in full sun goes off fast.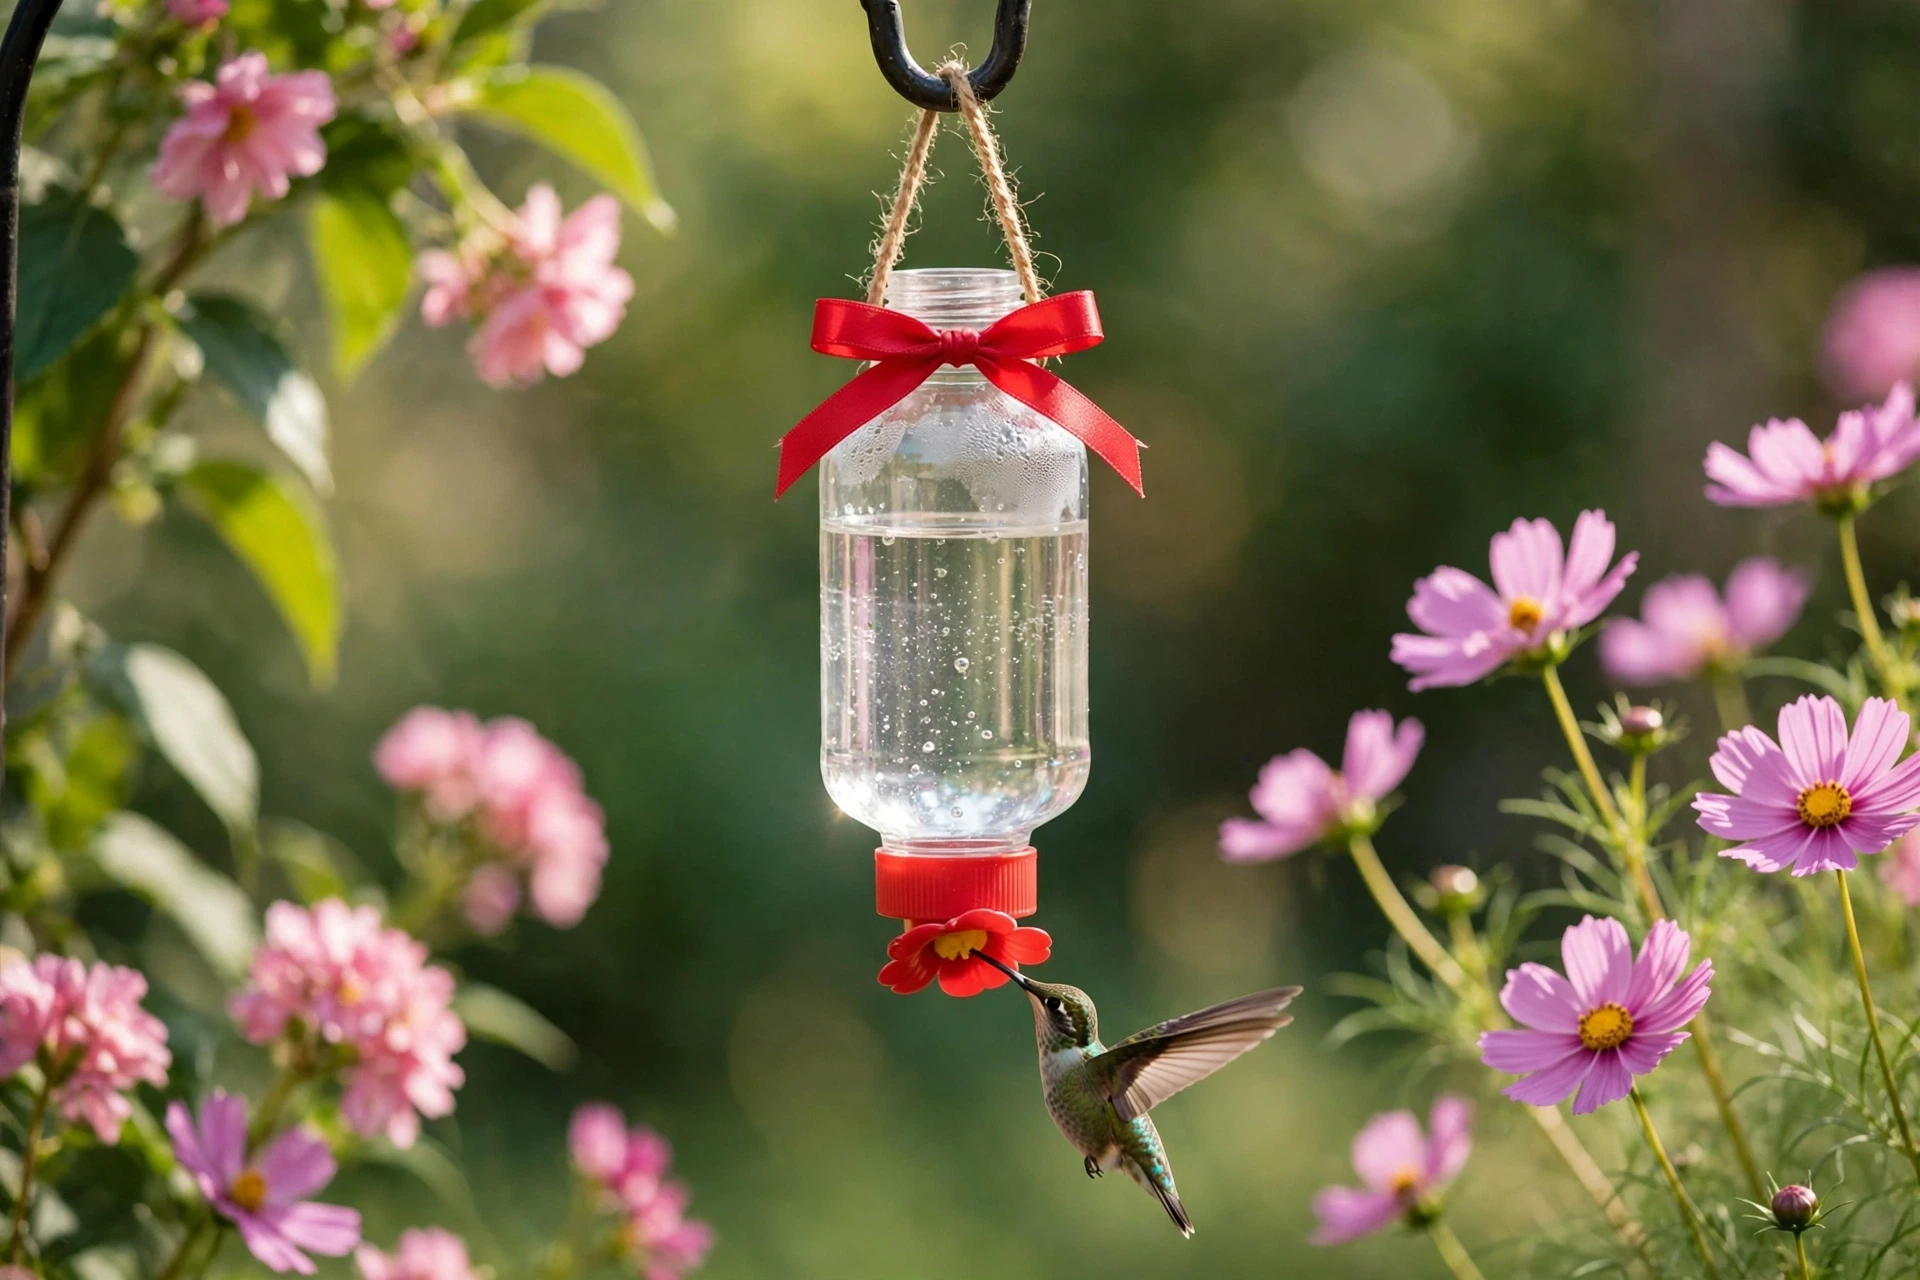
You may also like: 22 Cozy Weeknight Dinners for Tired Nights in 30 Minutes
Around the House
Not every plastic bottle craft is for the garden. Bottles are also good at holding things, because they are waterproof, light, and easy to cut to any height. These six ideas turn bottles into organisers and useful bits for the house, and they are the crafts that stay in use long after the paint has dried.
13. Build a Desk Organiser
Cut three or four bottles to different heights, paint them in matching colours, and glue them side by side onto a flat piece of cardboard or a wooden board. One tall one for rulers and scissors, one medium one for pens, one short one for paper clips. It sits on a desk and holds everything that usually ends up in a drawer or on the floor. It is the most practical of all the plastic bottle crafts in this guide, and it is the one that actually gets used every single day.
Best for: Homework desks, home offices, and anyone whose pens keep disappearing.
Cost: Free, plus a board or cardboard for about 1 to 2 dollars. Time: About 30 minutes.
Cut the bottles to heights that suit what they will hold, and smooth every cut edge with sandpaper or tape. Glue them down well, because a wobbly organiser tips over at the worst moment. And let the kids choose the colours, because an organiser they chose is an organiser they will actually use.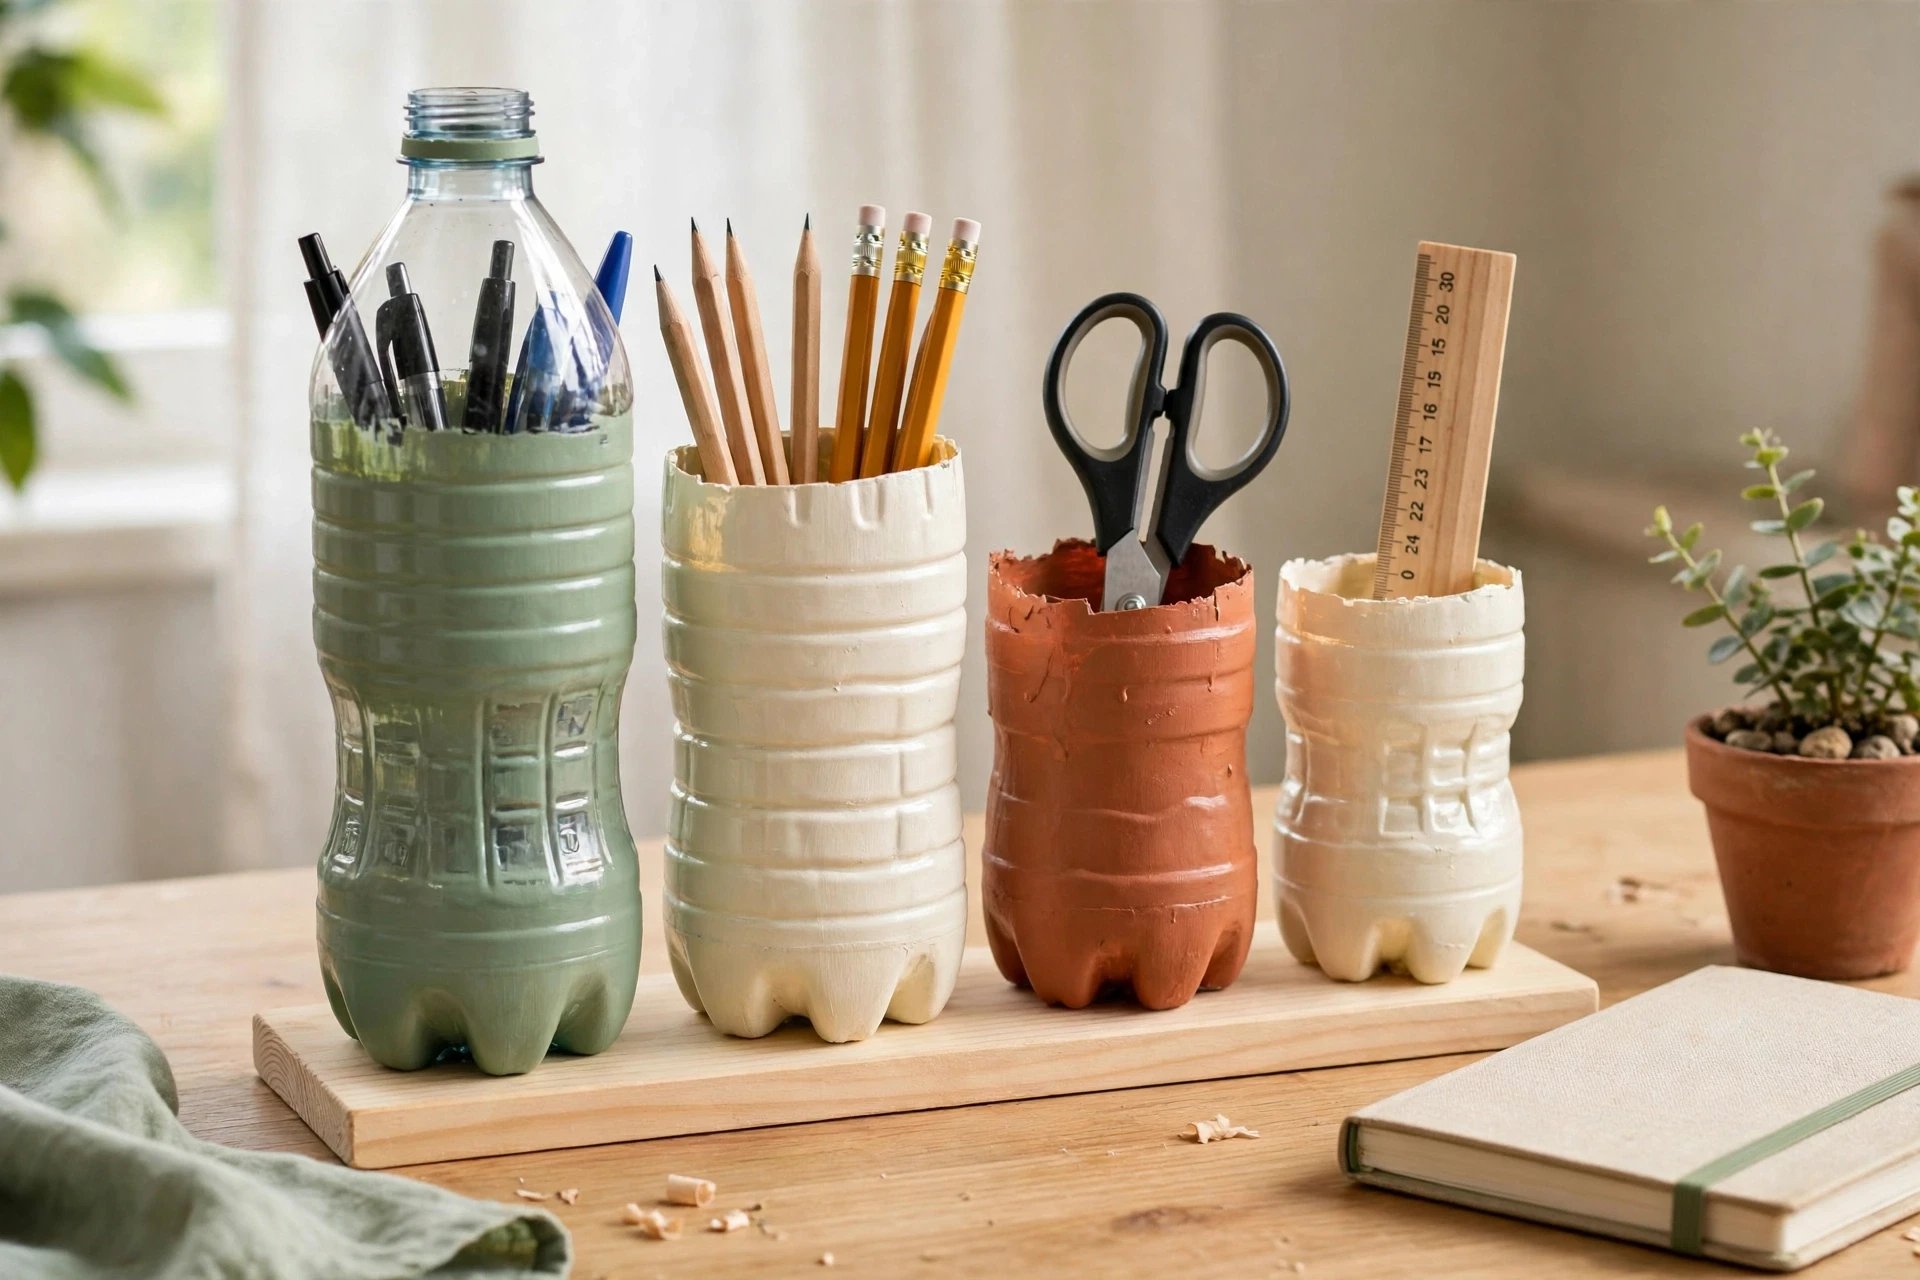
You may also like: 22 Holiday Cleaning Checklist Ideas for a Calm, Ready Home
14. Paint a Pencil Holder
Cut the top off a bottle, paint the outside, and you have a pencil holder. It sounds too simple to be a real idea, and that is exactly why it works. A kid can make three of them in one sitting, one for pencils, one for markers, one for paintbrushes, and each one can be a different colour, a different animal, or a different pattern. Put a strip of washi tape around the cut edge so it looks finished and feels smooth. It is the five-minute craft that starts every craft afternoon, because it warms up small hands and it always works.
Best for: Very young kids, quick wins, and the start of a craft afternoon.
Cost: Free. Time: About 10 minutes per holder, plus drying time.
Cut the bottle at a height that suits the pencils, about four or five inches tall is right. Use acrylic paint and let it dry fully before the pencils go in, or the paint will stick to the pencils. And put a small piece of card in the bottom if the bottle base is uneven, so the pencils stand straight.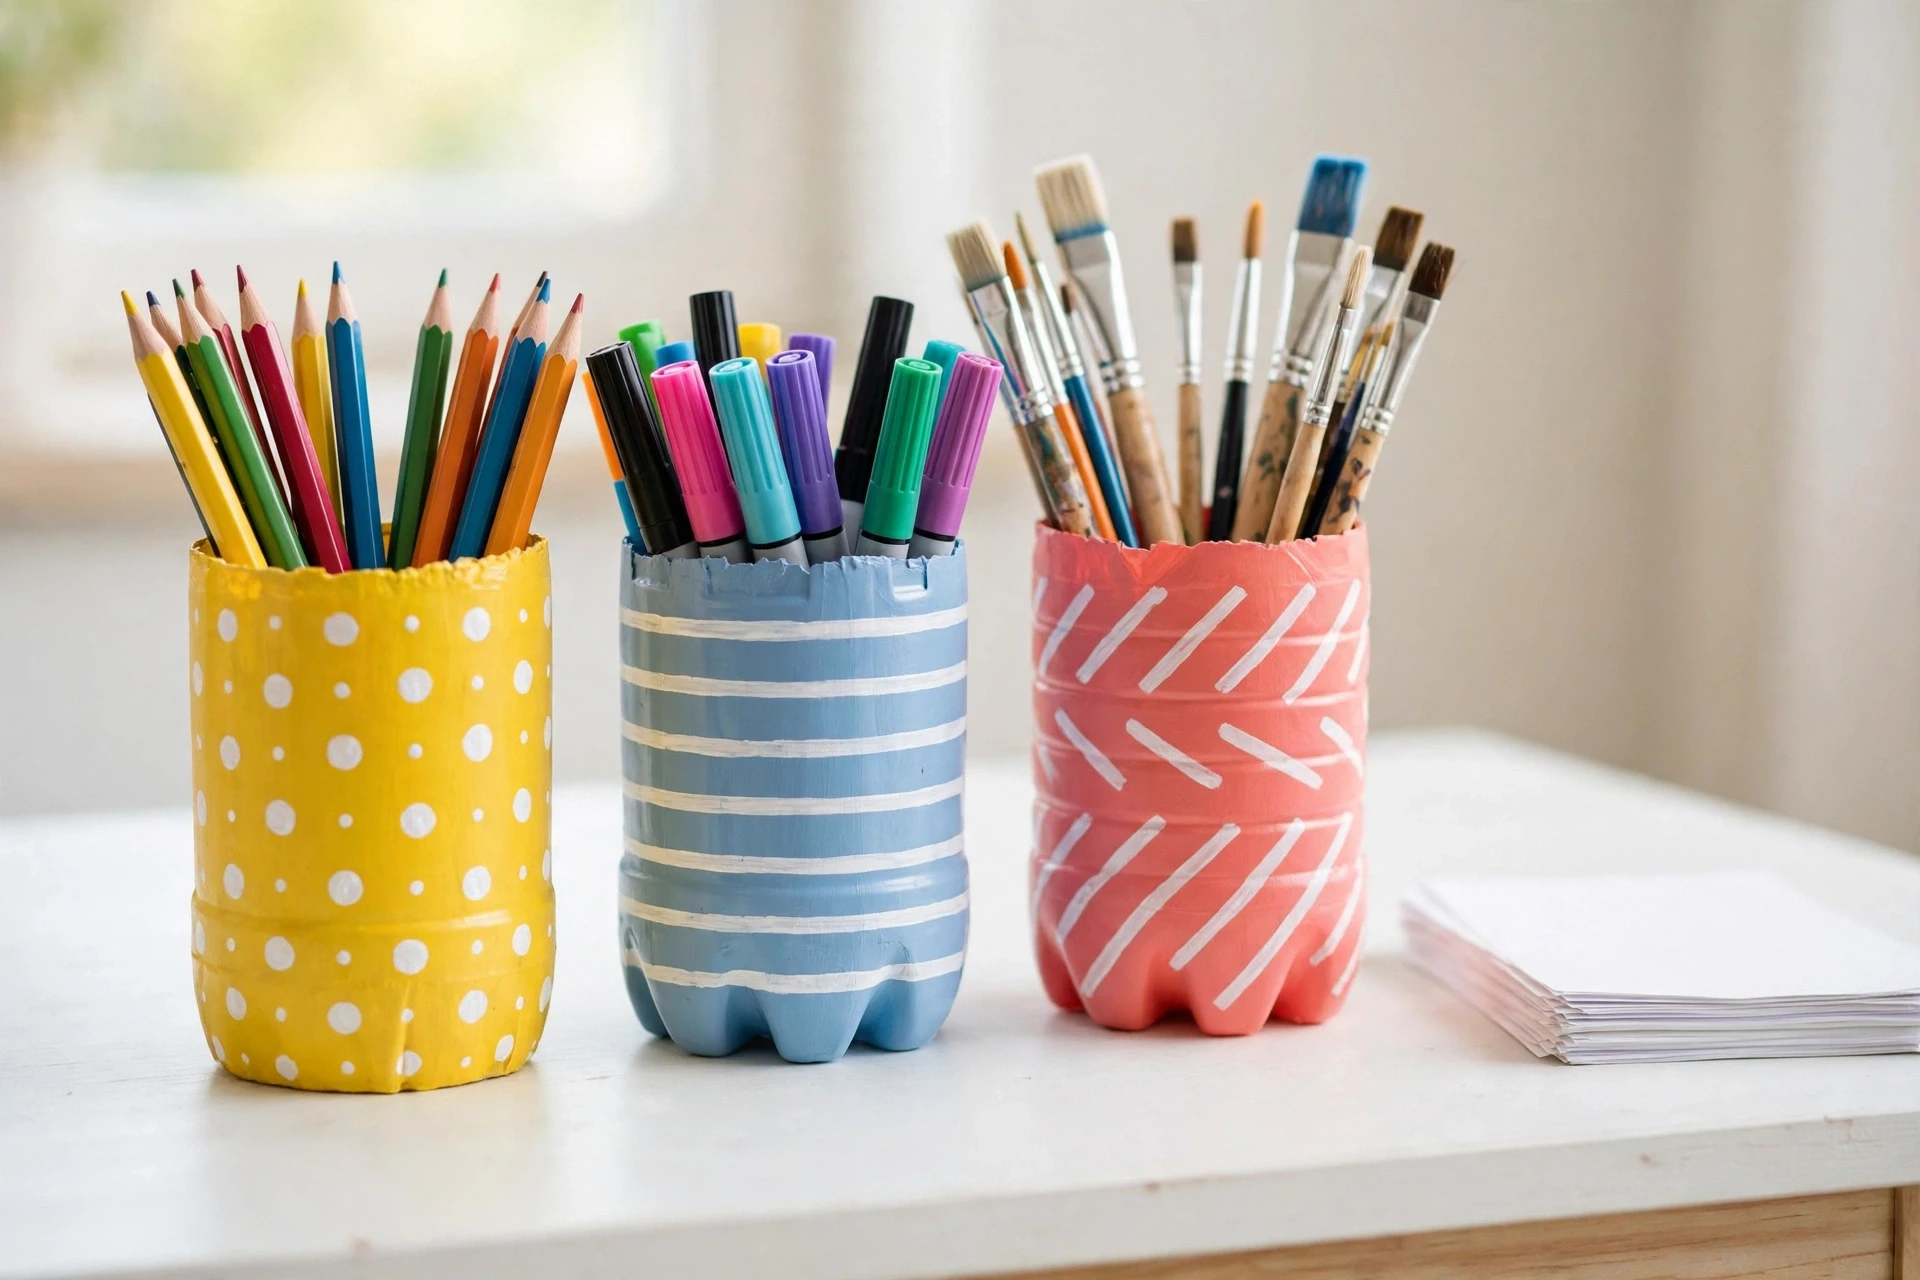
You may also like: 22 Kid Friendly Dinner Ideas for Picky Eaters Who Say No
15. Make a Piggy Bank
Cut a slot in the top of a bottle, paint it pink, add four legs made from bottle caps, two ears cut from the top of another bottle, and a curly tail made from a pipe cleaner. It is a pig, and it holds real coins. Kids love a piggy bank they made themselves, because every coin they drop in feels like feeding their pig. It is also the craft that teaches saving without a single lecture, because the pig gets heavier and the coins add up, and the kid can hear it and feel it.
Best for: Young savers, birthdays, and anyone teaching kids about money.
Cost: Free, plus a pipe cleaner for about 1 dollar. Time: About 30 minutes.
Cut the coin slot wide enough for the biggest coin you use, and smooth the edges so coins slide in easily. Glue the legs on well, because a pig with a missing leg tips over. And make the slot big enough to get the coins out again, or tape a flap over a wider opening at the bottom, or the pig will be full and useless.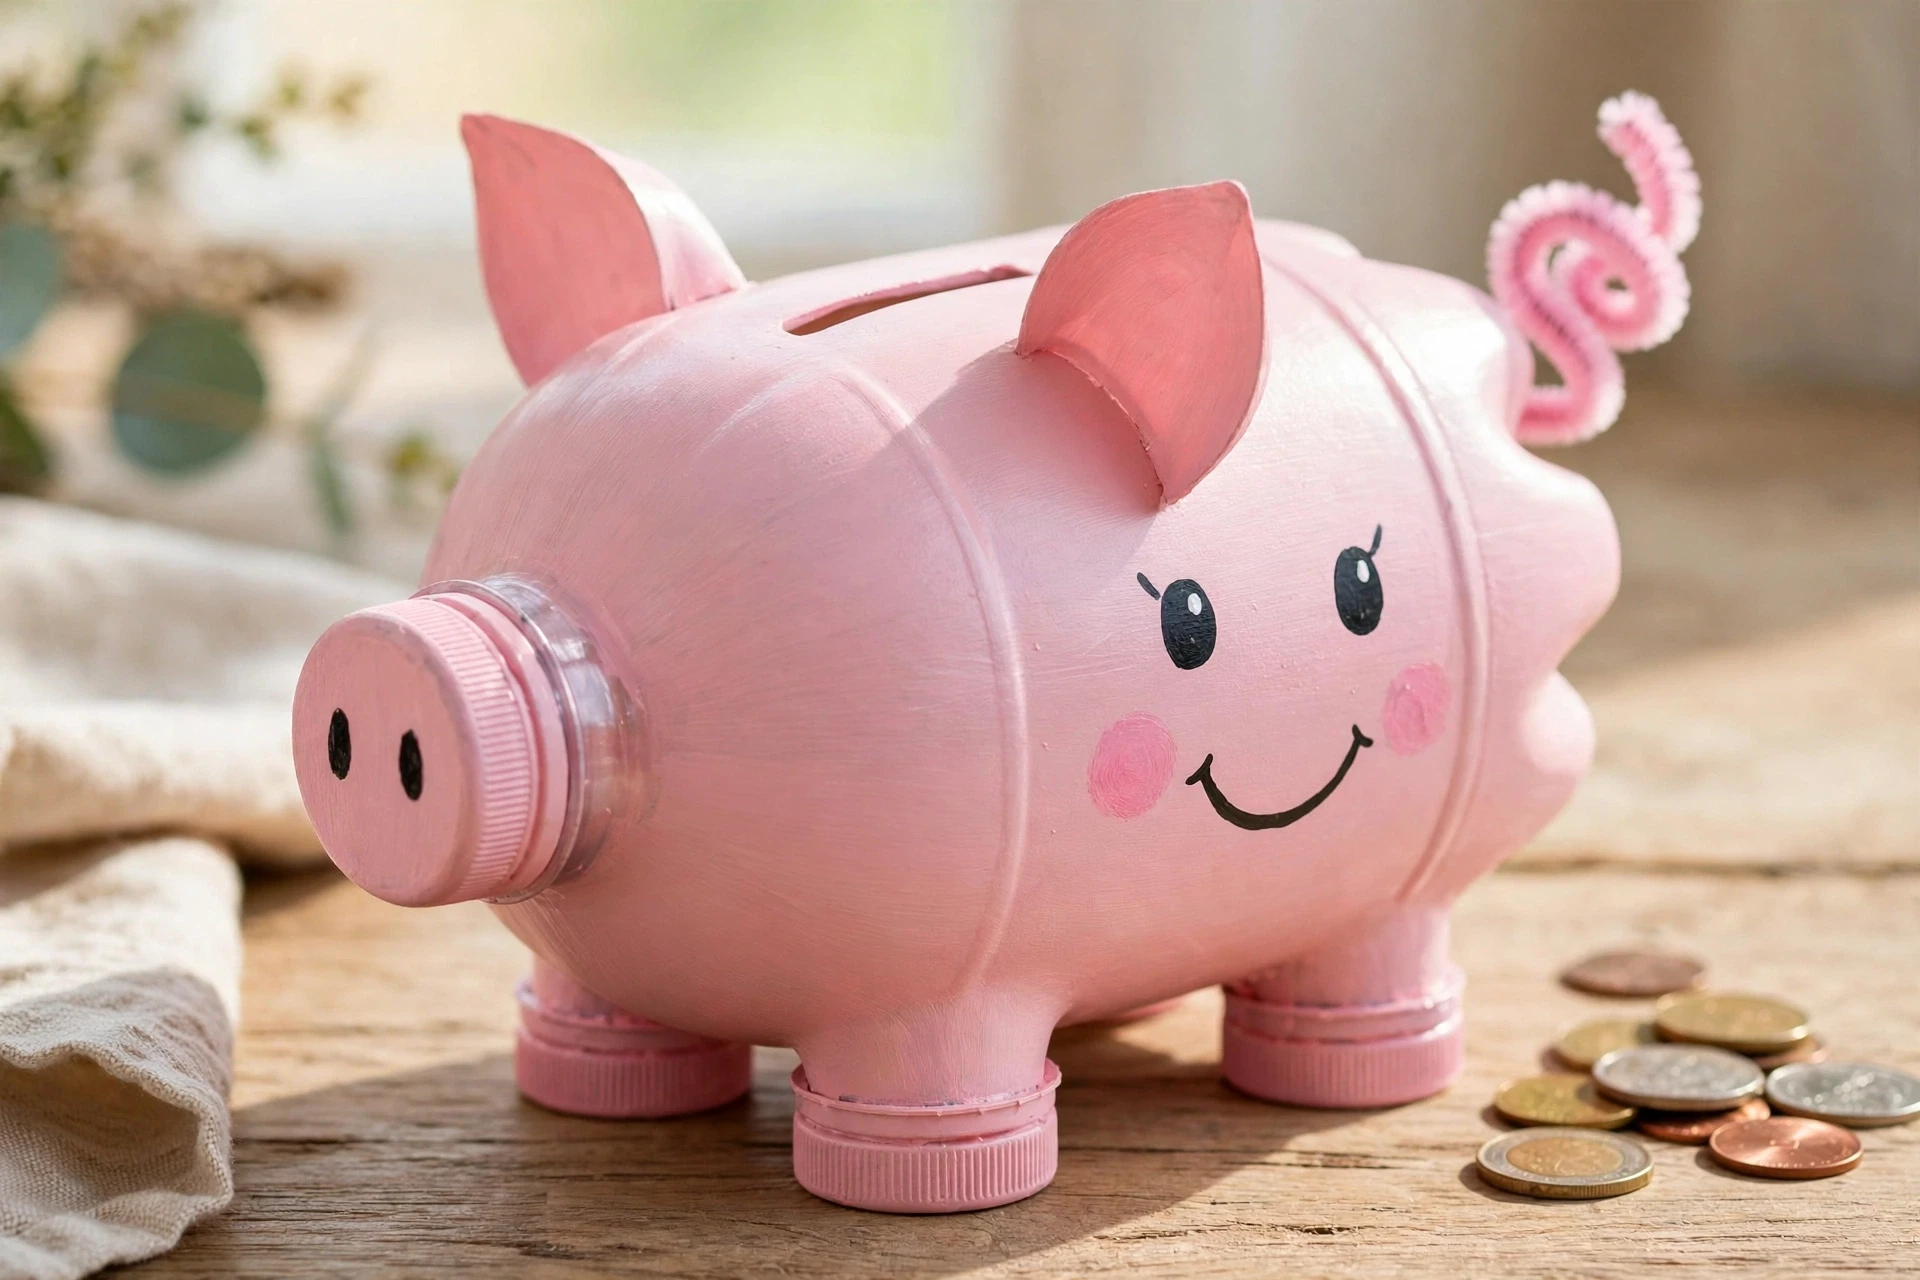
You may also like: 22 One Pot Recipes for Busy Weeknights That Actually Work
16. Turn a Bottle Into a Jewelry Stand
Cut the bottoms off three bottles in different sizes, stack them on a wooden dowel or a long stick fixed to a small base, and you have a tiered stand for rings, earrings, and bracelets. Paint each layer a different soft colour, or leave them clear so the jewelry is the star. It looks like a shop display, it costs nothing, and it keeps small jewelry where you can see it instead of in a tangled pile in a drawer. It is a lovely gift, too, because it looks far fancier than the bottle it came from.
Best for: Bedrooms, dressing tables, and handmade gifts.
Cost: Free, plus a wooden dowel and a small base for about 2 to 3 dollars. Time: About 30 minutes.
Use bottles with flat, wide bottoms so each layer sits level. Drill or poke a hole in the centre of each bottle bottom for the dowel, and glue each layer in place so it does not spin. And paint the underside, not the top, so the jewelry does not scratch the paint.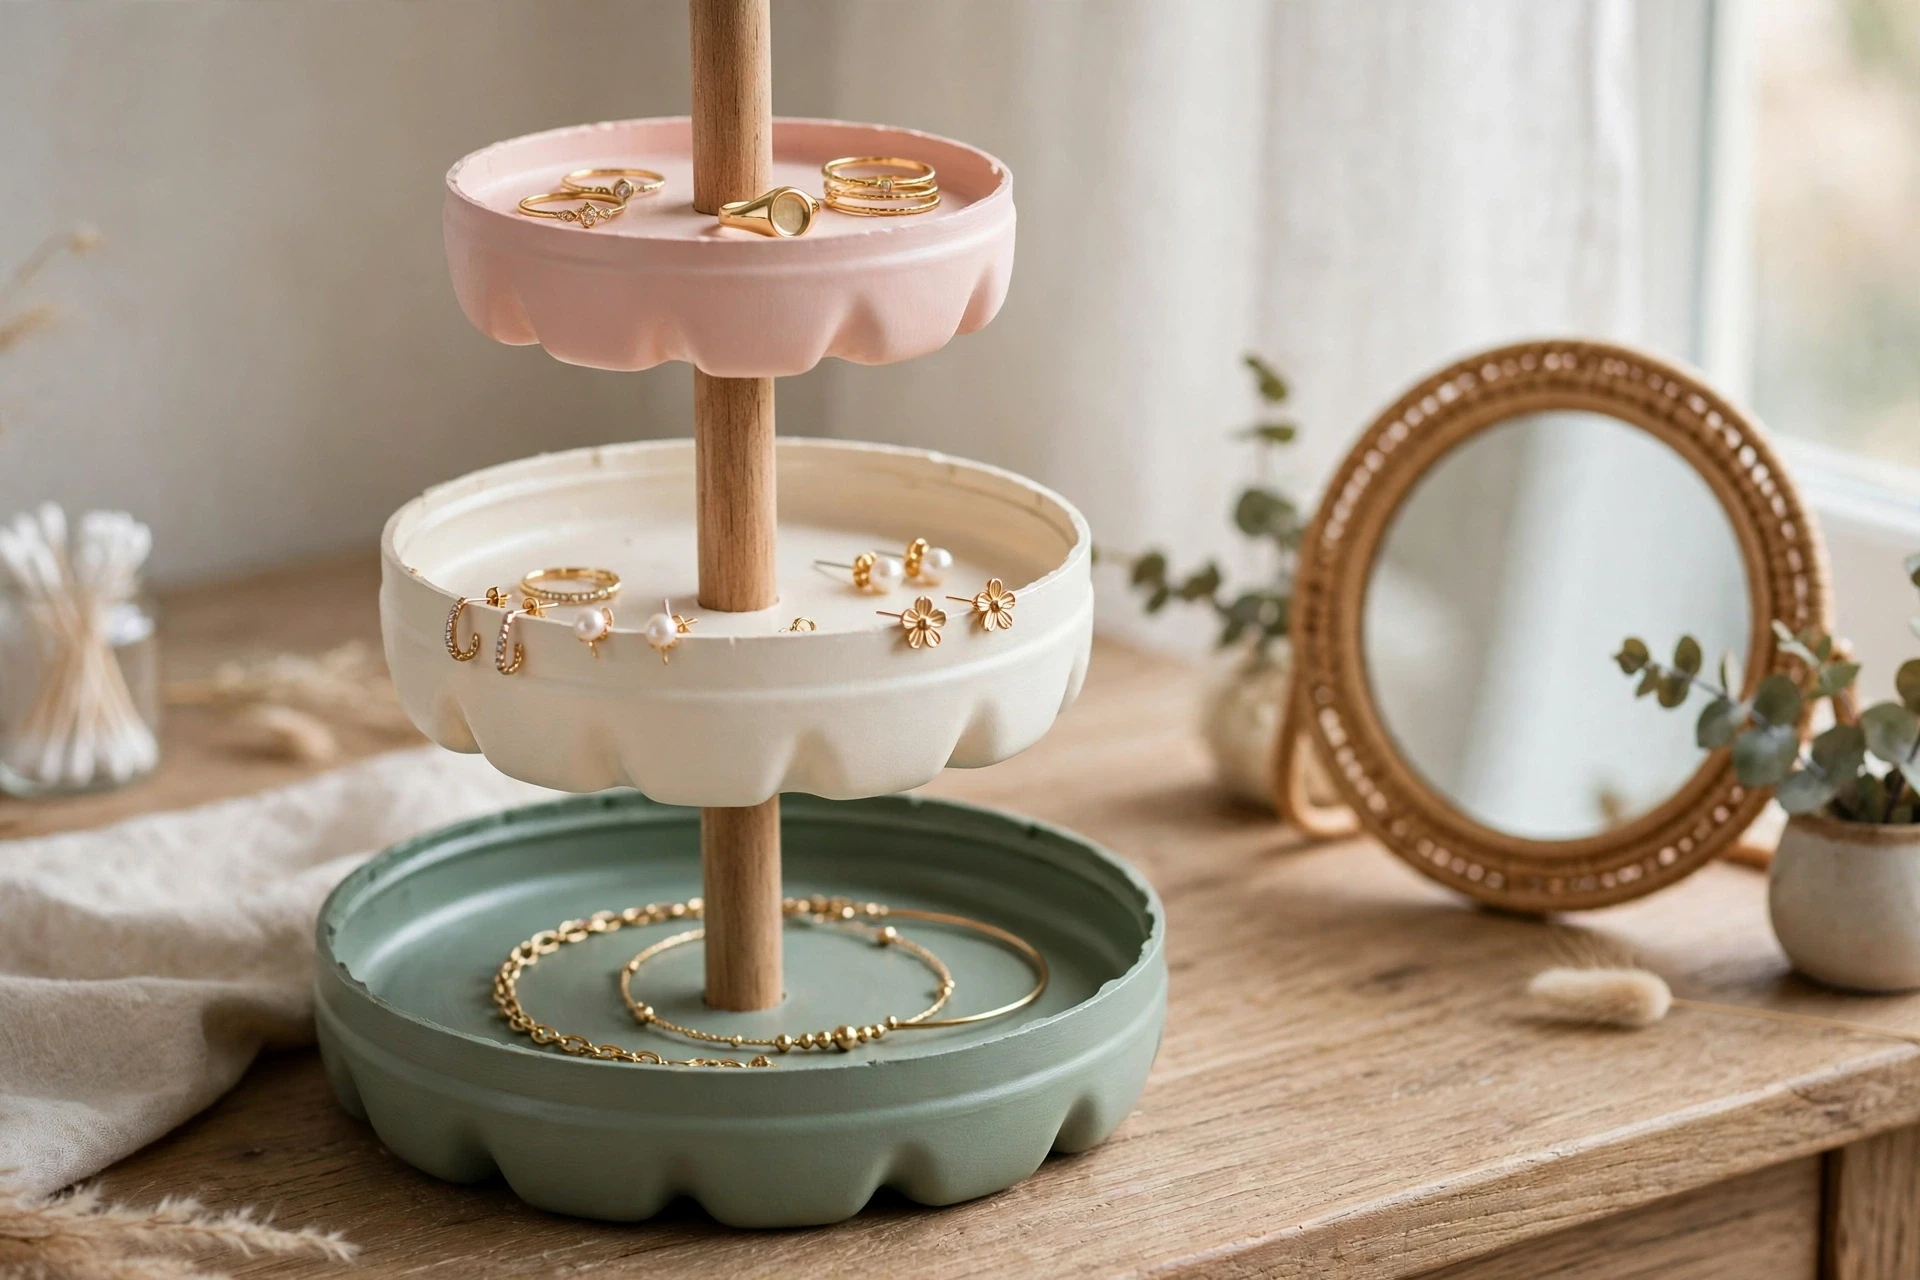
You may also like: 22 DIY Candles That Make Fall Feel Warm and Truly Special
17. Make a Watering Can
Take a large milk jug or a detergent bottle, wash it out well, and poke small holes in the cap with a hot needle or a nail. Fill it with water, screw the cap on, and tip it over your plants. The water comes out in a gentle sprinkle instead of a flood, which is exactly what small plants need. Decorate the outside with paint or stickers and it becomes a watering can a kid is proud to carry. It is the most useful of all the plastic bottle crafts for the garden, because it gets used every single day in summer.
Best for: Summer, garden helpers, and kids who love watering plants.
Cost: Free. Time: About 10 minutes.
Use a bottle that held food or drink, never one that held cleaning chemicals, even after washing. Poke the holes small and close together so the water sprinkles instead of pouring. And use a bottle with a handle if you can, because a full bottle of water is heavy for small hands.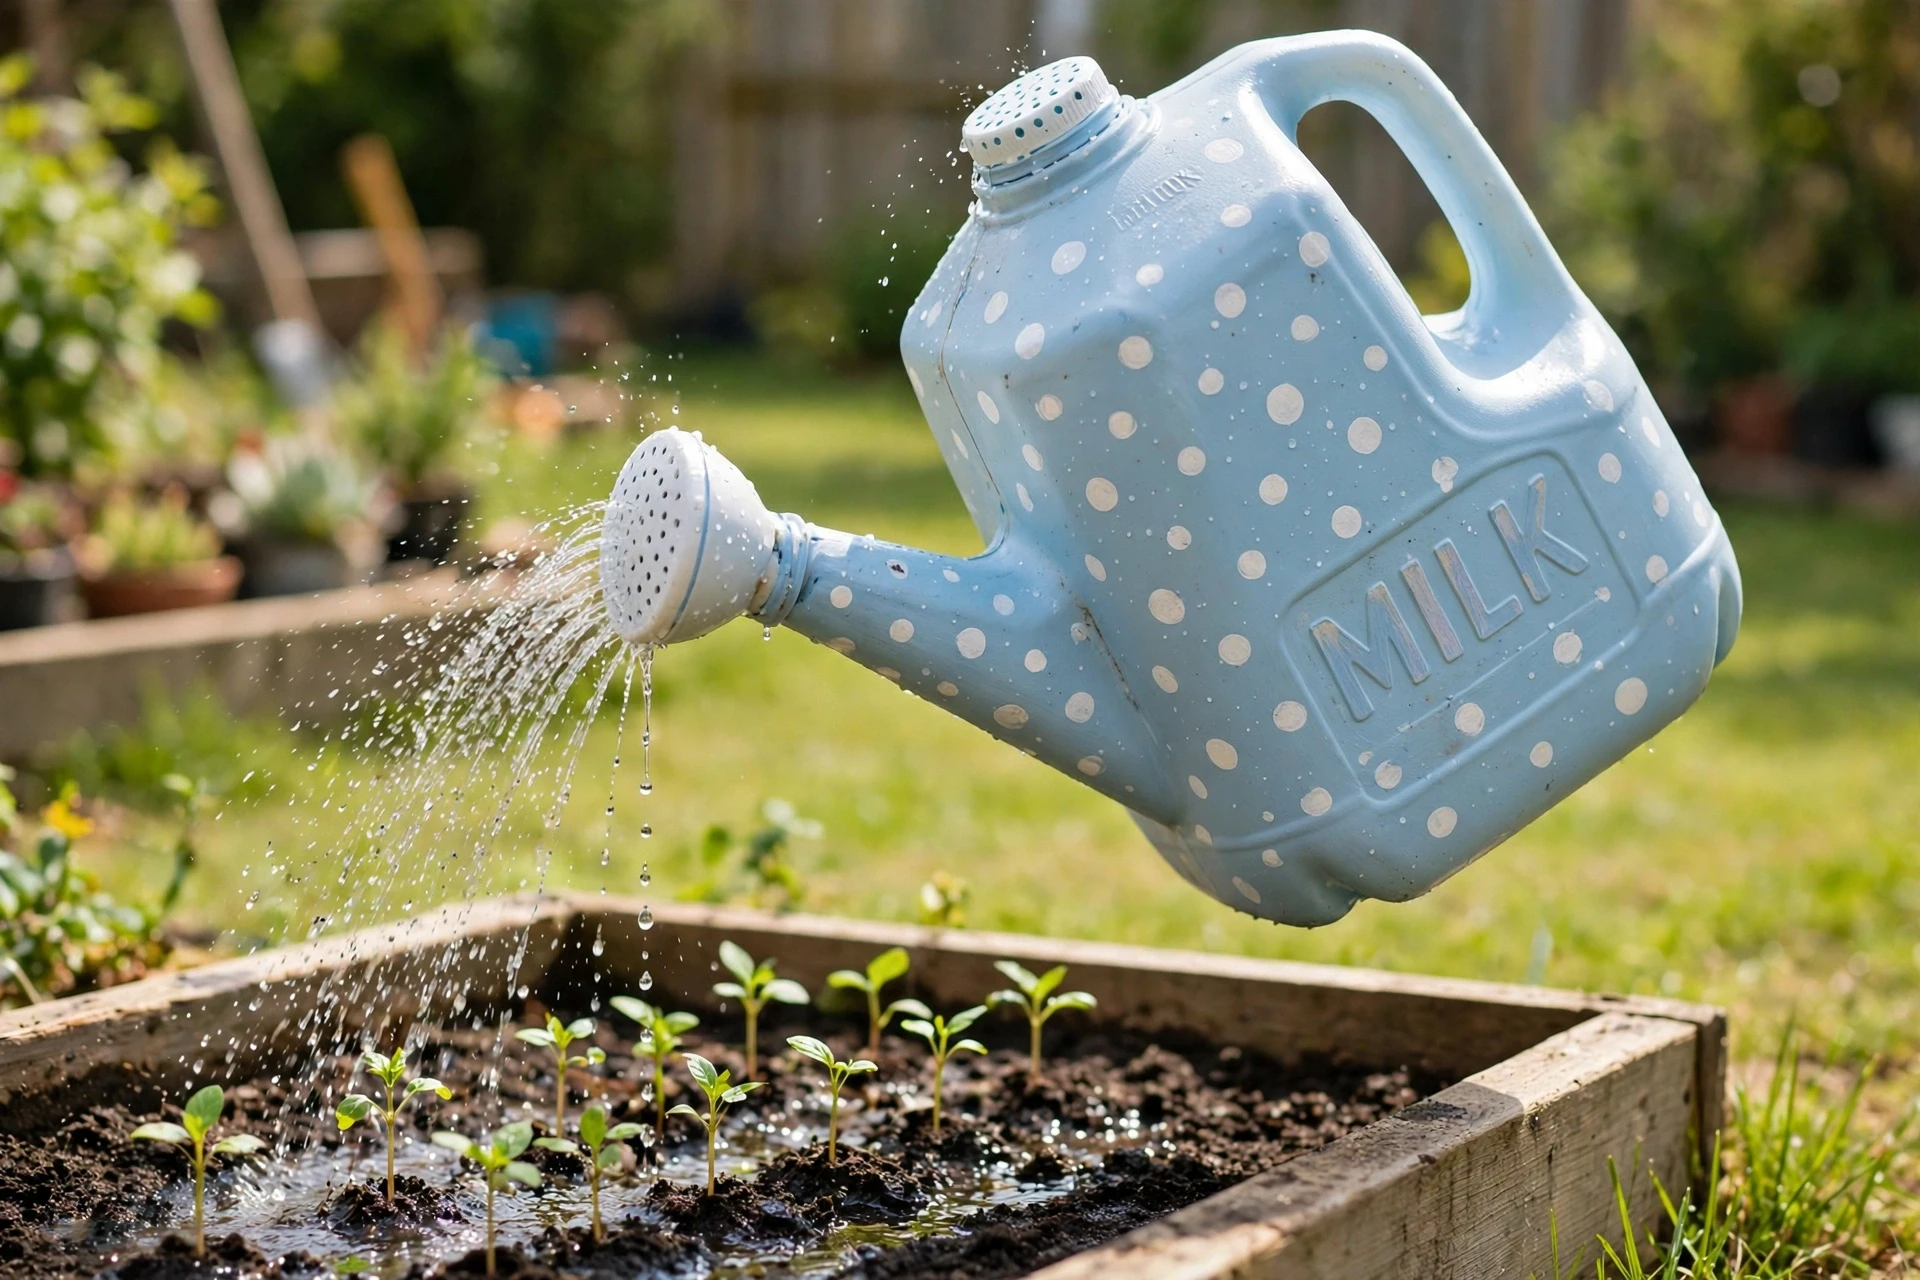
You may also like: 22 Driftwood Decor Ideas That Make Your Home Feel So Calm
18. Weave a Storage Basket
Cut several bottles into long flat strips, then weave the strips over and under each other to make a small basket. It takes a bit of patience, and it is the trickiest craft in this list, but the result is a real basket you can use for craft supplies, hair ties, or small toys. Paint the strips before you weave them, in two or three colours, and the basket comes out striped. It is a good project for older kids who like a challenge, and it is the one that surprises adults the most, because nobody expects a basket to come out of a bottle.
Best for: Older kids, patient crafters, and anyone who likes a challenge.
Cost: Free. Time: About 1 hour.
Cut the strips long and even, about an inch wide, and smooth the edges with sandpaper so they do not catch. Start with a simple over-under weave and keep it loose, because tight weaving is hard to fix. And glue the ends down when you finish, or the basket will slowly come undone.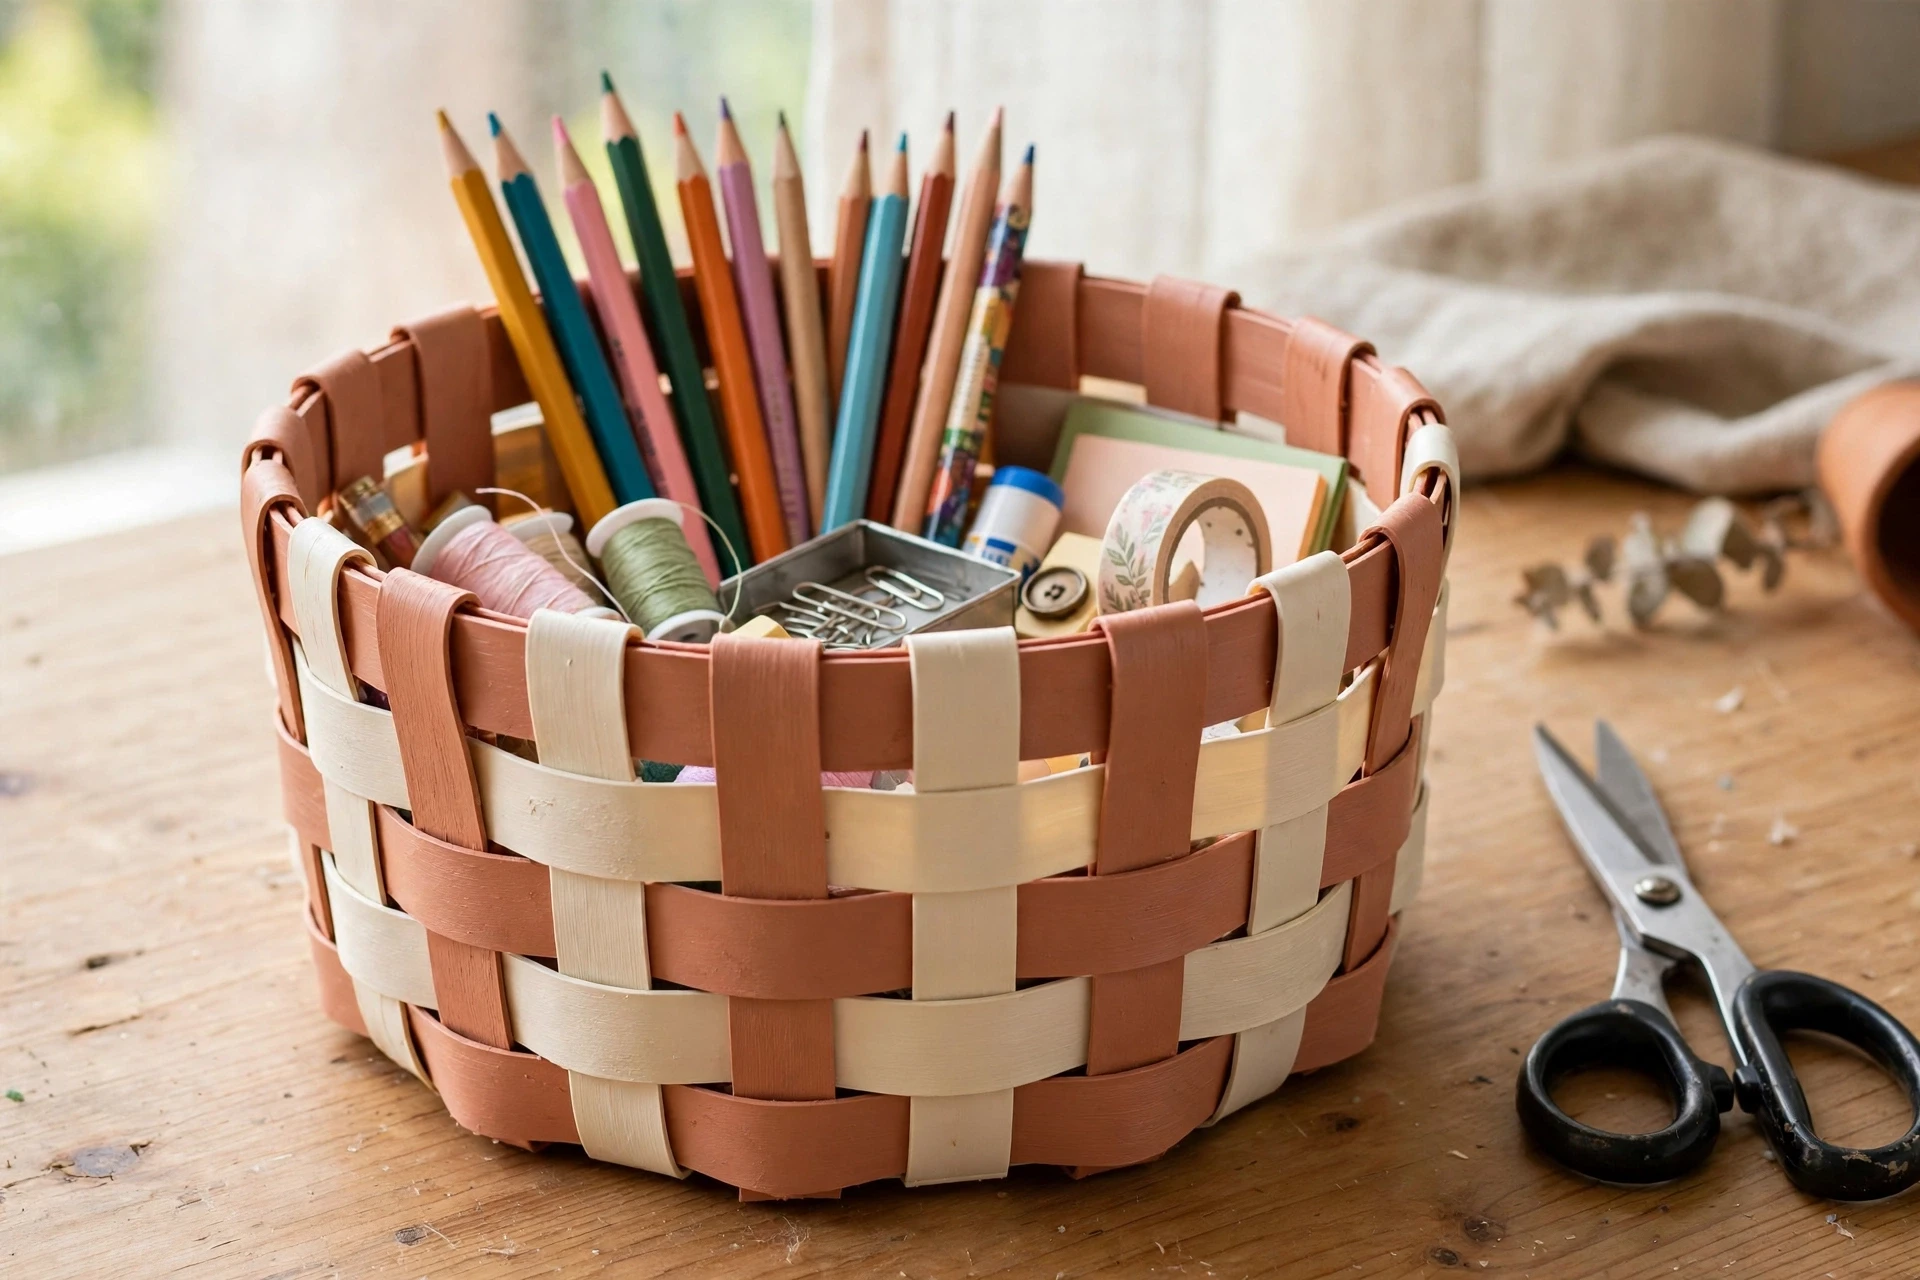
You may also like: 22 Holiday Cleaning Checklist Ideas for a Calm, Ready Home
Fun With Kids
The last group is pure play. These six ideas are toys and games made from bottles, and they are the ones kids ask to make again. None of them needs to be useful, and none of them needs to last forever. They need to be fun to make and fun to play with, and that is enough.
19. Build a Bottle Rocket
Take a large soda bottle, fill it a third full with water, and push a cork with a bike pump needle through it into the neck. Pump air in, step back, and the rocket flies. You can also make a pretend rocket that never leaves the ground, by painting the bottle silver, adding cardboard fins and a cone nose, and letting kids play astronaut with it in the garden. Either way, a bottle rocket is the loudest, most exciting of all the plastic bottle crafts in this guide, and it is the one kids remember for years.
Best for: Outdoor play, science-curious kids, and sunny afternoons.
Cost: Free, plus cardboard and paint for about 2 dollars. Time: About 30 minutes to build.
Do the water rocket outside, in a big open space, with an adult running the pump. Never aim it at people, and never stand over it while it is pressurised. For the pretend rocket, glue the fins on well, because they are the first thing to fall off. And let the kids paint it silver and red, because every rocket should look like a rocket.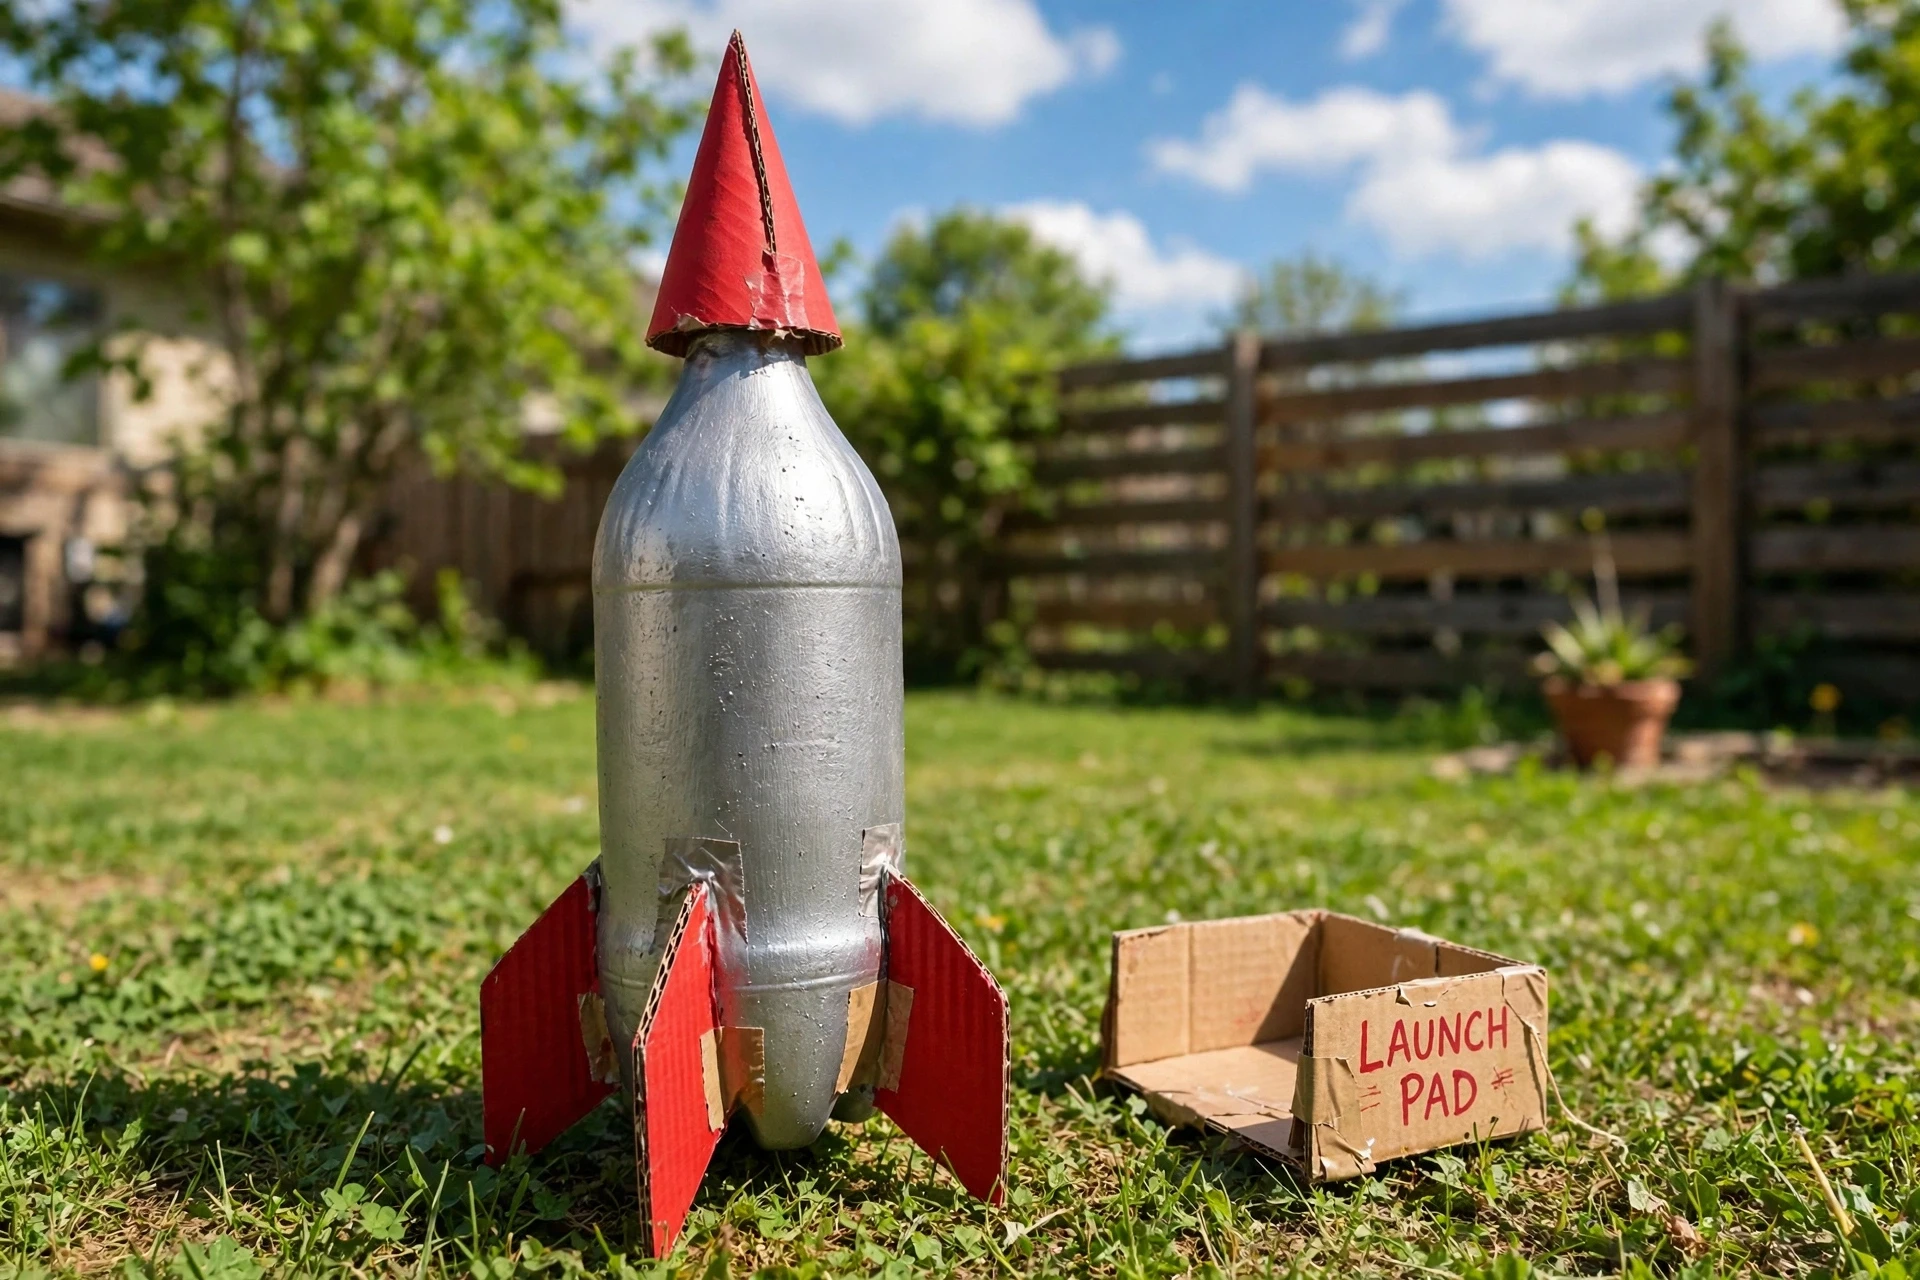
You may also like: 22 Kid Friendly Dinner Ideas for Picky Eaters Who Say No
20. Make a Jellyfish
Cut the bottom off a bottle, cut the sides into long thin strips, and curl the strips with scissors so they hang down like tentacles. Paint the bottle top in soft blues and purples, glue on two googly eyes, and hang it from the ceiling with fishing line. It floats in the air like a real jellyfish drifting through water. It is the easiest sea creature in this guide, it takes fifteen minutes, and it is the one that looks best hanging in a bedroom window where the light catches the tentacles.
Best for: Ocean lovers, bedrooms, and quick afternoon crafts.
Cost: Free, plus googly eyes and fishing line for about 1 to 2 dollars. Time: About 15 minutes.
Cut the strips long and thin, and curl them by pulling them gently over the edge of a pair of scissors, the way you curl ribbon. Hang the jellyfish where it can spin slowly in the air, because a still jellyfish looks like a bottle and a spinning one looks alive. And use a clear bottle if you can, because the light shines through it like water.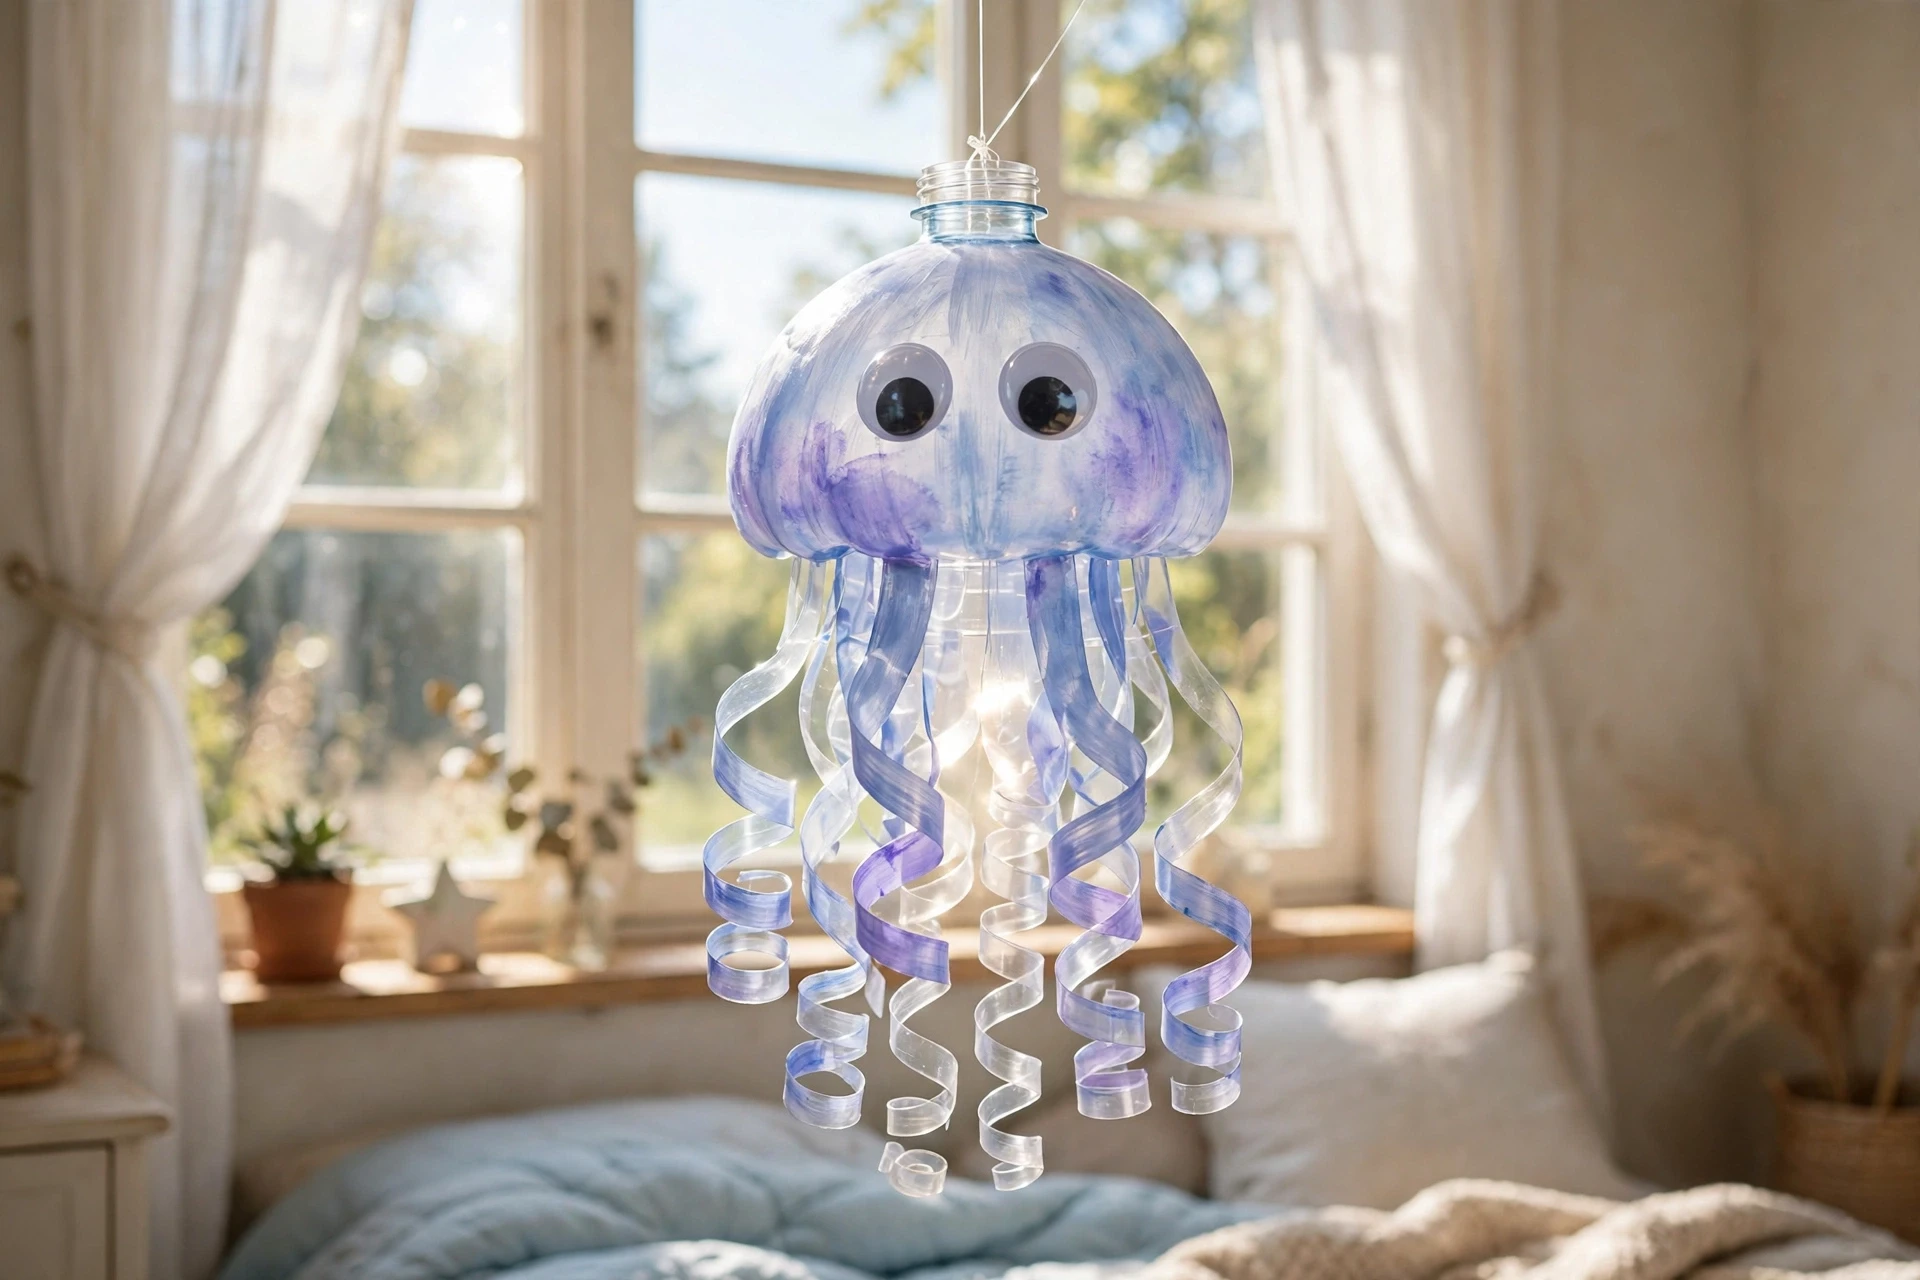
You may also like: 21 Christmas Window Painting Ideas to Brighten Your Home
21. Craft a Bottle Fish
Cut a bottle in half, keep the top half with the neck, and cut a fish tail shape from the bottom half. Glue the tail into the neck end, paint the whole thing in bright colours, add scales with a marker, and glue on a googly eye. Hang it from the ceiling with fishing line, or put it on a stick and use it as a puppet. It is a simple fish, it takes twenty minutes, and it is the craft that starts the whole underwater collection, because once you have one fish, you need a jellyfish, an octopus, and a whole bottle ocean.
Best for: Young kids, ocean themes, and anyone building a collection.
Cost: Free, plus a googly eye for about 1 dollar. Time: About 20 minutes.
Paint the fish before you glue the tail on, because painting around a glued tail is awkward. Use bright colours, because a fish should stand out. And if you are making a whole school of fish, use different bottle sizes so the fish are different sizes too, just like real fish.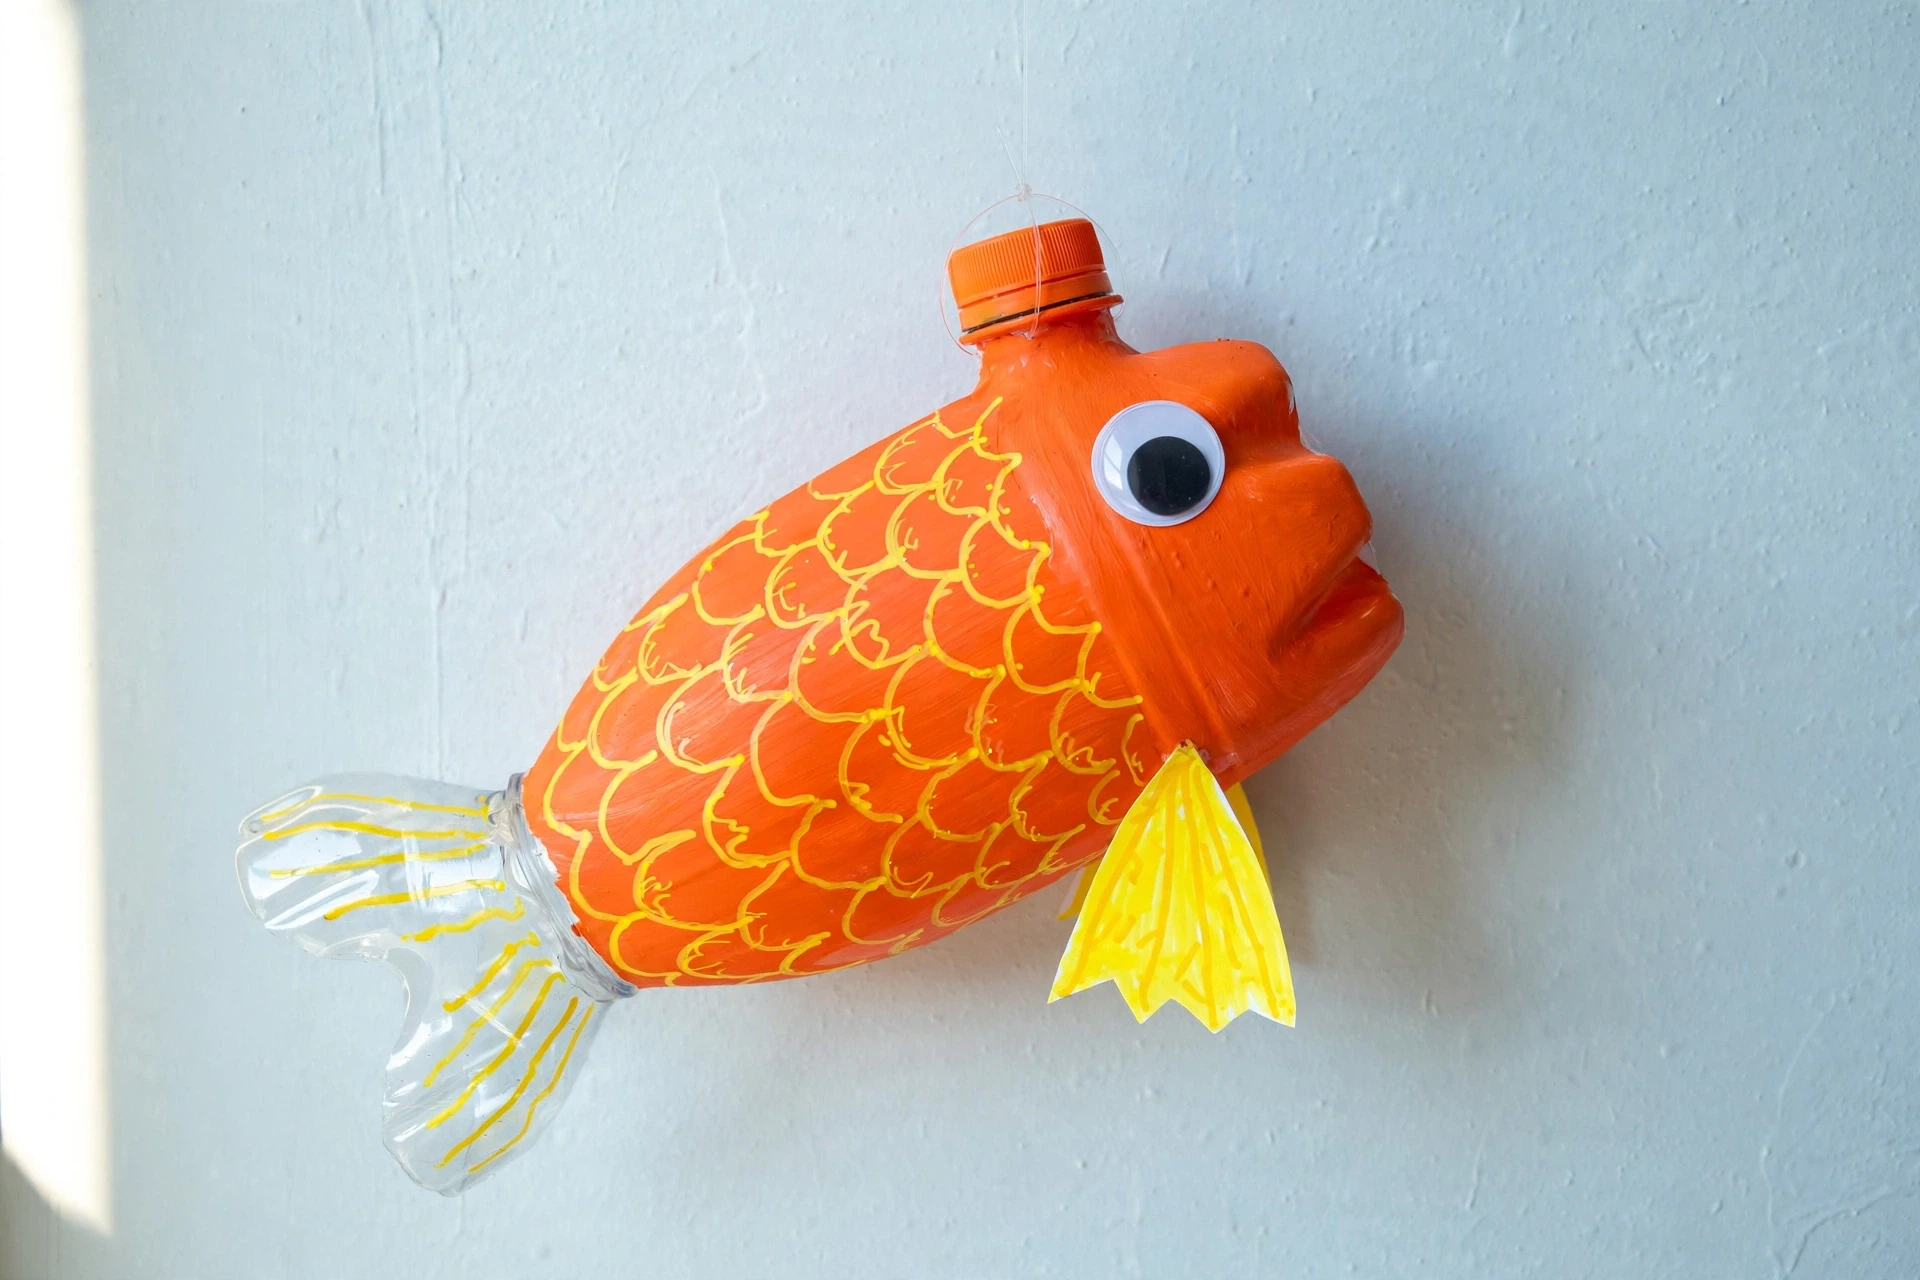
You may also like: 22 Cozy Christmas Apartment Decor Ideas for Small Spaces
22. Build a Bottle Wind Chime
Cut the bottoms off four or five bottles, paint each one a different bright colour, and hang them at different lengths from a wooden hoop or a stick, with a small bell or a bead at the bottom of each one. Hang the whole thing outside, and the wind moves the bottles so they clink softly against each other. It is not a loud chime, it is a gentle one, and it looks lovely hanging by a door or a window. It is also the craft that uses up the most bottles at once, which is handy when the bin is full.
Best for: Gardens, porches, and anyone with a full recycling bin.
Cost: Free, plus string and a few beads for about 2 dollars. Time: About 40 minutes.
Poke the hanging holes with a hot needle or a small drill, and smooth the edges so the string does not fray. Hang the bottles at different heights so they catch the wind differently. And use light bottles, because heavy bottles do not move in a light breeze.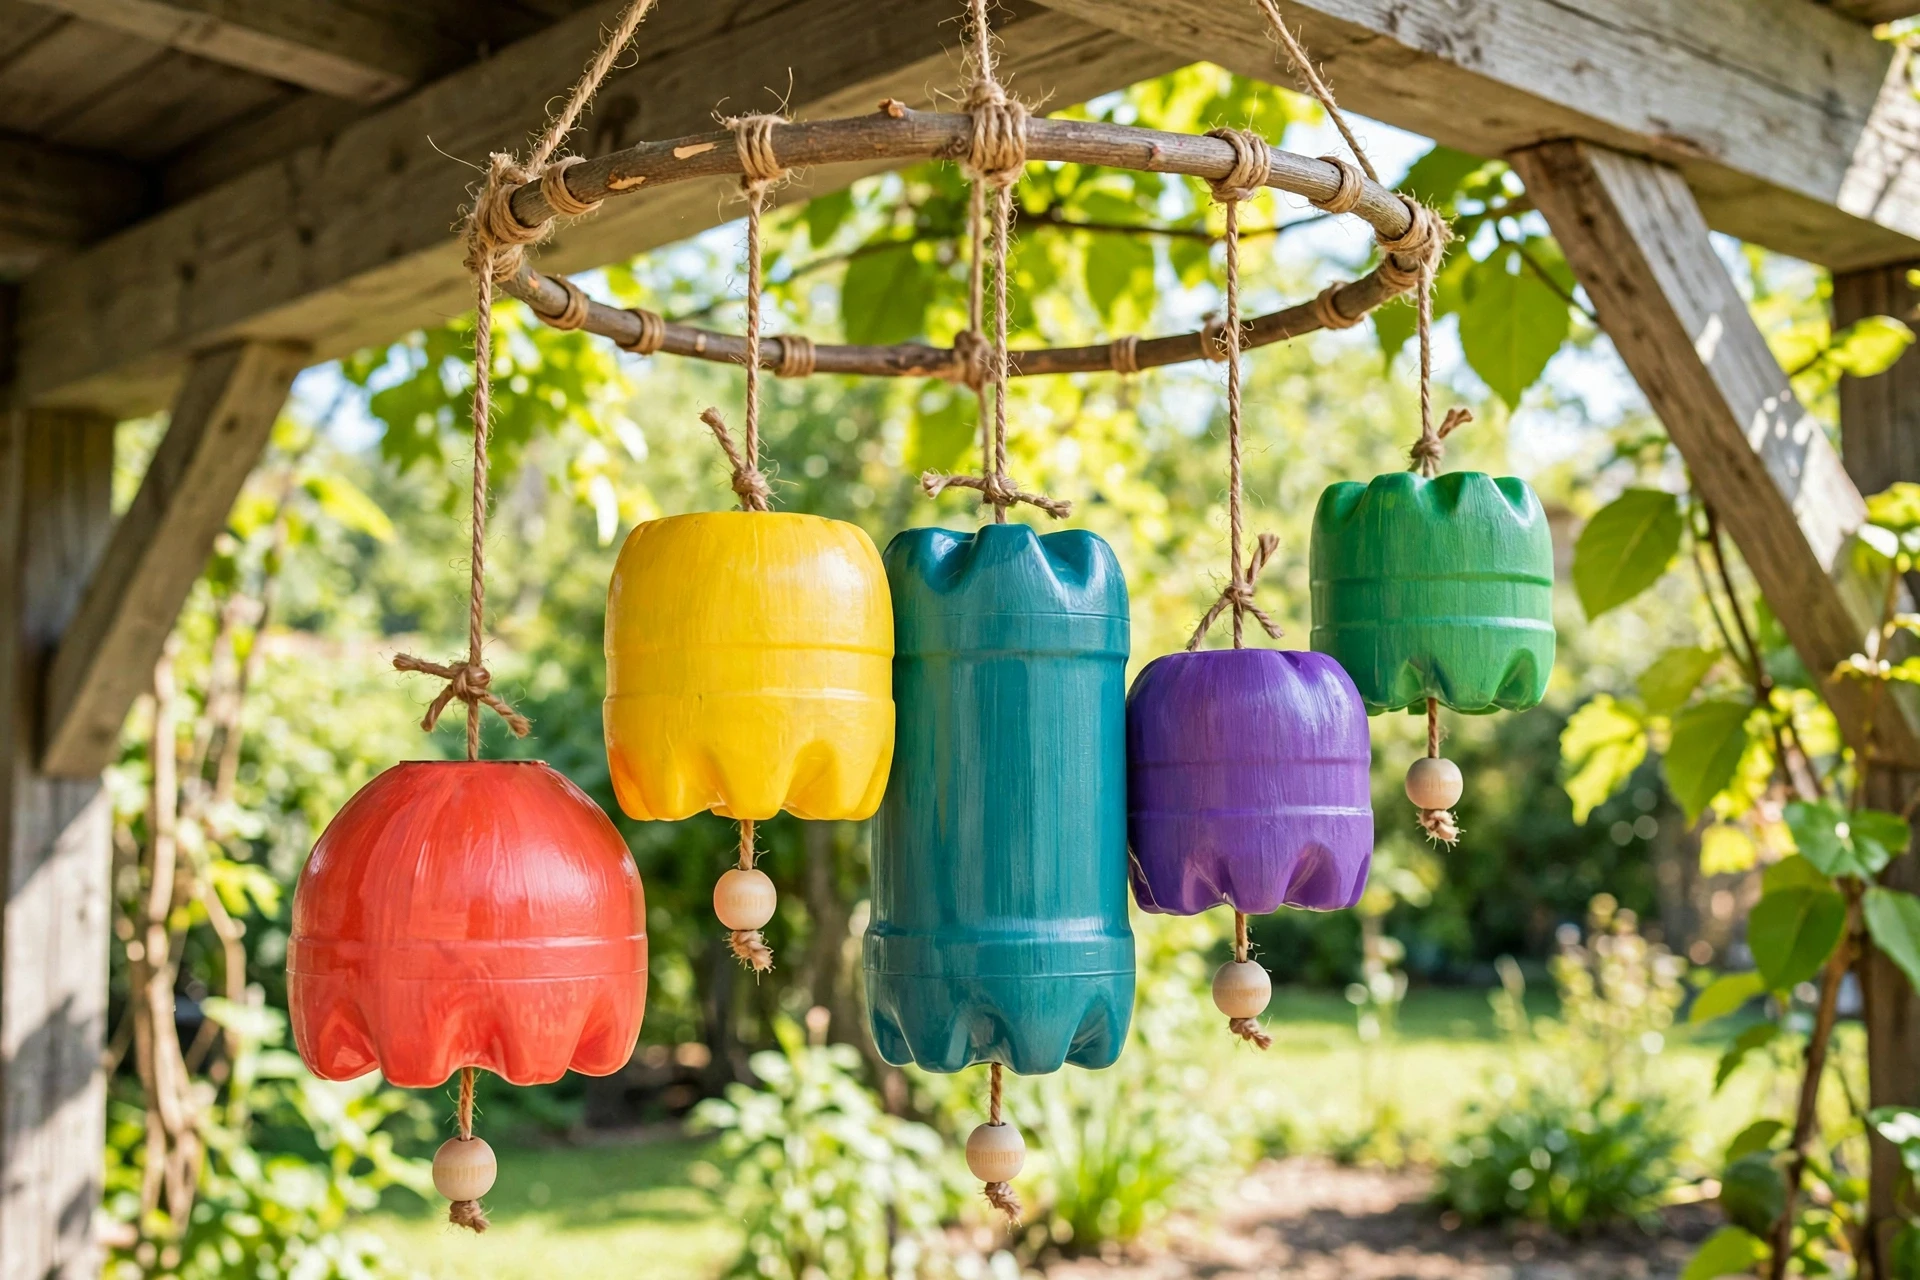
You may also like: 22 Thanksgiving Decor Ideas That Make Your Home Feel So Warm
23. Set Up Bottle Bowling
Save six bottles, fill each one a third full with water or sand so it stands steady, paint them in bright colours or give each one a number, and line them up like bowling pins. Roll a small ball at them and see how many you can knock down. It is a game, not a decoration, and it is the most active of all the plastic bottle crafts in this guide. Kids love it because it is a game they built themselves, and they love it even more when they beat the adults at it, which they will, because they practise more.
Best for: Garden parties, rainy days in a hallway, and competitive families.
Cost: Free, plus a small ball for about 2 dollars. Time: About 20 minutes to paint and set up.
Fill the bottles with the same amount of water so they all fall the same way. Screw the caps on tight, or the water will spill on the first strike. And paint the numbers big so everyone can see the score from across the garden.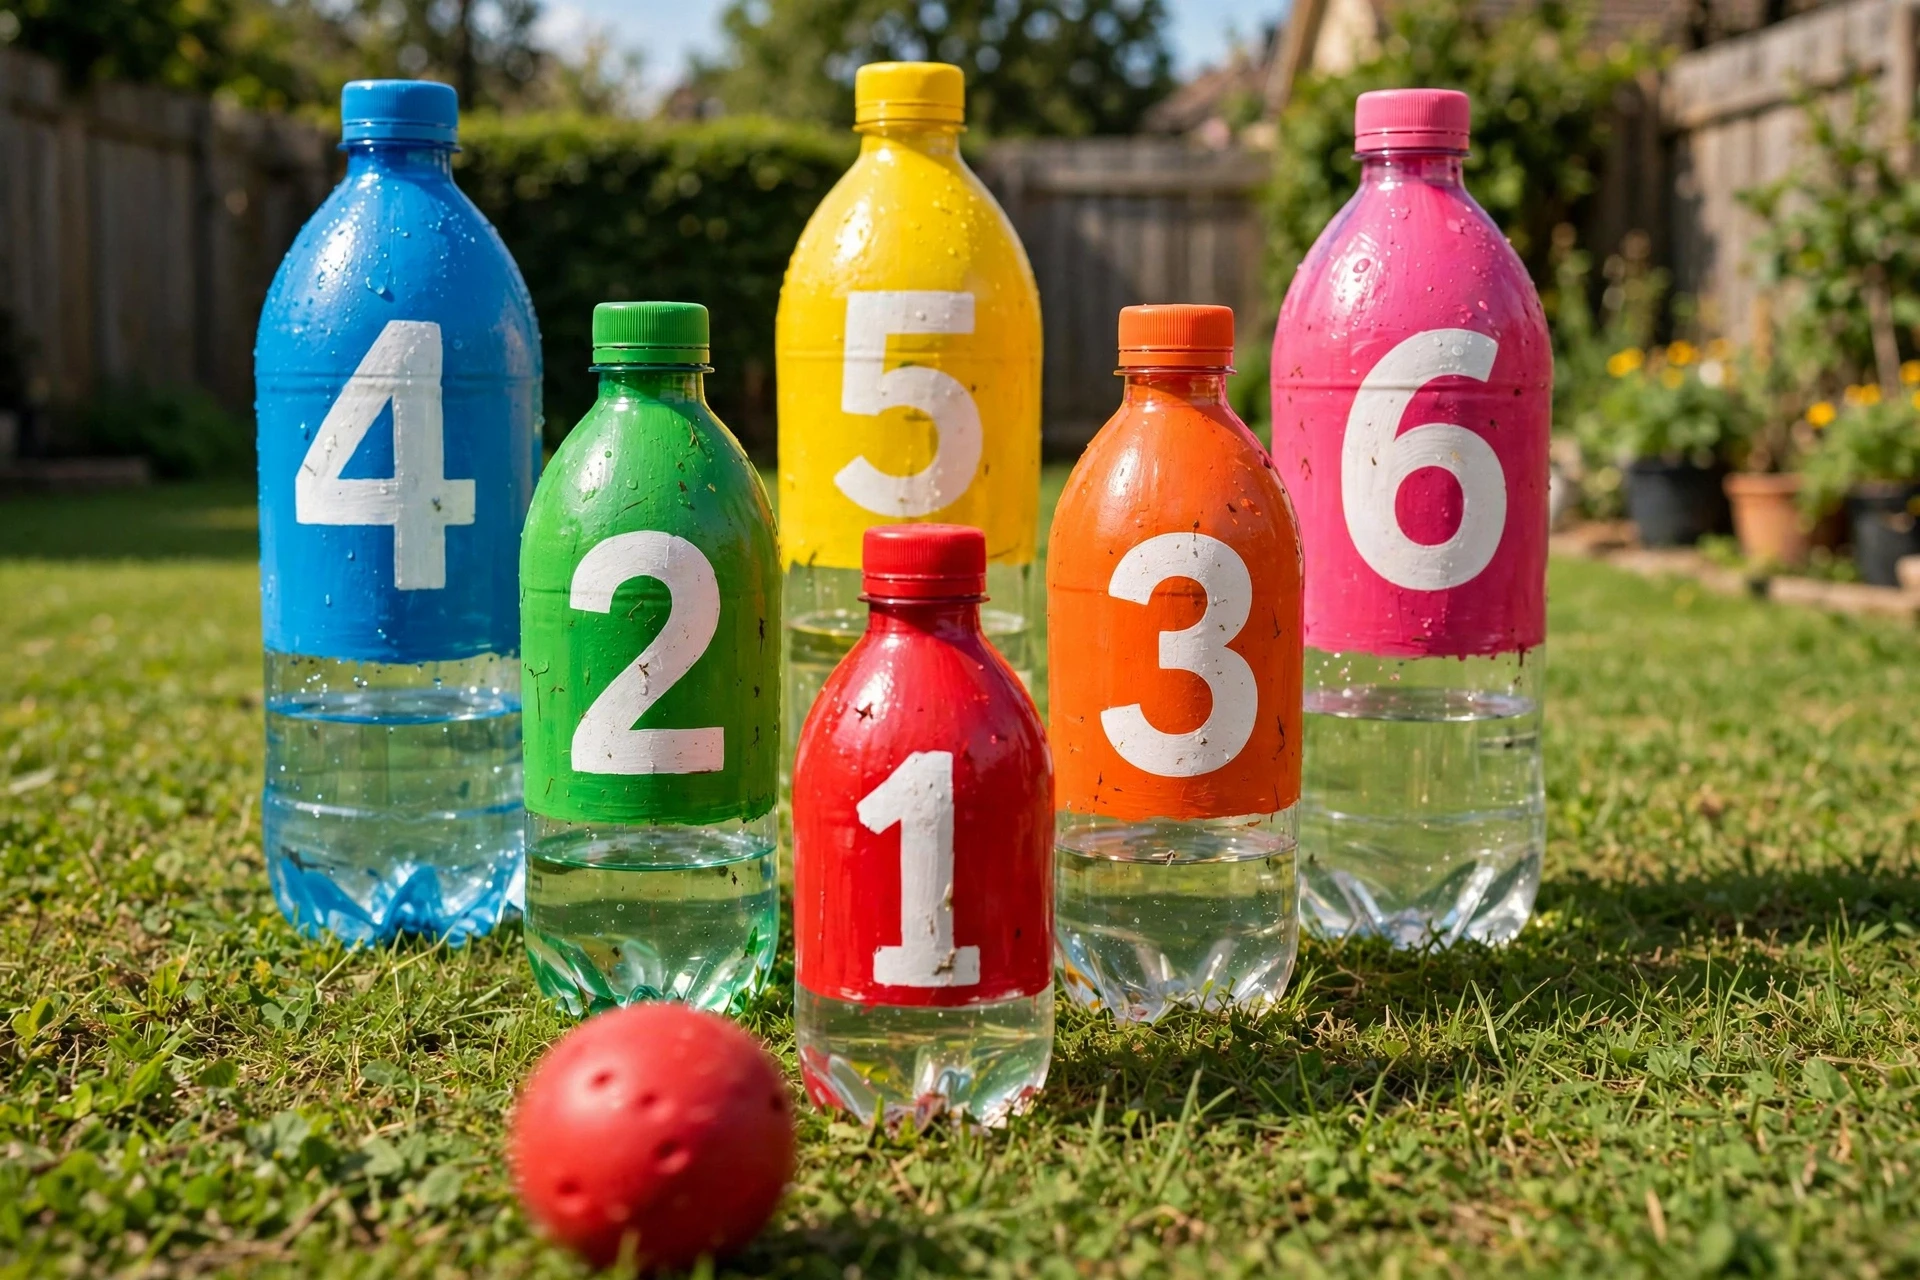
You may also like: 22 Cozy Weeknight Dinners for Tired Nights in 30 Minutes
24. Make a Calm-Down Sensory Bottle
Fill a clear bottle with water, a little clear glue, glitter, and a few small beads or sequins. Screw the cap on tight, glue it shut, and shake it. The glitter swirls slowly down through the thick water, and watching it fall is genuinely calming. It is the quietest of all the plastic bottle crafts in this guide, and it is the one that helps on hard days, because a kid who is upset can shake the bottle and watch the glitter settle, and by the time it settles, they have settled too. It takes five minutes, it costs almost nothing, and it is the bottle craft that gets used the most.
Best for: Bedtime, hard days, and any kid who needs a quiet minute.
Cost: Glitter and clear glue, about 2 to 3 dollars. Time: About 5 minutes.
Use clear glue, not white glue, or the water will go cloudy. Fill the bottle almost to the top so there is no big air bubble. Glue the cap shut with strong glue, because a sensory bottle that opens makes a glittery mess. And use fine glitter, because chunky glitter sinks too fast.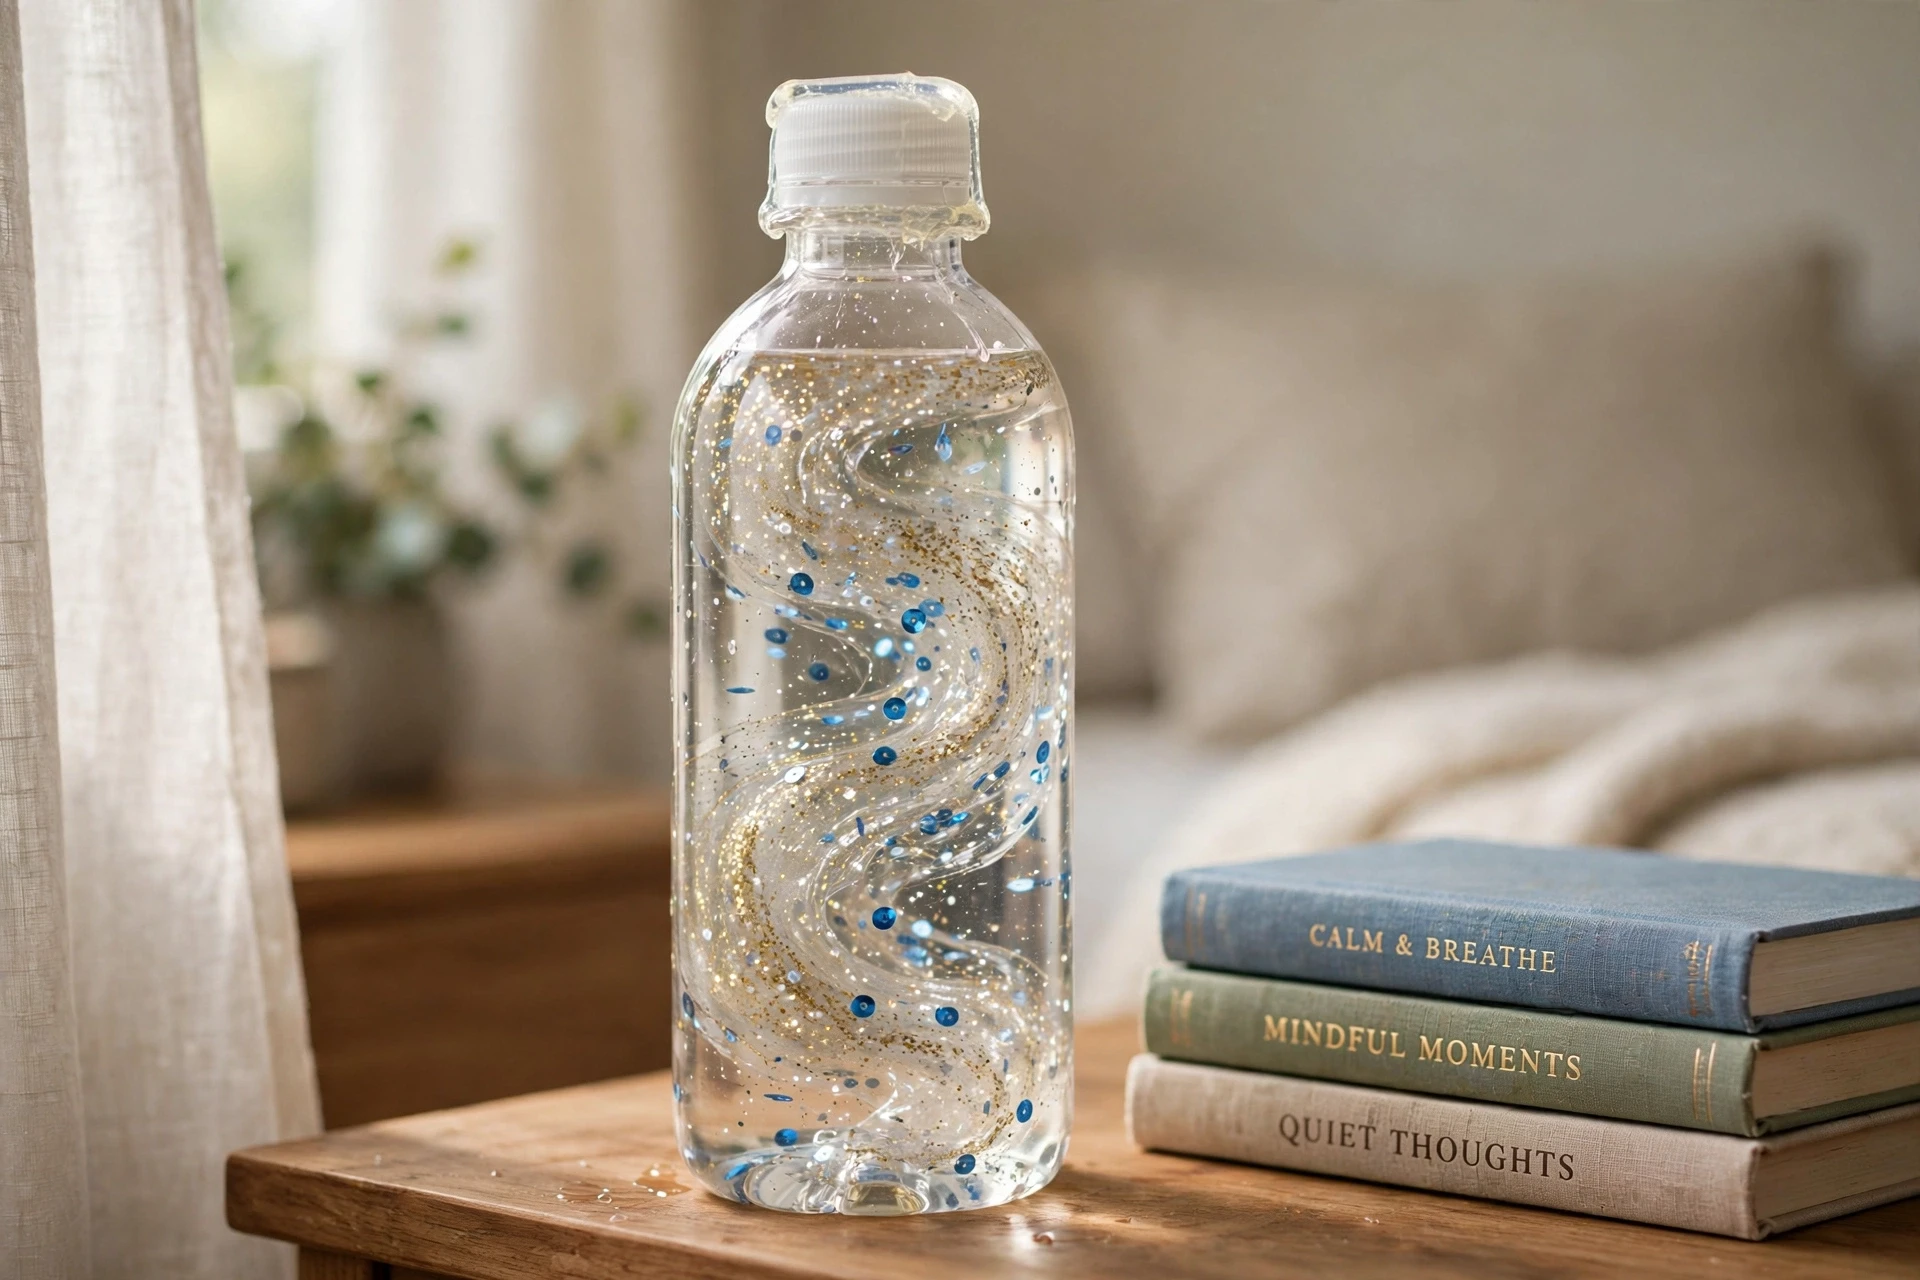
You may also like: 22 DIY Candles That Make Fall Feel Warm and Truly Special
At a Glance: Every Idea, Its Cost, and Its Time
| Group | Ideas | Budget | Time to do them all |
|---|---|---|---|
| Planters and the Garden | 1 to 5 | Free to 12 dollars | About 1.5 hours |
| Light and Glow | 6 to 9 | 1 to 5 dollars each | About 1.5 hours |
| For the Birds | 10 to 12 | Free to 5 dollars | About 1 hour |
| Around the House | 13 to 18 | Free to 3 dollars each | About 2.5 hours |
| Fun With Kids | 19 to 24 | Free to 3 dollars each | About 2 hours |
Most of these ideas cost nothing on their own, and most of them take under an hour. The paint and the glue are the only real costs, and you probably own both already. Everything else is a bottle that was going in the bin.
Do This, Not That
| Do This | Avoid This |
|---|---|
| Let the adult do all the cutting with a craft knife | Handing a child strong scissors and a tough bottle |
| Smooth every cut edge with sandpaper or tape | Leaving sharp plastic edges where small hands will touch |
| Use battery tea lights and fairy lights only | Putting a real candle inside a plastic bottle |
| Use bottles that held food or drink only | Using bottles that held cleaners or chemicals, even after washing |
| Pick 2 projects per sitting and finish them both | Starting five projects and finishing none of them |
| Paint with acrylic paint and let the first coat dry | Painting over wet paint so the colours smear |
| Hang bird feeders high, away from fences and cats | Hanging a feeder low where cats can reach it |
| Glue the cap shut on a sensory bottle | Leaving a glitter bottle open where it can spill |
Your Craft Weekend
You do not need a whole week to plan a craft afternoon. One weekend is enough if you split it right. The bottles get saved during the week, and the crafting happens on Saturday.
Friday Night: The Bin and the Table
Wash the bottles, peel the labels off, and let them dry overnight. Put ten to fifteen bottles in a box, in a few sizes, and set out the paint, the glue, the scissors, and the markers on the table. Cover the table with newspaper or an old sheet, because paint gets everywhere no matter how careful you are. Pick your 2 projects for Saturday and write them down. This is the prep night, and it takes about twenty minutes. Once the bottles are clean and the table is covered, the crafting can start the minute the kids sit down.
Saturday Morning: The Quick Win and the Big One
Start with a quick win, like the pencil holder or the sensory bottle, so everyone has a finished craft in twenty minutes. Then move to the longer project, like the fairy house lantern or the vertical garden wall, and give it the full hour. The adult does the cutting, the kids do the choosing and the painting and the naming. Put the finished crafts where everyone can see them, on the windowsill or the shelf, and take a photo. By lunch, you have two finished crafts and a table that needs ten minutes to clean. That is a good Saturday morning.
Saturday Afternoon: The Garden and the Birds
Take the planters and the bird feeder outside. Fill the planters with soil and seeds, hang the bird feeder from a branch, and put the mini greenhouse over a seedling. This is the part kids love most, because the craft leaves the table and goes to work in the garden. Fill the bird feeder with seed, step back, and wait. The first bird usually shows up before dinner. Then put the tools away, wash the brushes, and let the paint dry. The weekend is done. Do not start another project until next weekend, or the craft box will take over the house.
Take It Further
If you liked this guide, these are the next ones to read. They build on the same ideas, room by room, and they will help you get the house ready for the people you love.
- 22 Driftwood Decor Ideas That Make Your Home Feel So Calm
- 22 DIY Candles That Make Fall Feel Warm and Truly Special
- 22 Christmas Card Ideas That Feel Handmade and Truly Special
- 21 Christmas Window Painting Ideas to Brighten Your Home
- 22 Thanksgiving Decor Ideas That Make Your Home Feel So Warm
- 22 Fireplace Mantel Ideas for Fall and Christmas That Work
- 22 Cozy Christmas Apartment Decor Ideas for Small Spaces
- 21 Cozy Christmas Living Room Decor Ideas That Make Your Home Feel Magical
Crafter’s Cheat Sheet
If you read nothing else, read this.
- The rule: 1 bin of bottles, 2 projects per sitting, 3 jobs for the kids. That is the 1-2-3 Bottle Craft Method, and it is the whole guide in one line.
- The three things: The adult does the cutting, the craft has a job when it is done, and it is finished in one sitting. If a project has all three, it gets finished and it gets kept.
- The budget: Most ideas cost nothing. Paint, glue, and a few battery tea lights are the only real costs.
- The time: Two projects per sitting, one quick and one longer, about an hour and a half in total.
- The safety rule: Adults cut, kids paint. Smooth every edge, use LED lights only, and never use a bottle that held chemicals.
- The mistake to avoid: Starting five projects at once. That is how you end up with a table full of half-finished crafts and nobody who wants to craft again.
- The one thing to do first: Wash the bottles and peel the labels off the night before. Everything else follows from that one job.
Questions People Ask
What can you make with plastic bottles?
Planters, vases, pencil holders, lanterns, bird feeders, piggy banks, watering cans, and desk organisers are the most popular, and most need only scissors, glue, and paint. A bottle is free, waterproof, and already shaped like a container, so almost any craft that holds something works. Start with a planter or a bird feeder, because both are useful the same day you make them, and both teach kids that something from the bin can have a second life.
How do you safely cut a plastic bottle for crafts?
An adult should do the cutting. Score the bottle lightly with a craft knife on a stable surface, then finish the cut with strong scissors. Wear gloves if the plastic is thick, and always smooth the cut edge with sandpaper or cover it with tape before a child touches it, because cut plastic can be sharp. Keep child-safe scissors for paper only, because they are not strong enough for bottle plastic and they slip.
What paint sticks to plastic bottles?
Acrylic paint made for multi-surface use sticks best, especially with a light sanding first so the paint has something to grip. Spray paint made for plastic also works well for outdoor crafts, and enamel paint holds up best in rain and sun. Give the paint two thin coats instead of one thick one, and let the first coat dry fully before you add the second, or the colours will smear. A coat of clear sealant on top keeps the paint from chipping.
Can plastic bottle crafts be used outside?
Yes, and many of them work better outside than inside. Planters, bird feeders, birdhouses, wind chimes, and watering cans are all made for the garden. Use outdoor acrylic or spray paint made for plastic, add drainage holes to anything that holds soil, and bring painted crafts inside in very cold weather, because freezing can make the plastic brittle. Check them once a season and touch up the paint where it has chipped, and they will last for years.
A plastic bottle is not rubbish. It is a planter, a lantern, a bird feeder, and a piggy bank, waiting for someone to cut it open and paint it. Start with one idea from this list, the one that made your kid smile, and let the rest follow. Your recycling bin will never look the same again. Happy crafting. I will see you in the next one.
Neuman