Too Long; Didn’t Read
Fall winter nails this year are about the change of season itself: warm autumn shades that slowly cool into frost. The biggest fall nail ideas right now are burnt orange and maple brown, cozy cable knit textures, deep burgundy and forest green, and the first frosty silvers that show up in November. A gel set painted in mid November still looks fresh in early December, and a regular polish set lasts 7 to 10 days with a good top coat. Pick one star for your manicure, a colour, a finish, or one small design, and keep the rest simple. Below are 24 fall winter nails, grouped so you can find your match fast, with honest notes on difficulty, time, and how long each one lasts.
One honest note before you start. These are not evergreen trends. Fall nails peak in October and November, November nails are at their highest right now, and winter nails rise through November into January, then interest falls sharply after November and December. This guide is at its best right now, in the November moment, when the leaves are still falling and the first frost is on the windows. If you love one of these designs, book it or paint it this week, while the season is still here.
What's Inside This Guide
ToggleThe November My Nails Finally Caught Up
Every year the same thing happened to me. October would pass in a blur of jumpers and school runs, and I would look down at my hands in the middle of November and realise my nails were still bare from summer. The leaves were turning, the air smelled like woodsmoke, and my hands looked like they belonged to a different season entirely. So one grey November afternoon I sat down at the kitchen table with three bottles of polish I had bought on a whim: a burnt orange, a deep burgundy, and a bottle of gold glitter I had never opened.
I started with the burnt orange, because it matched the maple tree outside the window. Two thin coats, a glossy top coat, and suddenly my hands looked like they belonged to November. It took twenty minutes. It lasted a week and a half. The next week I tried a cable knit texture on two nails, just to see if it worked, and it did. That is when I understood what the fall to winter change is really about: it is not one look, it is a slow shift. Warm colours in early November, darker colours by the end of the month, and the first frosty silver when the mornings turn cold.
That is what these 24 designs are about. Every one of them is a real fall nail idea you can ask for at a salon or paint at home, with the colours, the tools, and the honest difficulty level. Some take ten minutes. Some take an hour and a steady hand. None of them needs a professional artist, but a few of them do need patience and a good top coat. I have grouped them so you can pick by mood: autumn leaves, cozy knits and warm neutrals, the dark November shades, the first frost, and the finishing touches that carry you into December.
The fall winter nails people are searching for right now all point the same way. Autumn nails in warm oranges and browns, november nails in burgundy and forest green, and winter nails in frosty silver and pale blue. Short almond and soft square shapes are the most popular this season, and the best looks pick one detail and let it shine. If you are searching for fall nails, fall nail ideas, autumn nails, or fall to winter nails, you will find them all here. Just remember the rule my burnt orange afternoon taught me: prep first, paint second, and never rush the top coat.
What’s Inside This Guide
- The 3 Things That Decide Whether a Fall to Winter Manicure Lasts
- Group 1: The Autumn Leaves (Designs 1 to 5)
- Group 2: Cozy Knits and Warm Neutrals (Designs 6 to 10)
- Group 3: The November Darks (Designs 11 to 15)
- Group 4: Frost Arrives (Designs 16 to 19)
- Group 5: The Finishing Touches (Designs 20 to 24)
- The 1-2-3 Fall to Winter Method
- At a Glance
- Do This Not That
- Your Fall to Winter Manicure Weekend Plan
- Take It Further
- Stylist’s Cheat Sheet
- Questions People Ask
The 3 Things That Decide Whether a Fall to Winter Manicure Lasts
Before you pick a design, these three things decide almost everything.
1. The prep. A great manicure is mostly preparation. Wash your hands, push the cuticles back gently, and wipe each nail with alcohol or polish remover so there is no oil left on the surface. Oil is the number one reason polish lifts and chips. Shape the nails with a fine file, buff the surface very lightly to take the shine off, and never skip the base coat. It protects the nail from staining, which matters a lot with burnt orange, burgundy, and dark green polish, and it gives the colour something to grip. A rushed prep means a manicure that chips in two days, no matter how pretty the design is. Cold weather makes this worse: dry air and hot water from washing up both lift polish faster, so the base coat matters even more in November than it does in summer.
2. The finish you choose. Regular polish, gel, and press-ons all behave differently as the weather turns. Regular polish lasts 7 to 10 days with a good top coat and daily cuticle oil, and it is the easiest to fix at home. Gel lasts 2 to 3 weeks, so a set done in mid November still looks good in early December, but it needs proper removal or it will peel layers off your nails. Press-ons last 5 to 7 days with glue and are the fastest option if you are short on time. Pick the finish that fits your week, not the one that looks best in a photo. A gel set you cannot remove properly does more damage than a plain polish set ever will. If your hands get very dry in cold weather, rub cuticle oil in every night: dry cuticles are the reason so many autumn nails start lifting at the edges.
3. One star, not five. The best fall winter nails all follow the same rule: one star, and everything else stays quiet. One star can be a colour, like a deep burgundy. It can be a finish, like a cable knit texture. Or it can be one small design, like a single gold leaf on the ring finger. When every nail has a different picture, the manicure looks busy and the eye does not know where to rest. When nine nails are calm and one or two carry the detail, the whole hand looks expensive. This is the difference between a manicure that gets compliments and one that looks like a craft project.
Keep those three in mind and every design below will make sense.
One more thing worth saying plainly. The fall nail ideas that work best are rarely the most complicated ones. A clean burnt orange, a thin copper line, or a single hand-painted leaf beats a busy pattern on every nail. Autumn nails look best when the base is smooth and the detail is small. That is the whole idea behind the 24 designs below, and it is why the simple fall nails in this guide sit right next to the boldest ones. Pick the one that fits your week, your skill, and your plans.
Group 1: The Autumn Leaves
These five are the warmest starting points. Burnt orange, maple brown, pumpkin spice, cinnamon, and gold leaf. They are the colours of the leaves outside your window, and they are at their best right now, while autumn nails are at their November peak. If you only paint one group from this guide, start here.
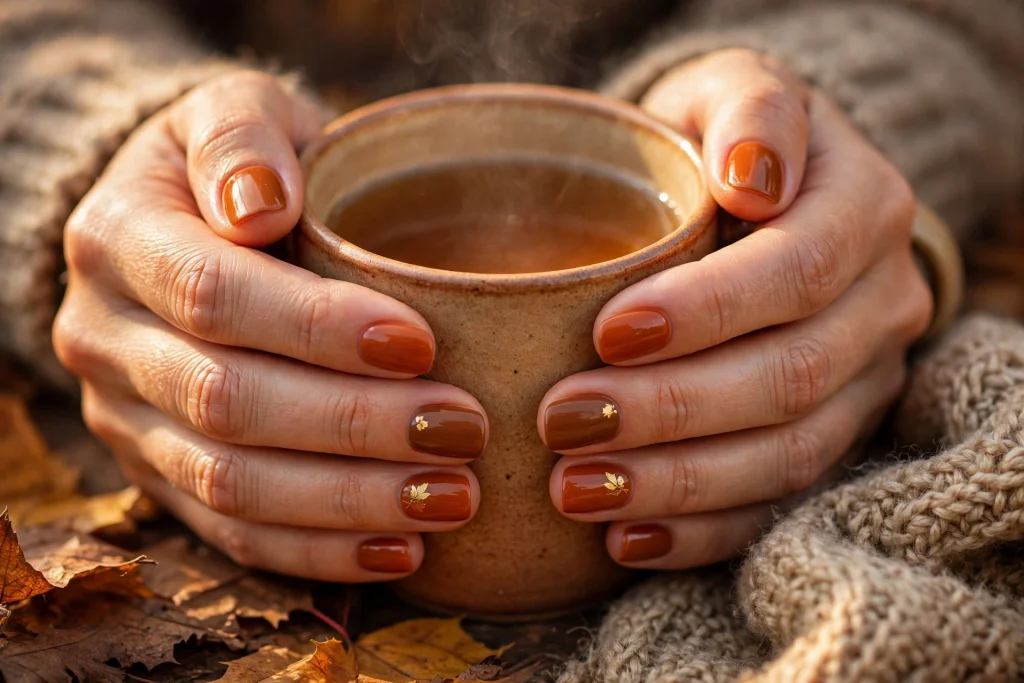
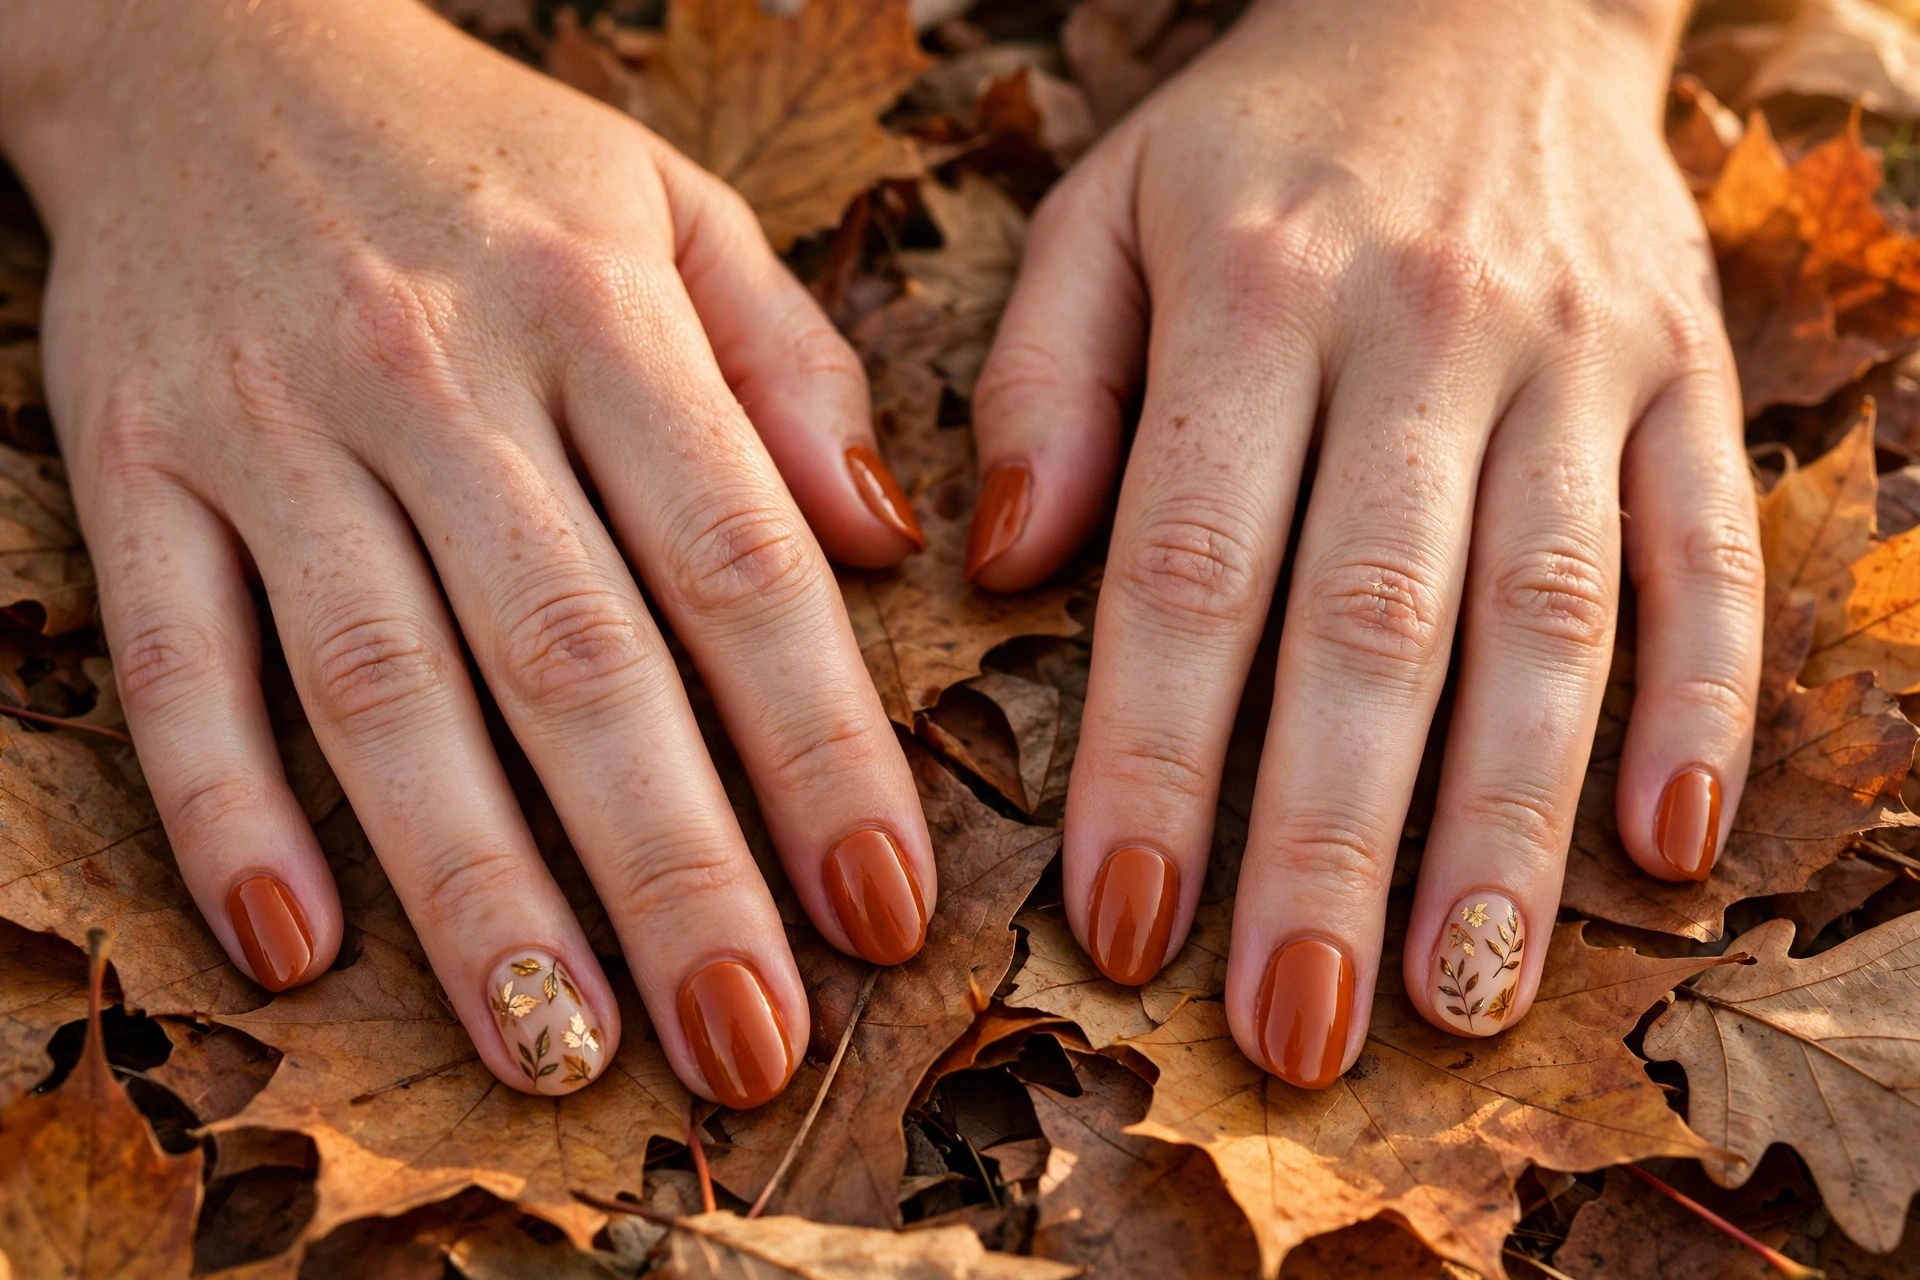
1. Burnt Orange Leaf Print
A warm burnt orange base with tiny hand-painted leaf shapes in gold and deep brown on the accent nails. It is the most autumn design in this guide, and it is the one that looks most like the season outside. The orange is rich without being loud, and the small leaves keep it from feeling like a plain orange manicure. It suits every skin tone, and it looks wonderful with a cream jumper or a brown coat.
How to do it: Apply a burnt orange base, two thin coats, and let it dry fully. On the ring finger of each hand, use a fine brush to paint three small leaf shapes in gold polish, then add a thin brown line down the middle of each leaf for the vein. Keep the leaves small, about a third of the nail, and keep them near the tip so they do not crowd the cuticle. Seal with a glossy top coat. If painting leaves feels hard, try a leaf stamp or a tiny leaf sticker first: the shape is what matters, not how you got it there.
How long it lasts: 7 to 10 days in regular polish, 2 to 3 weeks in gel. Orange shows chips less than red, so it stays looking neat for the whole week, and the glossy top coat keeps the leaves bright.
You may also like: 22 December Nails That Feel Festive and Look So Beautiful, if you want the same warm feeling with a December twist.
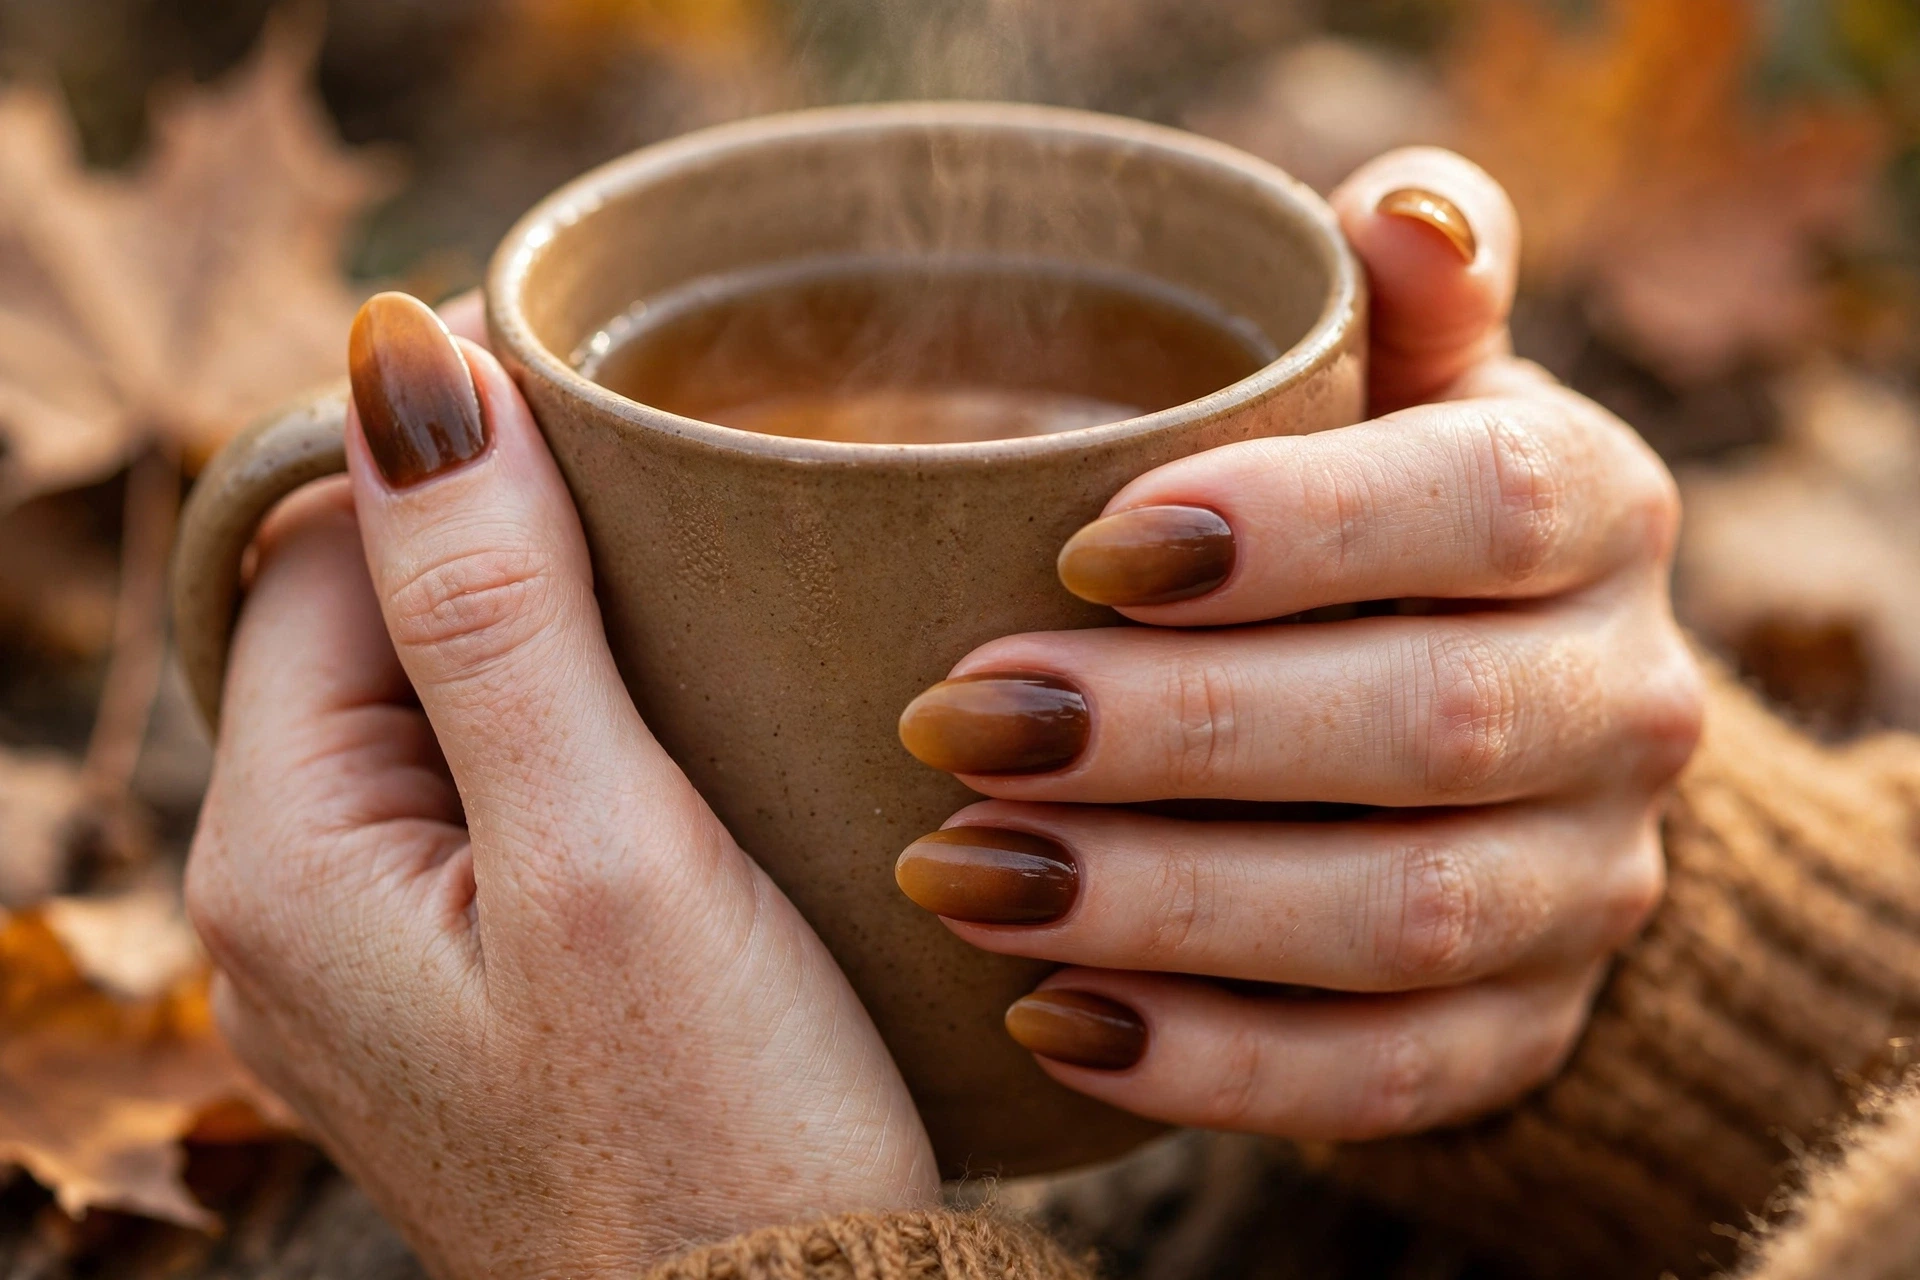
2. Maple Brown to Caramel Fade
A deep maple brown at the cuticle that fades into warm caramel at the tips, like the colour of a maple leaf as it turns. It is the softest ombre in this guide, and it is the one that looks most expensive, because the blend is smooth and the colours are warm. It suits medium nails best, because the fade needs a little length to show, but it works on short nails too if you keep the fade gentle.
How to do it: Apply a maple brown base, one thin coat. While the second coat is still slightly wet, dab caramel polish onto a small makeup sponge and press it onto the tips, working upward in short dabs until the two colours blend in the middle. Two layers of sponge work gives a smoother fade. Clean up the cuticles with a small brush dipped in remover, then seal with a glossy top coat. A thin gold shimmer line along the cuticle is optional, and it makes the whole hand look finished.
How long it lasts: 7 to 10 days in regular polish, 2 to 3 weeks in gel. Ombre hides regrowth well, because the base colour is close to the nail at the cuticle and the fade distracts the eye from the grow-out line.
You may also like: 22 Winter Nail Color Trends That Make Winter Feel Beautiful, if you want the same ombre idea in cooler winter shades.
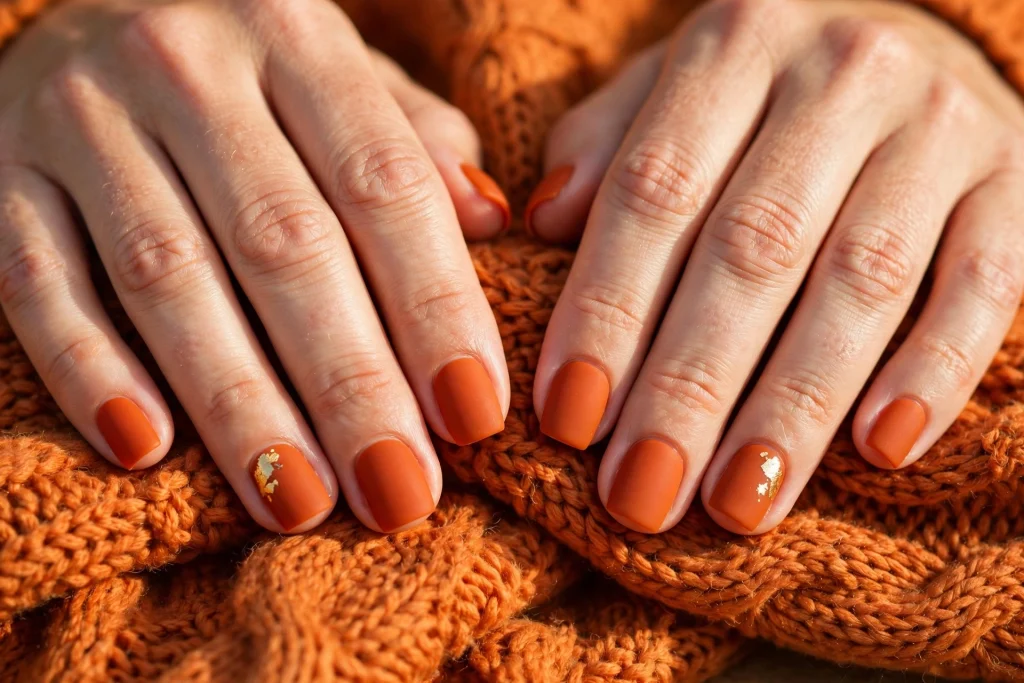
3. Pumpkin Spice Matte with a Gold Leaf
A burnt pumpkin orange with a soft matte finish, and one small gold leaf on the ring finger of each hand. It is the coziest design in this guide, and it smells like autumn even though it is only polish. The matte finish is what makes it special: it takes the bright pumpkin down a notch and makes it look like suede. It suits short nails beautifully, because the matte texture does the work and the design stays simple.
How to do it: Apply a pumpkin orange base, two thin coats, and let it dry fully. Place one small gold leaf sticker or paint a tiny gold leaf with a fine brush on the ring finger of each hand. Seal with a matte top coat, not a glossy one: the matte top coat is the whole point of this design, and a glossy top coat would change it completely. If the matte finish looks patchy, add a second thin layer of matte top coat and let it dry fully before you touch anything.
How long it lasts: 7 to 10 days in regular polish, 2 to 3 weeks in gel. Matte top coats wear faster at the tips than glossy ones, so refresh the matte top coat on day three if the shine starts coming back at the edges.
You may also like: 23 Christmas Nails 2026 That Feel Festive and Look So Good, if you want the same warm orange feeling with a festive twist.
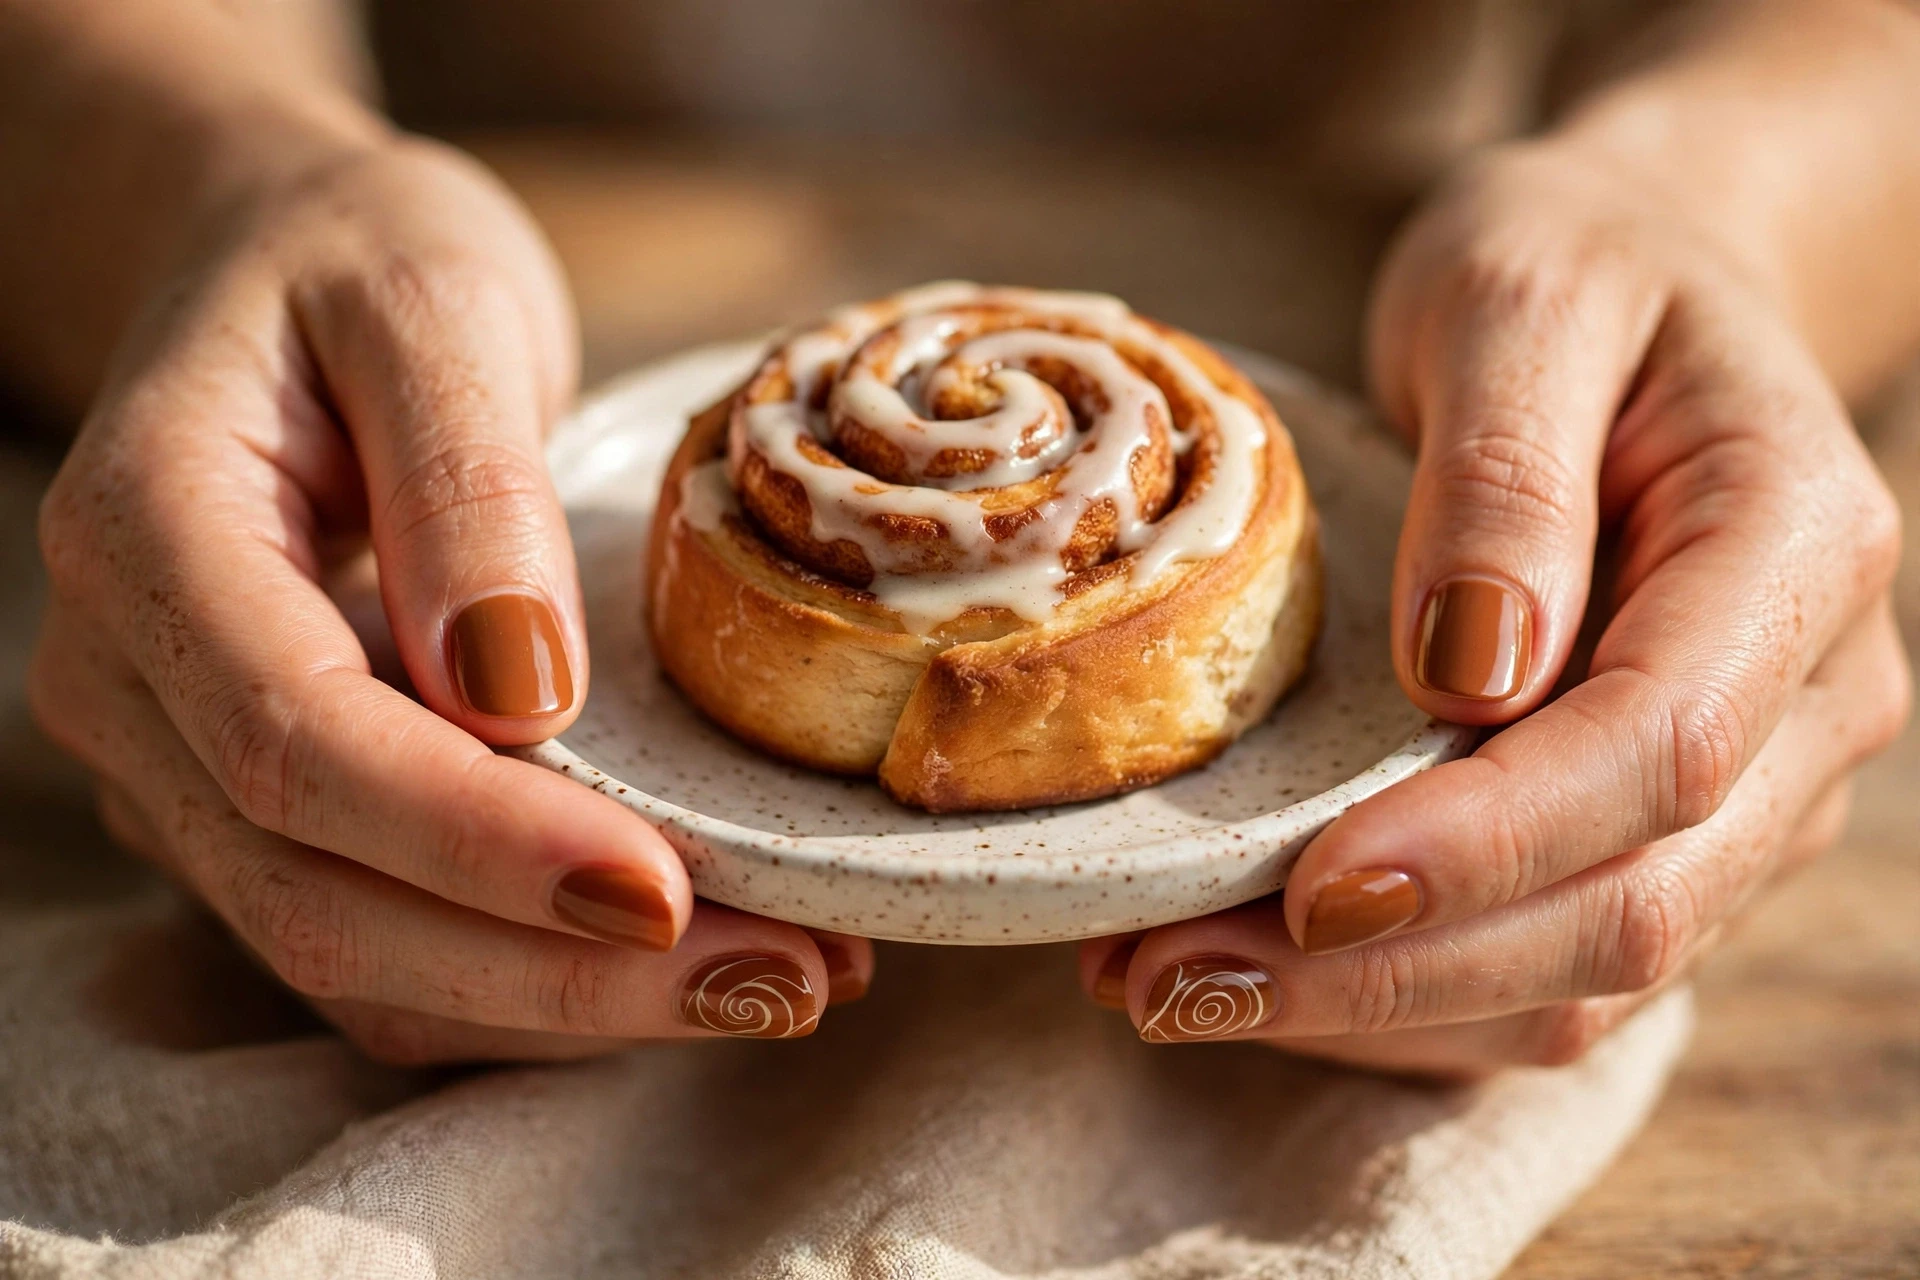
4. Cinnamon Swirl Accent
A warm cinnamon brown base with thin cream swirls on two accent nails, like the swirl on top of a cinnamon roll. It is the sweetest design in this group, and it is the one that looks best with a coffee in your hand. The swirls are simple curves, not a pattern, so they are much easier to paint than they look, and they make the whole hand feel warm.
How to do it: Apply a cinnamon brown base, two thin coats, and let it dry fully. On the ring finger of each hand, use a fine brush or a thin striping brush to draw two or three gentle cream curves across the nail, starting at one corner and sweeping to the other. Keep the lines thin and do not try to make them perfect: slightly wobbly swirls look hand-painted in the best way. Seal with a glossy top coat. If your hand shakes, rest your painting hand on the table and move the nail, not the brush.
How long it lasts: 7 to 10 days in regular polish, 2 to 3 weeks in gel. The brown base is forgiving, and the cream swirls are thin enough that a small chip barely shows.
You may also like: 22 January Nail Colors That Make Winter Feel So Beautiful, if you want the same warm brown feeling in a winter shade.
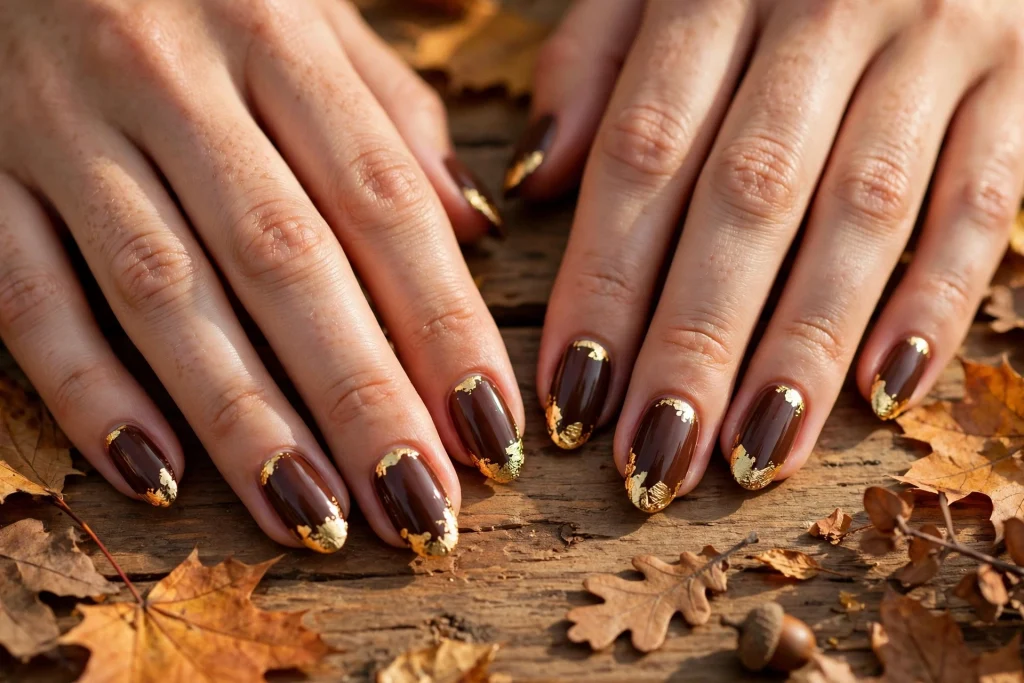
5. Harvest Gold Leaf Tips
A deep chestnut brown base with gold leaf only on the tips, like the last gold leaves still on the tree. It is the most grown-up design in this group, because the gold is only at the very edge and the rest of the hand stays calm and dark. It suits medium nails best, because the gold tip needs a little length to show, and it looks wonderful with gold jewellery.
How to do it: Apply a chestnut brown base, two thin coats, and let it dry fully. Use a small brush to paint a thin gold line along the free edge of each nail, or use a sponge to dab gold foil flakes only onto the tips. Keep the gold band thin: a thick gold tip looks heavy, and a fine gold edge looks like jewellery. Clean up the smile line with a small brush dipped in remover, then seal with a glossy top coat. If you use foil flakes, press them down gently so they sit flat, and add a second top coat over the tips so they feel smooth.
How long it lasts: 7 to 10 days in regular polish, 2 to 3 weeks in gel. The dark base hides chips well, and the gold tip is thin enough that wear at the edge barely shows.
You may also like: 22 Medium Length Hairstyles for Thick Hair That Work So Well, if you want a warm autumn look to match these nails.
Group 2: Cozy Knits and Warm Neutrals
These five are for the jumpers, the scarves, and the hot drinks. Cable knit texture, houndstooth, hot cocoa, colour blocking, and latte art. They are the quietest designs in this guide, and they are the ones that work best for every day, because they go with everything you already own. If red feels too loud for you in November, start here.
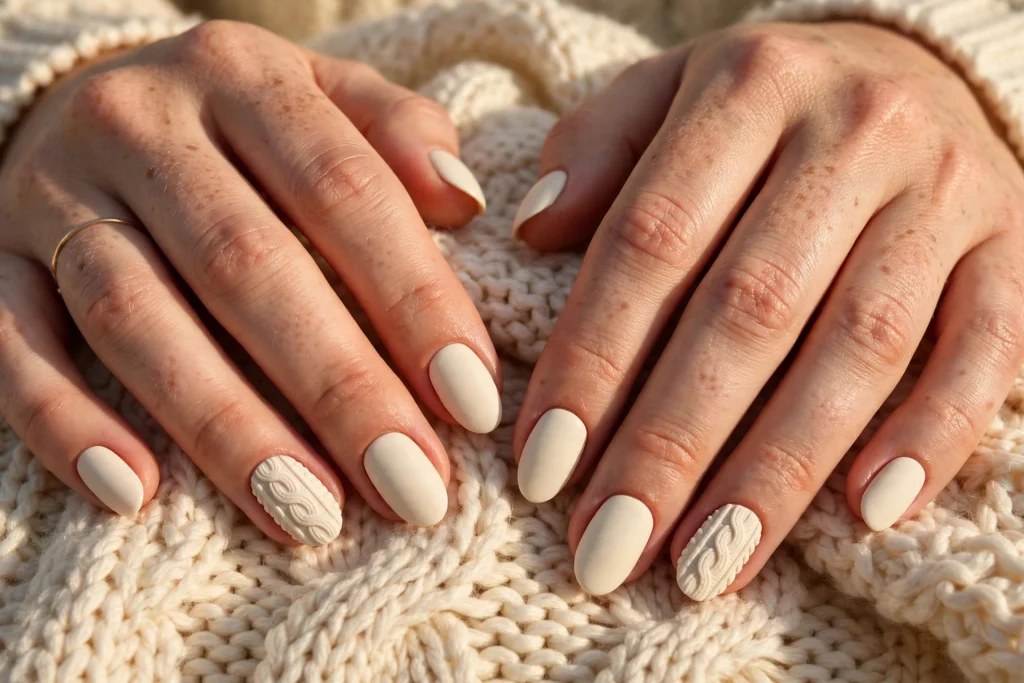
6. Cable Knit Texture Nails
A soft cream base with a raised cable knit pattern on two accent nails, like the knit of your favourite jumper. It is the coziest design in this guide, and it is the one people touch first when they see it, because the texture looks so real. It suits short nails well, because the pattern is small and the cream base keeps the hand looking clean.
How to do it: Apply a cream base, two thin coats, and let it dry fully. On the ring finger of each hand, use a thick gel polish or a 3D gel to draw two thin vertical lines with a small cross between them, like a cable stitch, then cure under a lamp if you use gel. If you do not have 3D gel, a nail stamp with a knit pattern gives almost the same look in half the time. Seal the plain nails with a glossy top coat, and seal the knit nails with a matte top coat if you want the texture to look like wool. Keep the pattern small: two cables per nail is enough, and more than that looks crowded.
How long it lasts: 7 to 10 days in regular polish, 2 to 3 weeks in gel. The raised texture can catch on fabric, so wear gloves for rough housework, and refresh the top coat if the texture starts to dull.
You may also like: Summer Work Outfits That Look Clean, Professional, and Easy to Wear, if you want outfit ideas that pair with a cozy manicure.
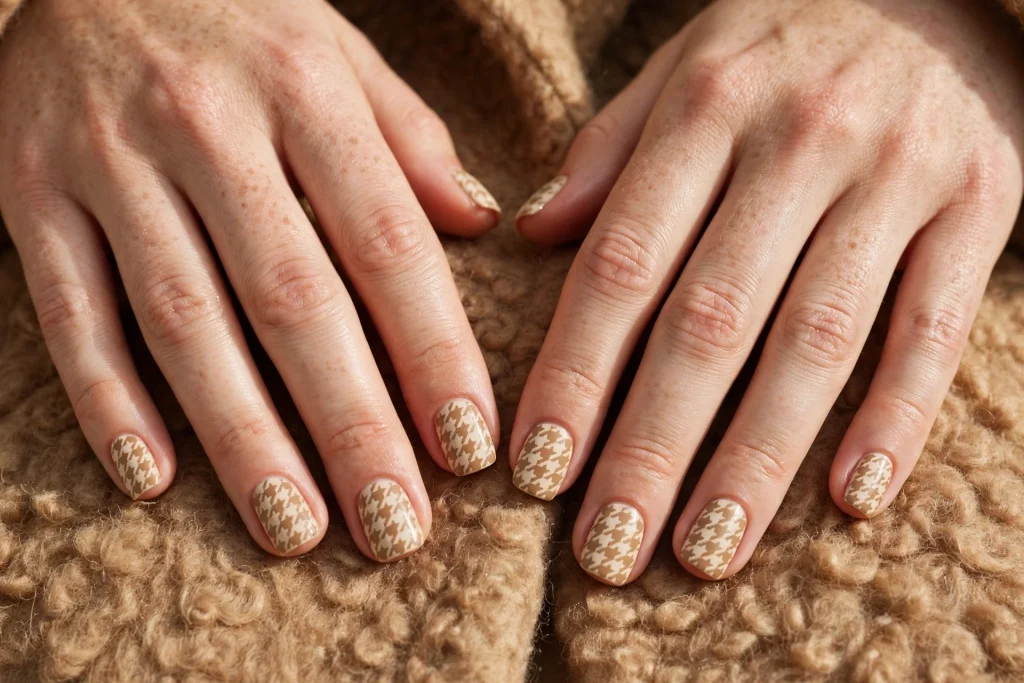
7. Houndstooth in Camel and Cream
A camel and cream houndstooth pattern on a nude base, like a classic autumn coat. It is the most tailored design in this guide, and it is the one that looks best with a structured jacket or a smart coat. The pattern is small and neat, so it reads as a print rather than a picture, and it suits short nails well because the pattern fits easily on a small nail.
How to do it: This is the easiest way: use a houndstooth nail stamp. Apply a nude base, two thin coats, and let it dry fully. Stamp the houndstooth pattern in camel brown onto each nail, or onto the accent nails only if you want a quieter version. If you paint it by hand, use a fine brush to draw small broken checks, but be honest with yourself: stamping gives a much cleaner result, and the stamps are cheap. Seal with a glossy top coat. If the stamp smudges, wipe it off with remover and try again: the base underneath stays safe if it is fully dry.
How long it lasts: 7 to 10 days in regular polish, 2 to 3 weeks in gel. The nude base hides regrowth, and the small pattern hides small chips well.
You may also like: Spring Brunch Outfit Ideas That Actually Make Getting Ready Easy, if you want outfit ideas for a tailored look.
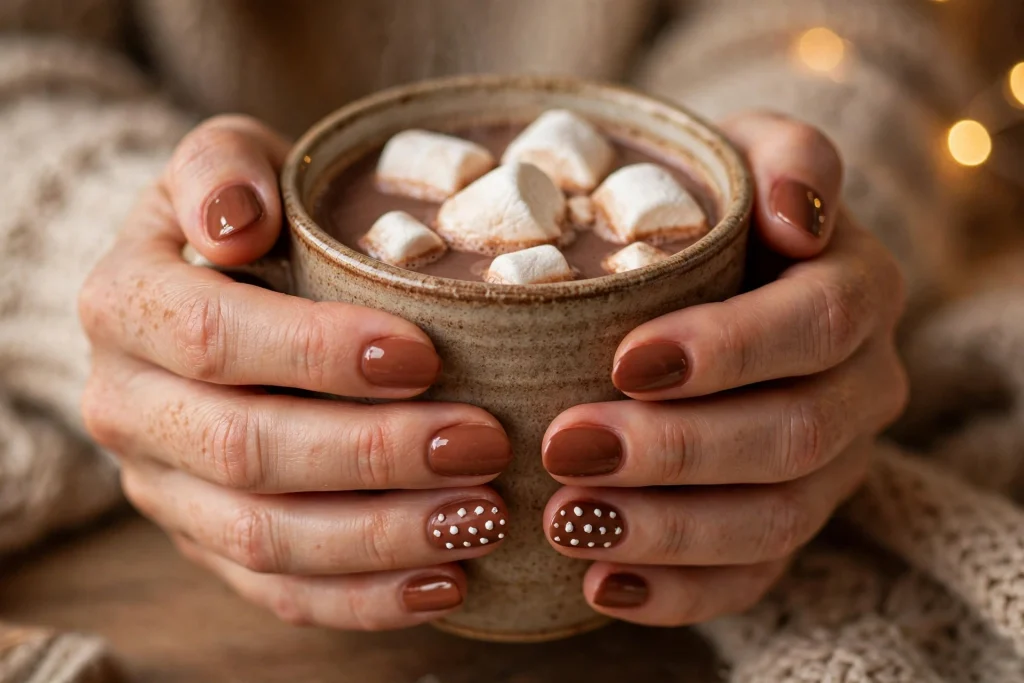
8. Hot Cocoa with Marshmallow Dots
A warm cocoa brown base with tiny white dots on the accent nails, like marshmallows floating in hot cocoa. It is the sweetest design in this group, and it is the one that makes people smile first. The dots are just dots, so it is one of the easiest designs in this guide to paint at home, and it works on every nail length.
How to do it: Apply a warm cocoa brown base, two thin coats, and let it dry fully. On the ring finger of each hand, use a dotting tool to add five or six small white dots in a loose cluster, like marshmallows in a mug. Keep the dots different sizes: two bigger ones and three or four smaller ones look more natural than six identical dots. Add one tiny cream dot in the middle of the cluster if you want a swirl of cream. Seal with a glossy top coat. If a dot goes wrong, wipe just that nail with remover and start the dots again: the base underneath stays safe.
How long it lasts: 7 to 10 days in regular polish, 2 to 3 weeks in gel. The brown base is forgiving, and the dots are small enough that a tiny chip barely shows.
You may also like: 22 December Nails That Feel Festive and Look So Beautiful, if you want the same cozy feeling with a December twist.
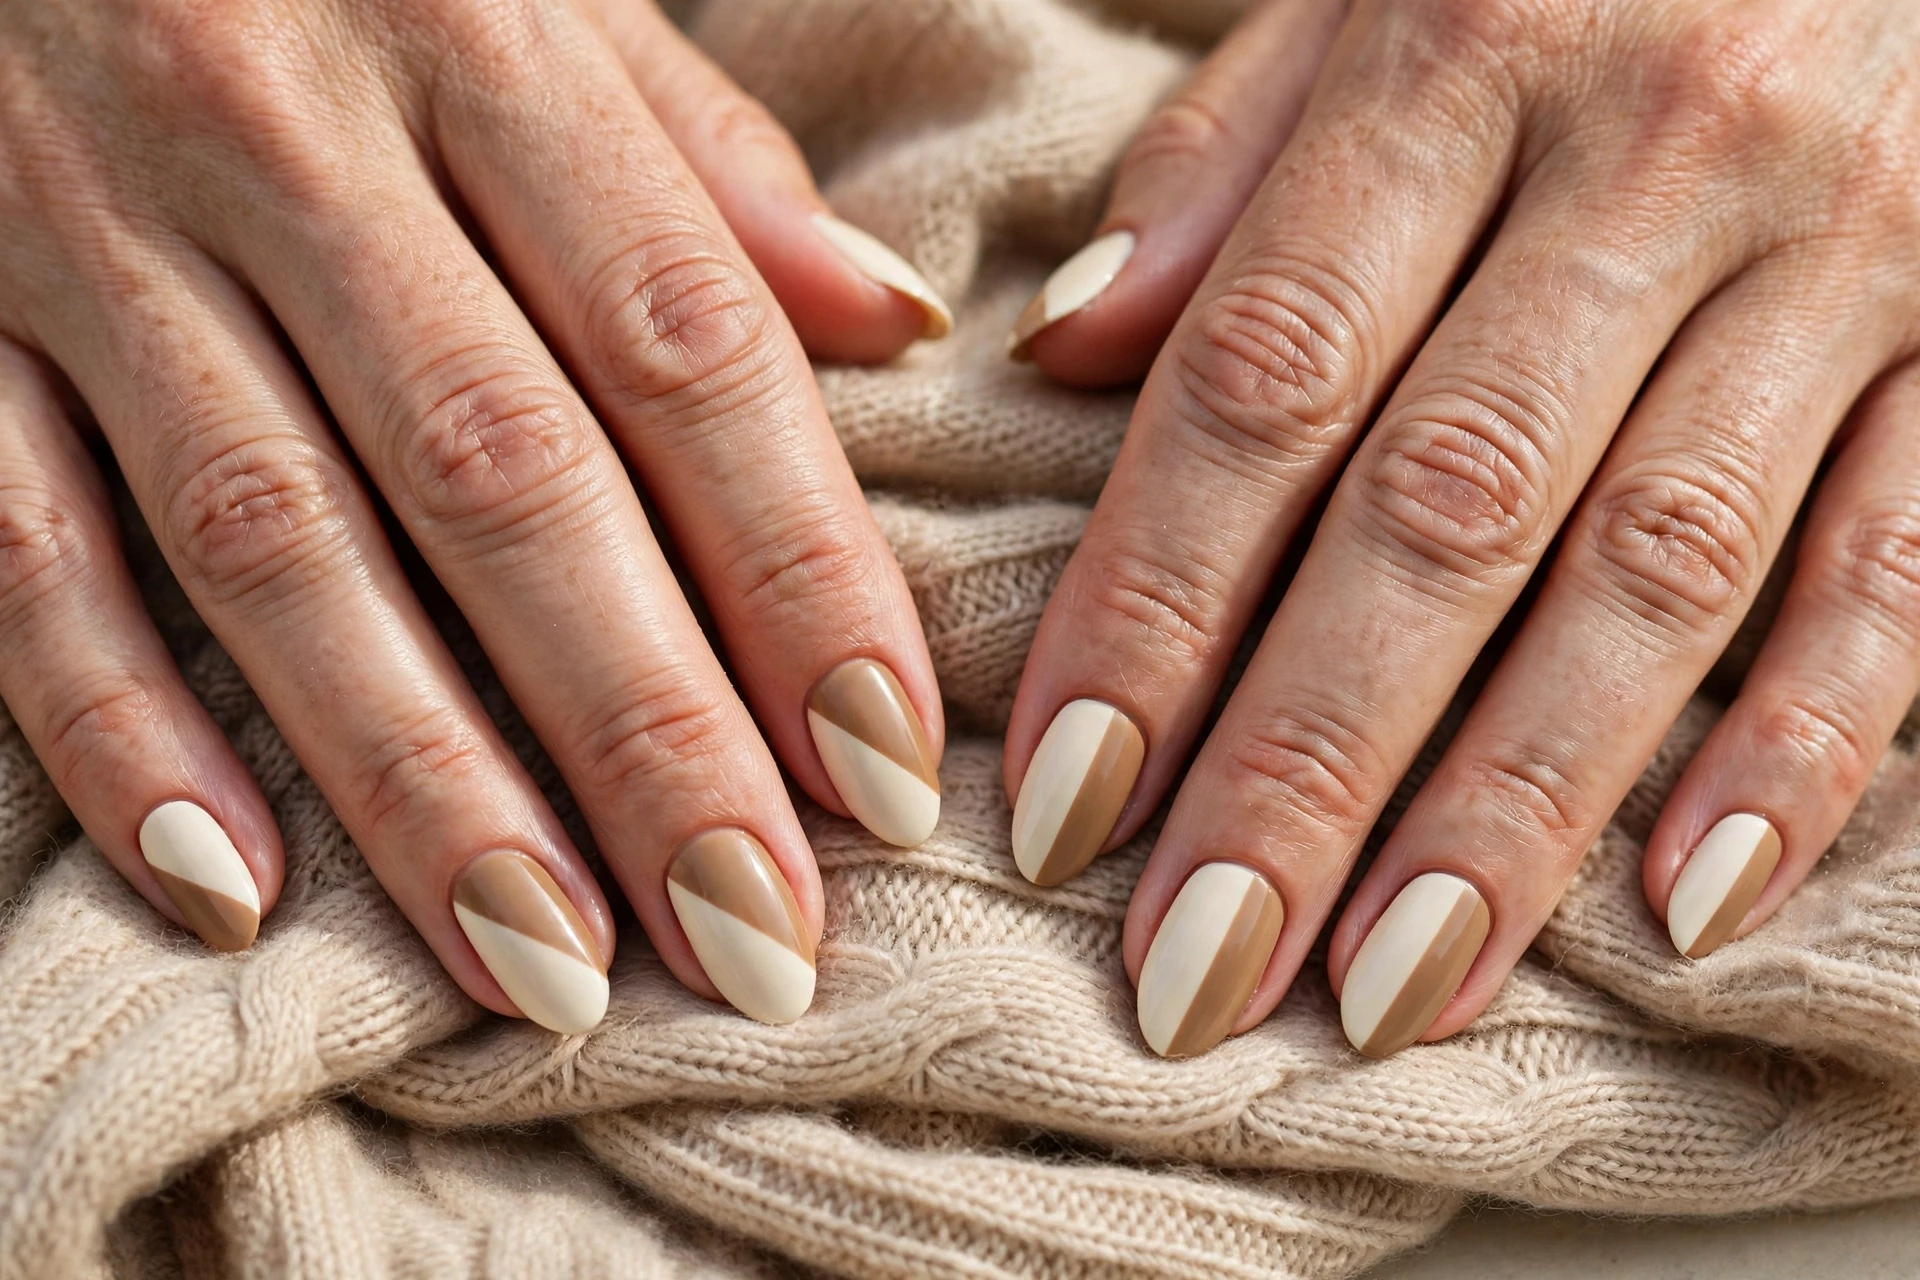
9. Camel and Cream Colour Block
A camel brown and cream colour block, split diagonally across each nail. It is the cleanest design in this group, and it is the one that looks most like a fashion editorial, because the blocks are bold and the colours are quiet. It suits medium nails best, because the diagonal needs a little length to show, but it works on short nails too if you keep the blocks simple.
How to do it: Apply a cream base, two thin coats, and let it dry fully. This matters: if the base is even slightly tacky, the tape will pull it off. Place thin striping tape diagonally across each nail, paint camel brown over one side, and peel the tape off while the brown is still slightly wet. Clean up the line with a small brush dipped in remover, then seal with a glossy top coat. If you do not have striping tape, a steady hand with a thin brush works too, but tape gives a much cleaner line.
How long it lasts: 7 to 10 days in regular polish, 2 to 3 weeks in gel. The cream base shows chips more than dark colours, so refresh the top coat every two days and wear gloves for dishes.
You may also like: Minimal Jewelry Ideas That Make You Look Put Together Without Trying, if you want jewellery that pairs with a clean manicure.
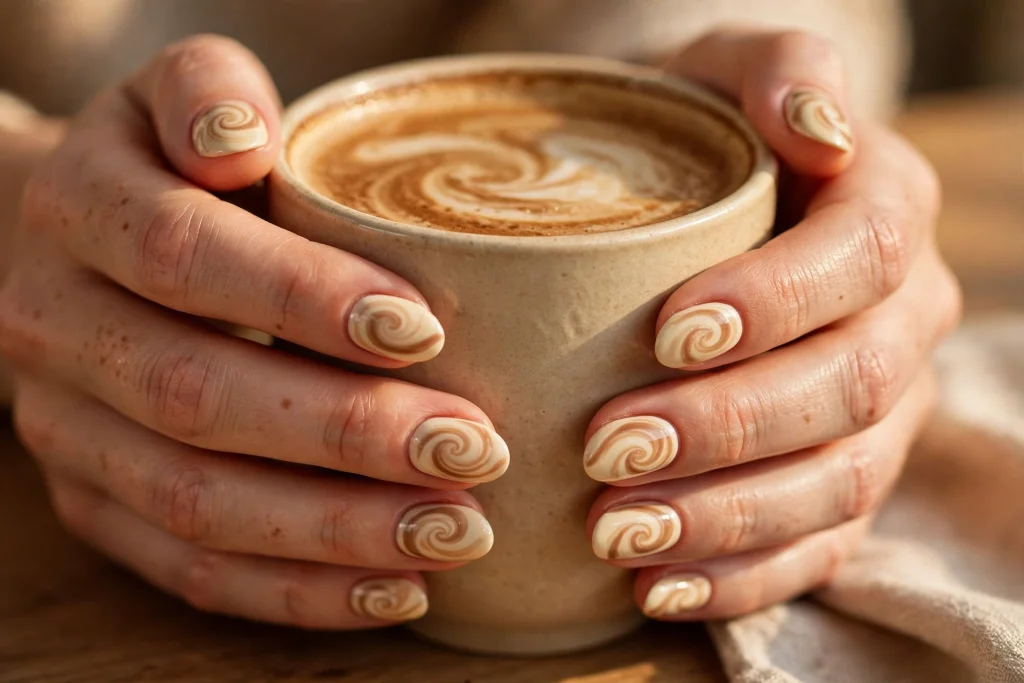
10. Latte Art Swirl
A creamy latte base with a soft brown swirl on each nail, like the art on top of a flat white. It is the prettiest design in this group, and it is the one that looks best in photos, because the swirl is soft and the colours are warm. It suits short nails well, because the swirl is gentle and does not need much room.
How to do it: Apply a creamy latte base, two thin coats, and let it dry fully. Use a fine brush to draw one gentle brown curve across each nail, starting at one corner and sweeping to the other, then add a second thinner curve beside it. Keep the lines thin and do not try to make them perfect: slightly wobbly swirls look hand-painted in the best way. Seal with a glossy top coat. If the swirl looks too faint, add a second thin line over the first one while the polish is still slightly wet, so the two lines blend a little.
How long it lasts: 7 to 10 days in regular polish, 2 to 3 weeks in gel. The pale base hides regrowth well, and the swirl is thin enough that a small chip barely shows.
You may also like: Medium Gold Hoops with Casual Outfits That Always Look Effortless, if you want jewellery that pairs with a warm neutral manicure.
Group 3: The November Darks
These five are the deep, rich looks that carry you through the darkest weeks of November. Burgundy, forest green, charcoal, mulled wine, and toasted almond. They are the most grown-up designs in this guide, and they are the ones that look best with evening outfits and candlelight. If your autumn nails have been bright and warm, this is the group where the season turns.
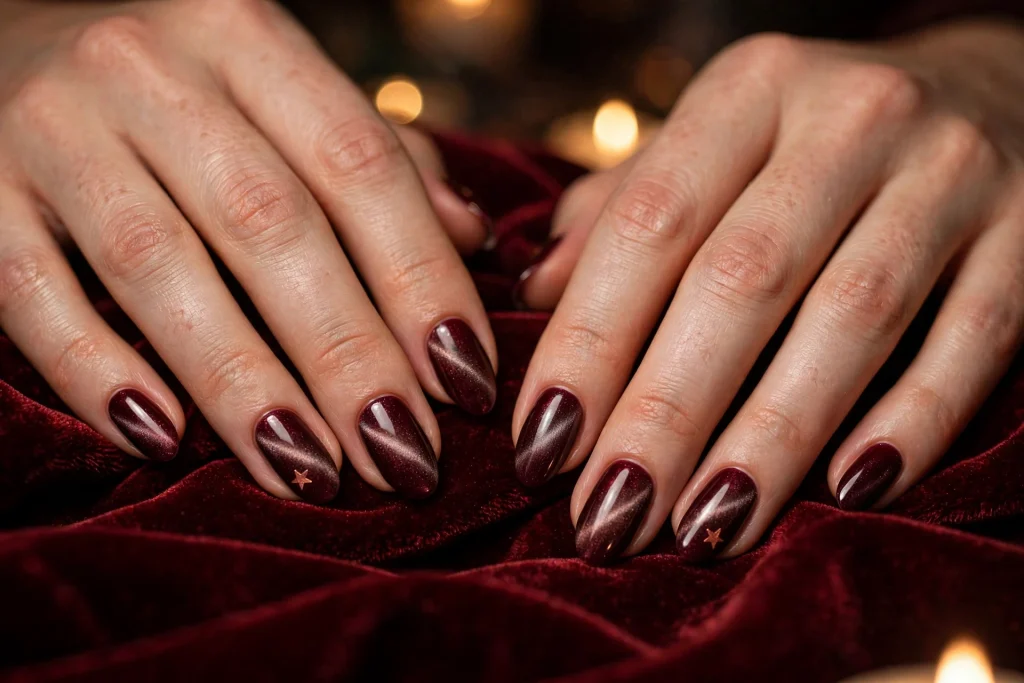
11. Burgundy Velvet with a Copper Star
A deep burgundy velvet base with one tiny copper star on the ring finger of each hand. It is the richest design in this guide, and it is the one that looks most like November itself: dark, warm, and a little bit glowing. The burgundy is deeper than a normal red, almost wine, and the copper star is warmer than gold, so the whole hand looks like candlelight. It suits medium nails best, because the velvet finish needs a little length to show its depth.
How to do it: Apply a base coat and one coat of very dark burgundy gel as a base, then a coat of burgundy cat eye gel polish. Hold the magnet just above the wet polish for 10 seconds, slowly and steadily, to pull the shimmer into a soft band. Cure under a lamp. On the ring finger, place one tiny copper star sticker or paint a small star with a fine brush and copper polish. Seal with a glossy top coat. This one needs gel and a lamp, so it is a salon job or a home gel kit, not regular polish. If the velvet band looks too sharp, hold the magnet a little further away and move it slowly for a softer glow.
How long it lasts: 2 to 3 weeks in gel. The velvet finish hides small chips well because the shimmer distracts the eye, and the dark base hides wear at the tips.
You may also like: 22 Winter Nail Color Trends That Make Winter Feel Beautiful, if you want the same velvet finish in a winter shade.
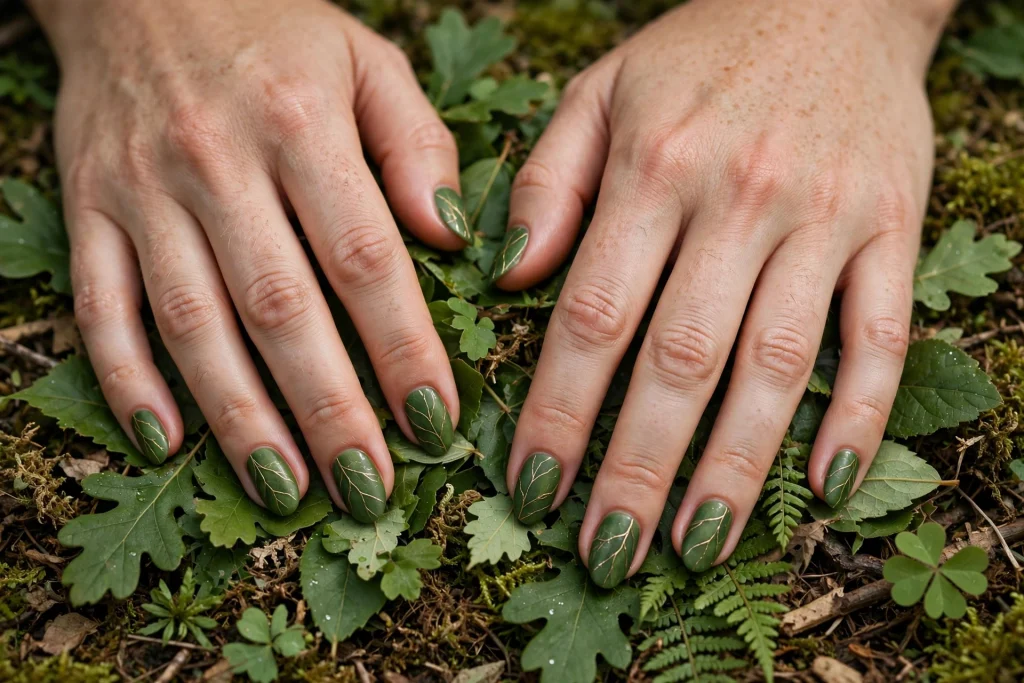
12. Forest Floor Green with Gold Veins
A deep mossy forest green base with thin gold veins running across the nails, like marble or like the veins on a leaf. It is the most unusual design in this guide, and it is the one that gets asked about most, because the gold veins look like they were drawn by hand. It suits medium nails best, because the veins need a little room to wander, and it looks wonderful with gold jewellery.
How to do it: Apply a deep forest green base, two thin coats, and let it dry fully. Use a very fine brush or a thin striping brush to draw two or three wobbly gold lines across each nail, starting at one edge and wandering to the other. Keep the lines thin and uneven: straight lines look printed, and wobbly lines look like marble. Add one tiny gold dot where two lines cross if you want extra detail. Seal with a glossy top coat. If a line goes wrong, wipe just that nail with remover and start the lines again: the green base underneath stays safe if it is fully dry.
How long it lasts: 7 to 10 days in regular polish, 2 to 3 weeks in gel. The dark base hides chips well, and the gold veins are thin enough that a small chip barely shows.
You may also like: 23 Christmas Nails 2026 That Feel Festive and Look So Good, if you want the same green family with a festive twist.
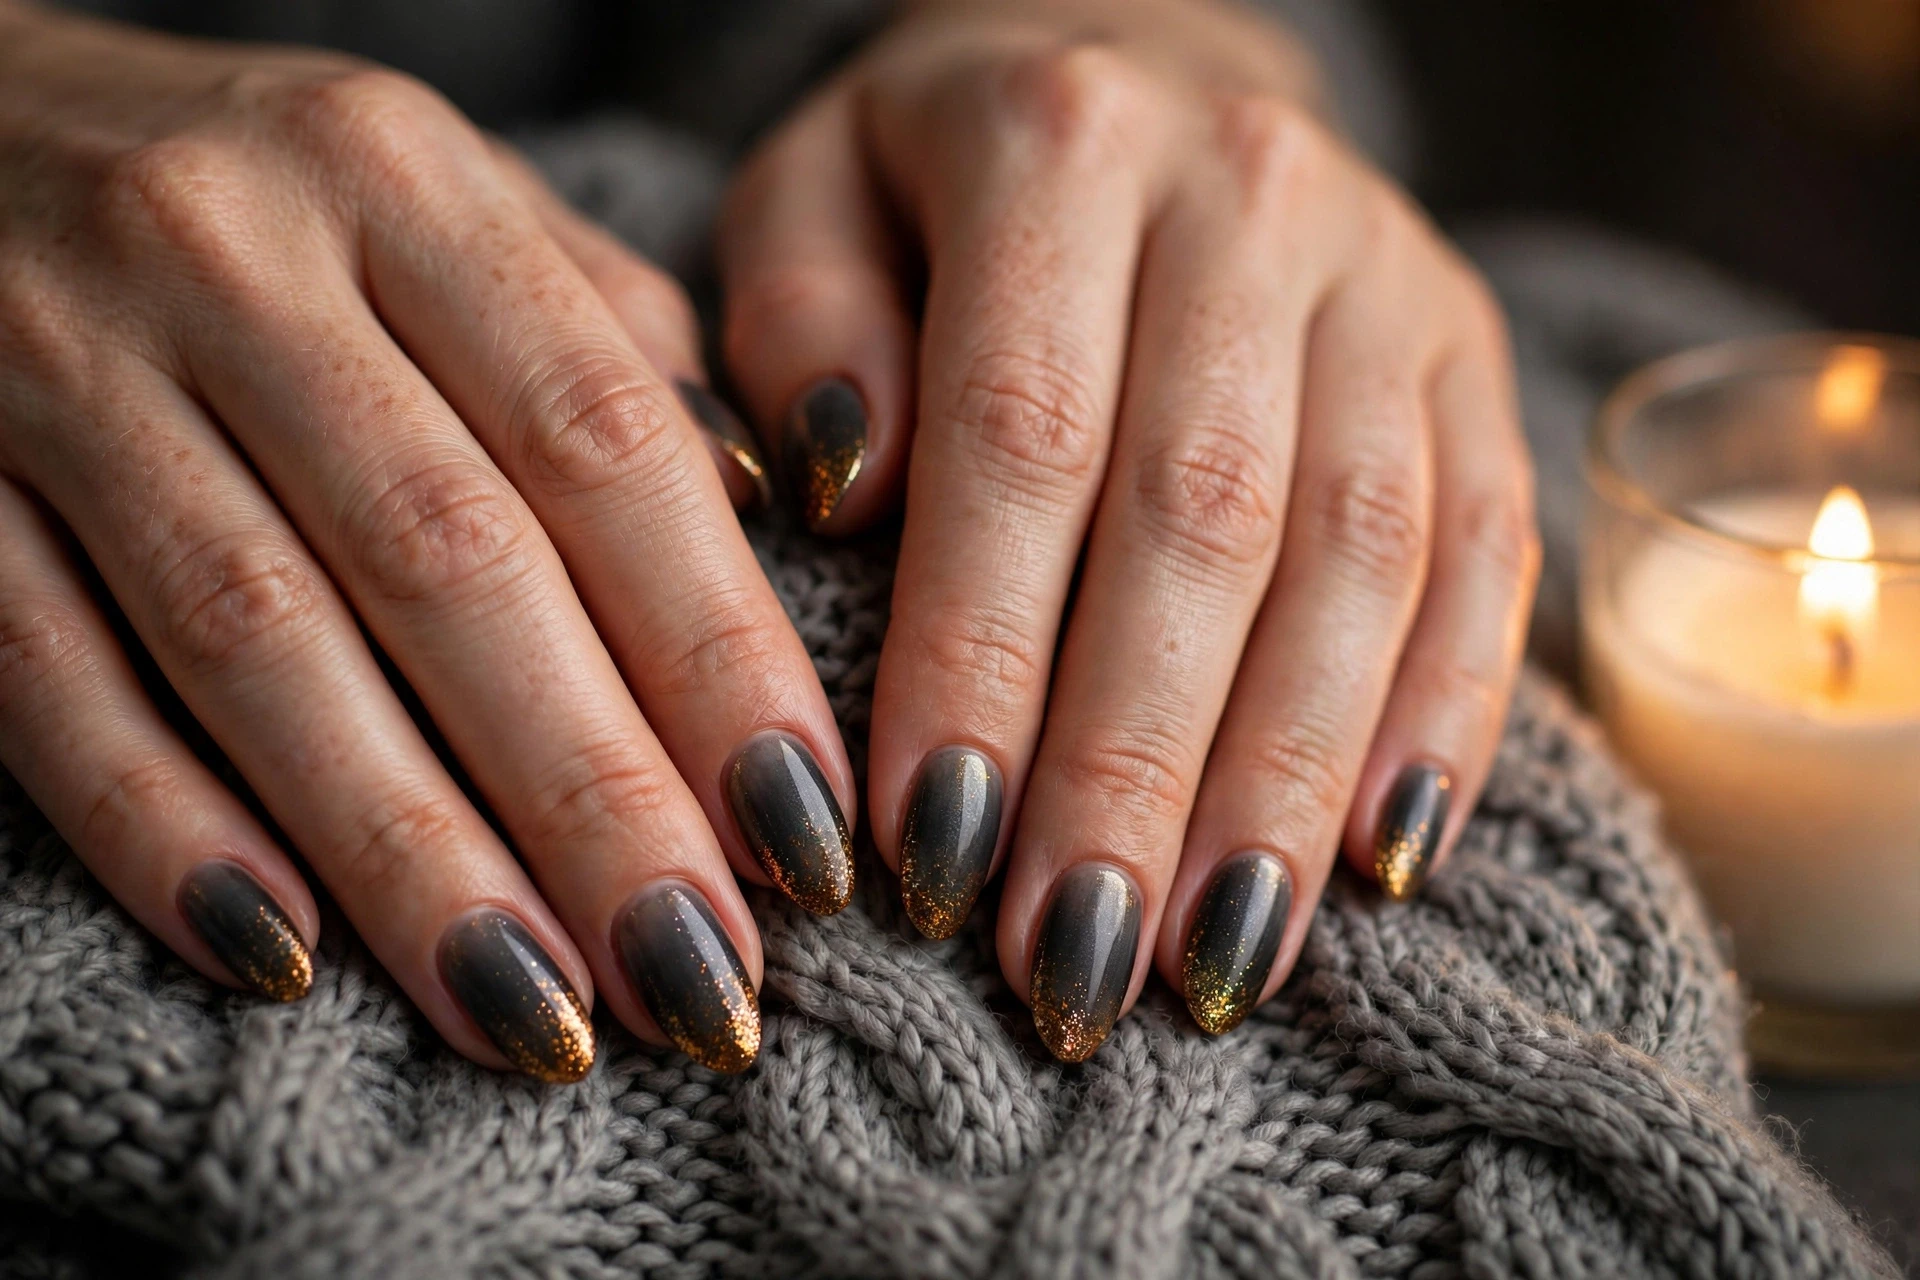
13. Smoky Charcoal with Amber Glitter Fade
A smoky charcoal grey base with amber glitter that starts dense at the tip and fades toward the cuticle. It is the moodiest design in this guide, and it is the one that looks best on a grey November day, because the amber glitter is the only warm thing in the whole hand. It suits every nail length, and it is very forgiving: glitter covers a lot of small mistakes.
How to do it: Apply a charcoal grey base, two thin coats. Take an amber glitter polish and dab it on the tip of each nail with the brush, then use a small sponge to push the glitter downward and fade it out toward the middle of the nail. Two layers of glitter gives a denser fade. Seal with two glossy top coats, because glitter is rough and needs extra sealing to feel smooth. Let each layer dry fully, or the glitter will drag.
How long it lasts: 7 to 10 days in regular polish, 2 to 3 weeks in gel. Glitter is tough and hides chips well. Removal takes longer: soak cotton pads in acetone, wrap with foil, and wait ten minutes instead of scrubbing.
You may also like: 22 January Nail Colors That Make Winter Feel So Beautiful, if you want the same dark grey feeling in a winter shade.
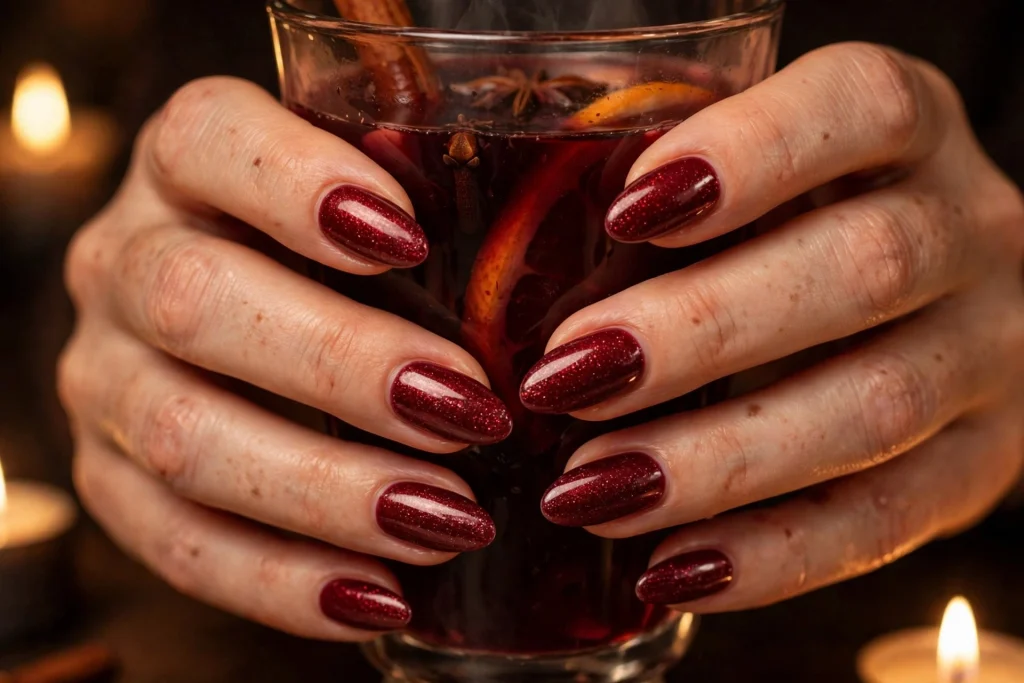
14. Mulled Wine Shimmer
A deep mulled wine red with a soft shimmer running through it, like the drink itself in a glass by the fire. It is the warmest dark in this guide, and it is the one that looks best with a red sweater or a dark coat. The shimmer is fine and even, so it glows rather than sparkles, and it makes the whole hand look warm in cold light.
How to do it: Apply a base coat, then two thin coats of mulled wine shimmer polish, letting each coat dry fully before the next. Dark colours show every streak, so use thin coats and a steady hand, and do not flood the cuticle. Seal with a glossy top coat. If you get wine on the skin, clean it up right away with a small brush dipped in remover, because dark red stains the skin if it sits. The shimmer polish is more forgiving than a plain dark colour, because the sparkle hides small streaks in the base.
How long it lasts: 7 to 10 days in regular polish, 2 to 3 weeks in gel. Dark colours hide chips well, and the shimmer finish keeps the wine looking rich for the whole week.
You may also like: 22 December Nails That Feel Festive and Look So Beautiful, if you want the same deep red feeling with a December twist.
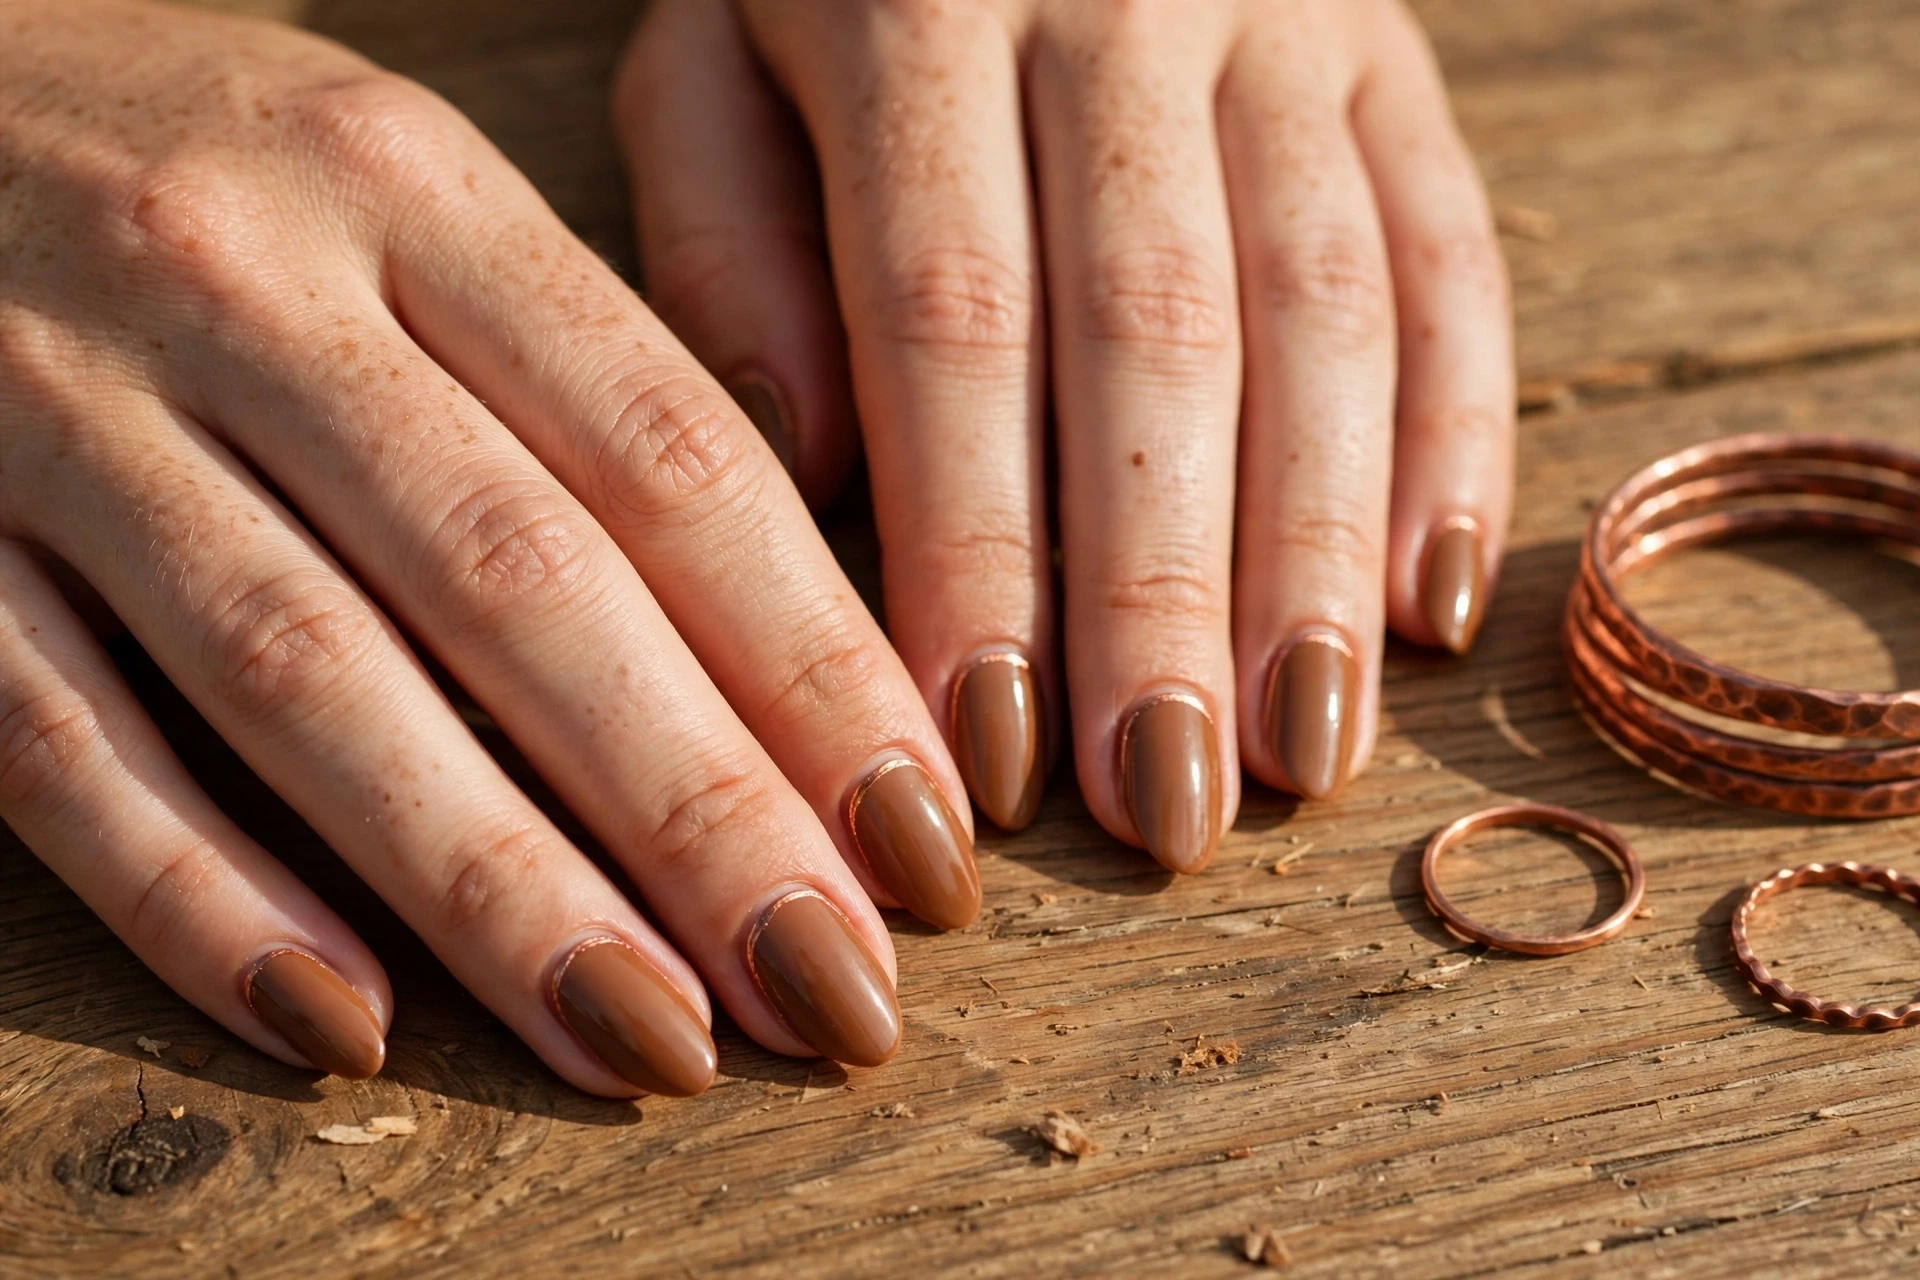
15. Toasted Almond with a Copper Line
A warm toasted almond brown base with a thin copper line along the cuticle of each nail. It is the quietest dark in this group, and it is the one that works best for the office, because the brown is soft and the copper line is the only detail. It suits short nails well, and it is the design that looks most like a piece of jewellery rather than a manicure.
How to do it: Apply a warm toasted almond base, two thin coats, and let it dry fully. Use a thin striping brush to paint a fine copper line along the cuticle of each nail. Keep the line very thin: a thick line looks heavy, and a fine line looks like jewellery. Clean up the line with a small brush dipped in remover, then seal with a glossy top coat. If your hand shakes, rest your painting hand on the table and move the nail, not the brush.
How long it lasts: 7 to 10 days in regular polish, 2 to 3 weeks in gel. The warm brown base hides chips well, and the copper line is thin enough that a small chip barely shows.
You may also like: Minimal Jewelry Ideas That Make You Look Put Together Without Trying, if you want jewellery that pairs with a copper accent.
Group 4: Frost Arrives
These four are for the mornings when the grass is white and the windows are misted. Snow-dusted pine, frosted glass, silver ombre, and frozen berry. They are the coldest designs in this guide, and they are the ones that carry you from late November into December. If your fall nails have been all warm browns and oranges, this is the group where winter nails start to take over.
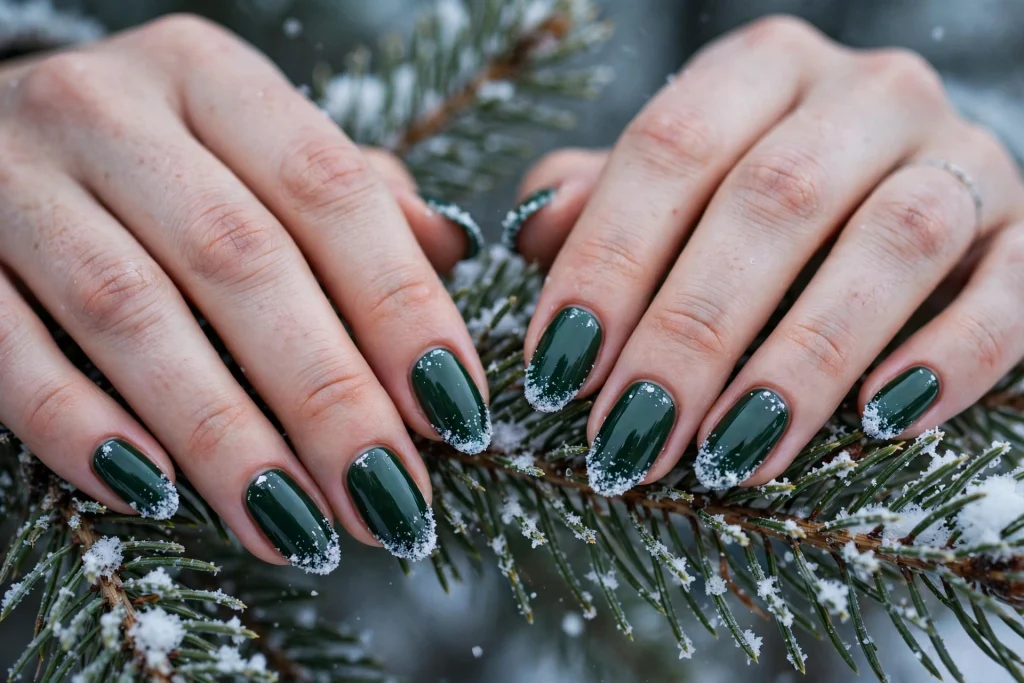
16. Snow-Dusted Pine Tips
A deep pine green base on the bottom half of the nail with white speckles dusted over the tips, like snow sitting on a pine branch. It is the most seasonal design in this group, and it is the one that looks best in a photo, because the white speckles catch the light. It suits medium nails best, because the two zones need a little length to show.
How to do it: Apply a deep pine green base, two thin coats, and let it dry fully. Use a small sponge to dab white polish lightly onto the tips, in short dabs, so the white sits as speckles rather than a solid band. Two light layers of dabbing gives a dusted look; one heavy layer gives a solid tip, which is not what you want here. Add a few tiny white dots with a dotting tool if you want more snow. Seal with a glossy top coat. If the speckles look too heavy, wipe the sponge almost dry before you dab: less polish on the sponge means a lighter dusting.
How long it lasts: 7 to 10 days in regular polish, 2 to 3 weeks in gel. The dark base hides chips well, and the white speckles are light enough that wear at the tip barely shows.
You may also like: 23 Christmas Nails 2026 That Feel Festive and Look So Good, if you want the same pine green feeling with a festive twist.
17. Frosted Window Effect
A pale grey-blue base with thin white veins running across the nails, like frost spreading on a windowpane. It is the most unusual design in this group, and it is the one that looks most like winter itself, because the veins are random and no two nails look the same. It suits short nails well, because the pattern is delicate and does not need much room.
How to do it: Apply a pale grey-blue base, two thin coats, and let it dry fully. Use a very fine brush to draw thin white lines across each nail, branching like frost: one main line, then two or three smaller lines branching off it. Keep the lines thin and uneven, and do not plan them: random lines look like frost, and planned lines look like a drawing. Add a tiny white dot where two lines meet if you want extra detail. Seal with a glossy top coat. If a line goes wrong, wipe just that nail with remover and start the lines again.
How long it lasts: 7 to 10 days in regular polish, 2 to 3 weeks in gel. The pale base shows chips more than dark colours, so refresh the top coat every two days and wear gloves for dishes.
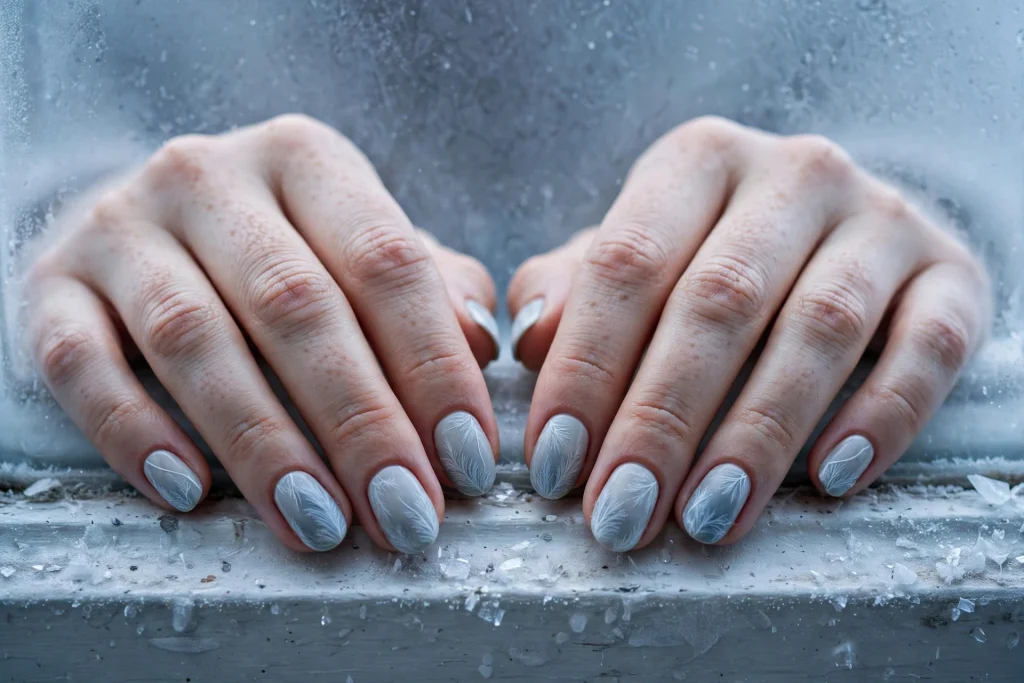
You may also like: 22 Winter Nail Color Trends That Make Winter Feel Beautiful, if you want the same frosty feeling in a winter shade.
18. Silver Frost Ombre
A soft grey base that fades into silver glitter at the tips, like frost creeping up from the edge of a window. It is the coldest, most graphic look in this group, and it is stunning with a dark coat or silver jewellery. It is also the most forgiving ombre in this guide, because the glitter hides any unevenness in the blend.
How to do it: Apply a soft grey base, two thin coats. While the second coat is still slightly wet, dab silver glitter polish onto a small makeup sponge and press it onto the tips, working downward in short dabs until the glitter fades into the grey in the middle. Two layers of sponge work gives a smoother fade. Seal with two glossy top coats, because glitter is rough and needs extra sealing to feel smooth. Let each layer dry fully, or the glitter will drag.
How long it lasts: 7 to 10 days in regular polish, 2 to 3 weeks in gel. Glitter is tough and hides chips well. Removal takes longer: soak cotton pads in acetone, wrap with foil, and wait ten minutes instead of scrubbing.
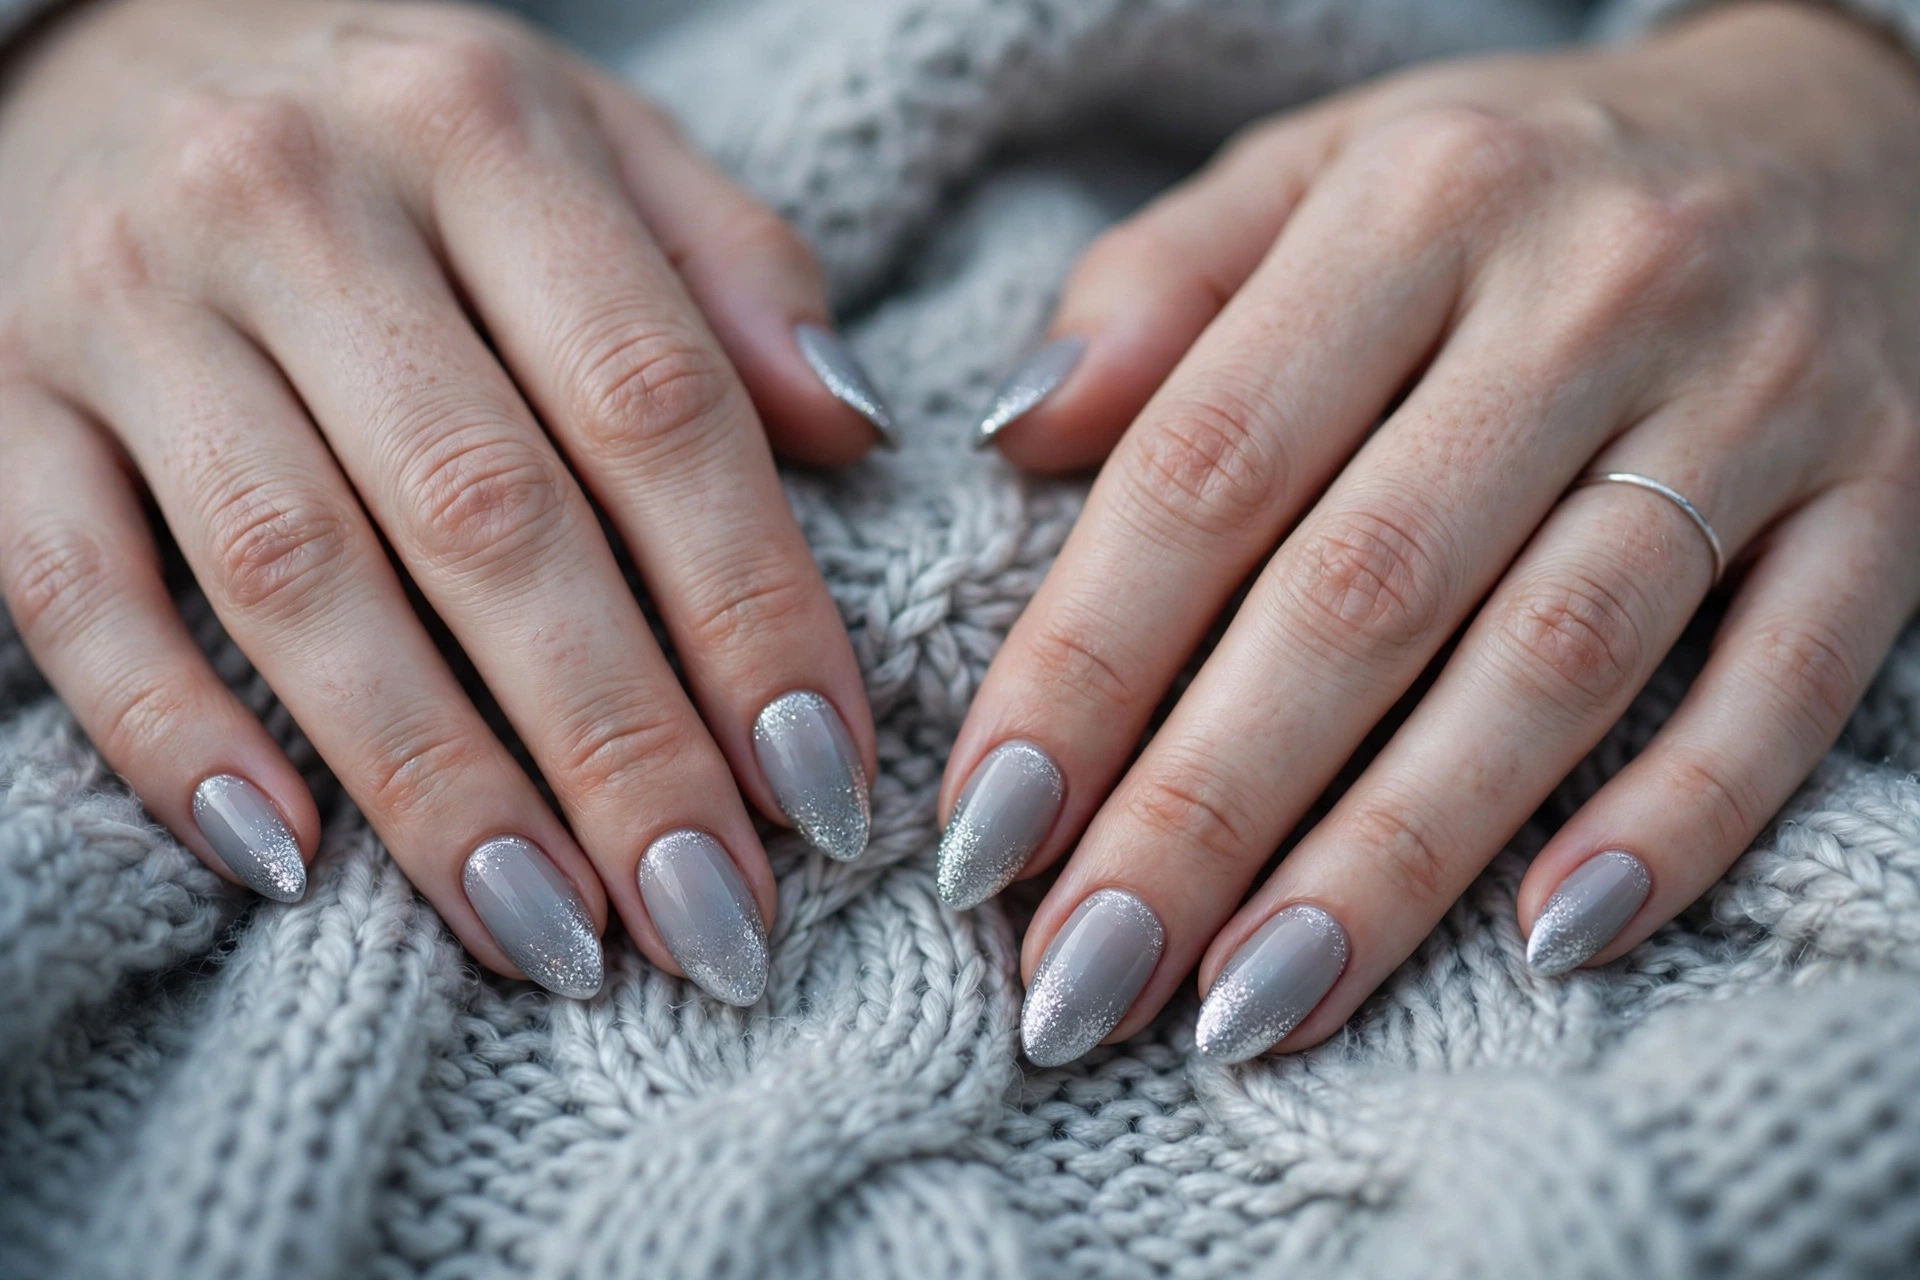
You may also like: 22 January Nail Colors That Make Winter Feel So Beautiful, if you want the same silver frost feeling in a January shade.
19. Frozen Berry with a Silver Line
A soft berry lavender base with a thin silver line across the middle of each nail. It is the prettiest design in this group, and it is the one that looks best with a pale coat or a silver scarf, because the berry is soft and the silver line is the only sharp thing in the whole hand. It suits short nails well, and it is the design that works best if you want winter nails that do not look cold.
How to do it: Apply a soft berry lavender base, two thin coats, and let it dry fully. Use a thin striping brush to paint a fine silver line across the middle of each nail, straight and level. Keep the line very thin: a thick line looks heavy, and a fine line looks like jewellery. Clean up the line with a small brush dipped in remover, then seal with a glossy top coat. If your hand shakes, rest your painting hand on the table and move the nail, not the brush.
How long it lasts: 7 to 10 days in regular polish, 2 to 3 weeks in gel. The soft berry base hides chips better than a pale colour, and the silver line is thin enough that a small chip barely shows.
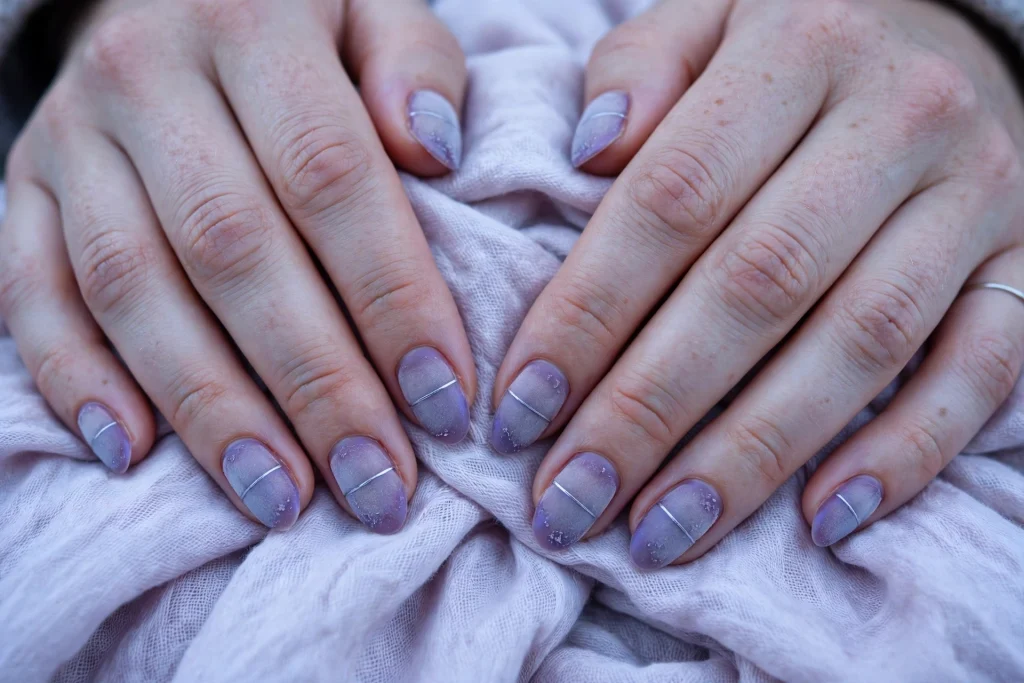
You may also like: Medium Gold Hoops with Casual Outfits That Always Look Effortless, if you want jewellery that pairs with a soft berry manicure.
Group 5: The Finishing Touches
These five are the details that finish the season. Rosehip and gold, a bronze leaf on olive, a cream moon on acorn brown, falling leaves, and a November sunset. They are the most varied designs in this guide, and they are the ones to pick when you have already tried the warm colours and the dark colours and you want one more idea before December. Each one is small, simple, and easy to wear every day.
20. Rosehip and Gold Foil
A dusty rosehip pink base with gold foil pressed along the cuticle of each nail, like the last rosehips of autumn with the low sun on them. It is the softest design in this group, and it is the one that looks best with a blush coat or a cream jumper, because the pink is dusty rather than bright. It suits short nails well, and it is the design that works best if you want fall nails that feel gentle rather than bold.
How to do it: Apply a dusty rosehip base, two thin coats, and let it dry fully. While the top coat is still slightly wet, use tweezers to press tiny pieces of gold foil along the cuticle of each nail, in a thin uneven line. Press the foil down gently so it sits flat, then seal with two glossy top coats. The foil needs extra sealing or it will lift at the edges. Keep the foil line thin and close to the cuticle: a wide band of foil looks heavy, and a fine line looks like jewellery.
How long it lasts: 7 to 10 days in regular polish, 2 to 3 weeks in gel. The dusty pink base hides regrowth well, and the foil is at the cuticle where wear shows last, so it stays looking neat for the whole week.
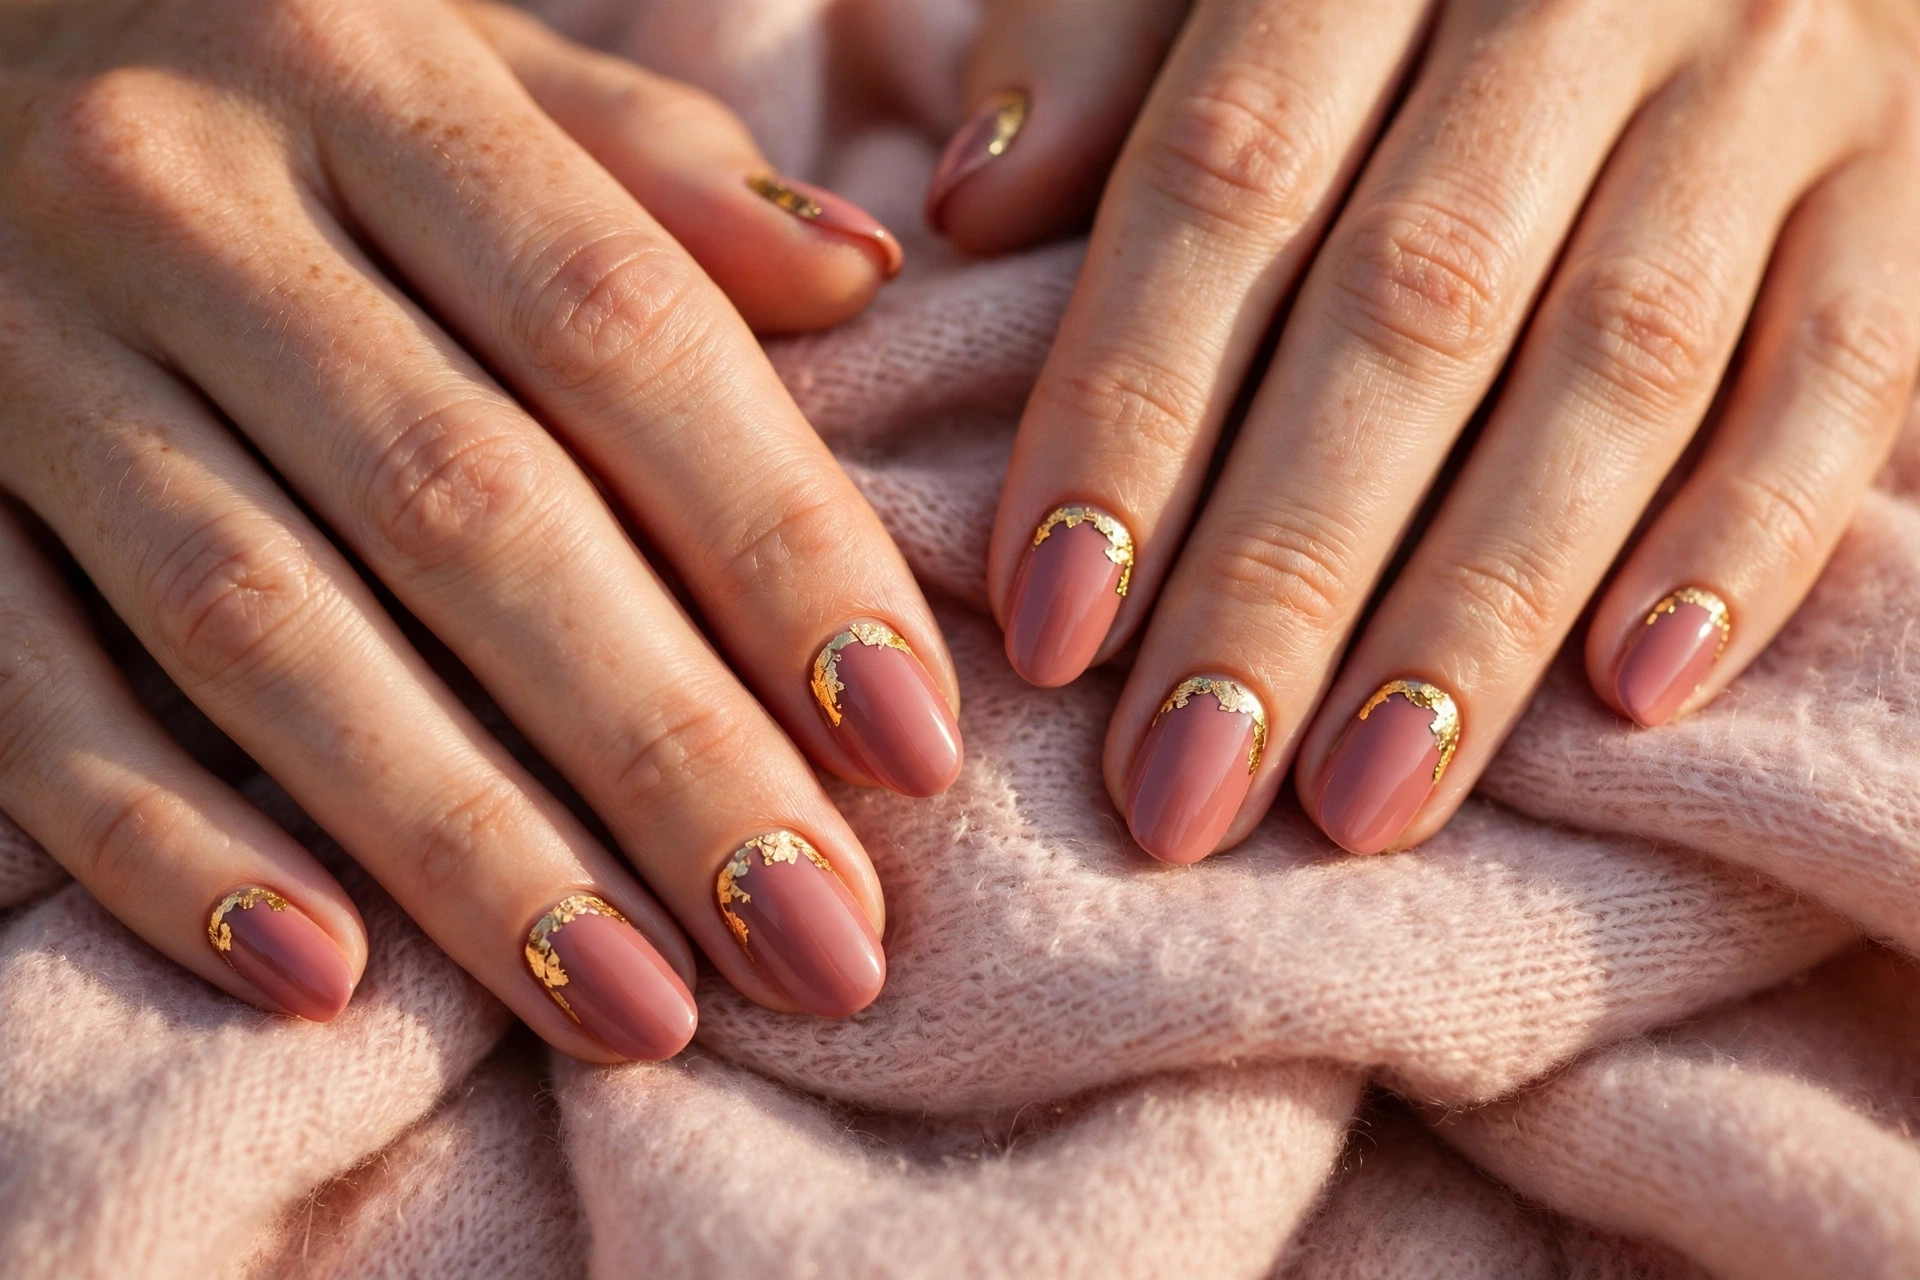
You may also like: 22 December Nails That Feel Festive and Look So Beautiful, if you want the same soft pink feeling with a December twist.
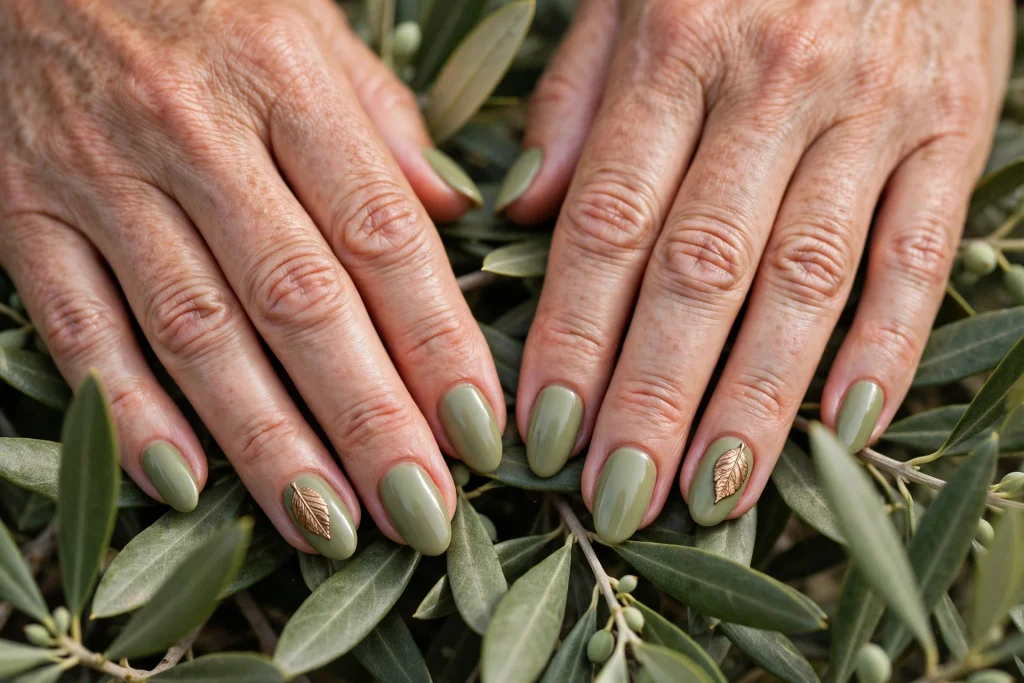
21. Bronzed Leaf Accent on Olive
A soft olive green base with a single bronze leaf on the ring finger of each hand. It is the most autumn design in this group, and it is the one that looks most like the season itself, because olive and bronze are the colours of late autumn leaves. It suits medium nails best, because the leaf needs a little room, but it works on short nails too if you keep the leaf small.
How to do it: Apply a soft olive green base, two thin coats, and let it dry fully. On the ring finger of each hand, use a fine brush to paint one small leaf in bronze polish, with a thin darker line down the middle for the vein. Keep the leaf small, about a third of the nail, and keep it near the centre so it does not crowd the tip or the cuticle. Seal with a glossy top coat. If painting a leaf feels hard, try a tiny leaf sticker in bronze first: the shape is what matters, not how you got it there.
How long it lasts: 7 to 10 days in regular polish, 2 to 3 weeks in gel. The olive base is forgiving, and the single leaf is small enough that a tiny chip barely shows.
You may also like: 23 Christmas Nails 2026 That Feel Festive and Look So Good, if you want the same green family with a festive twist.
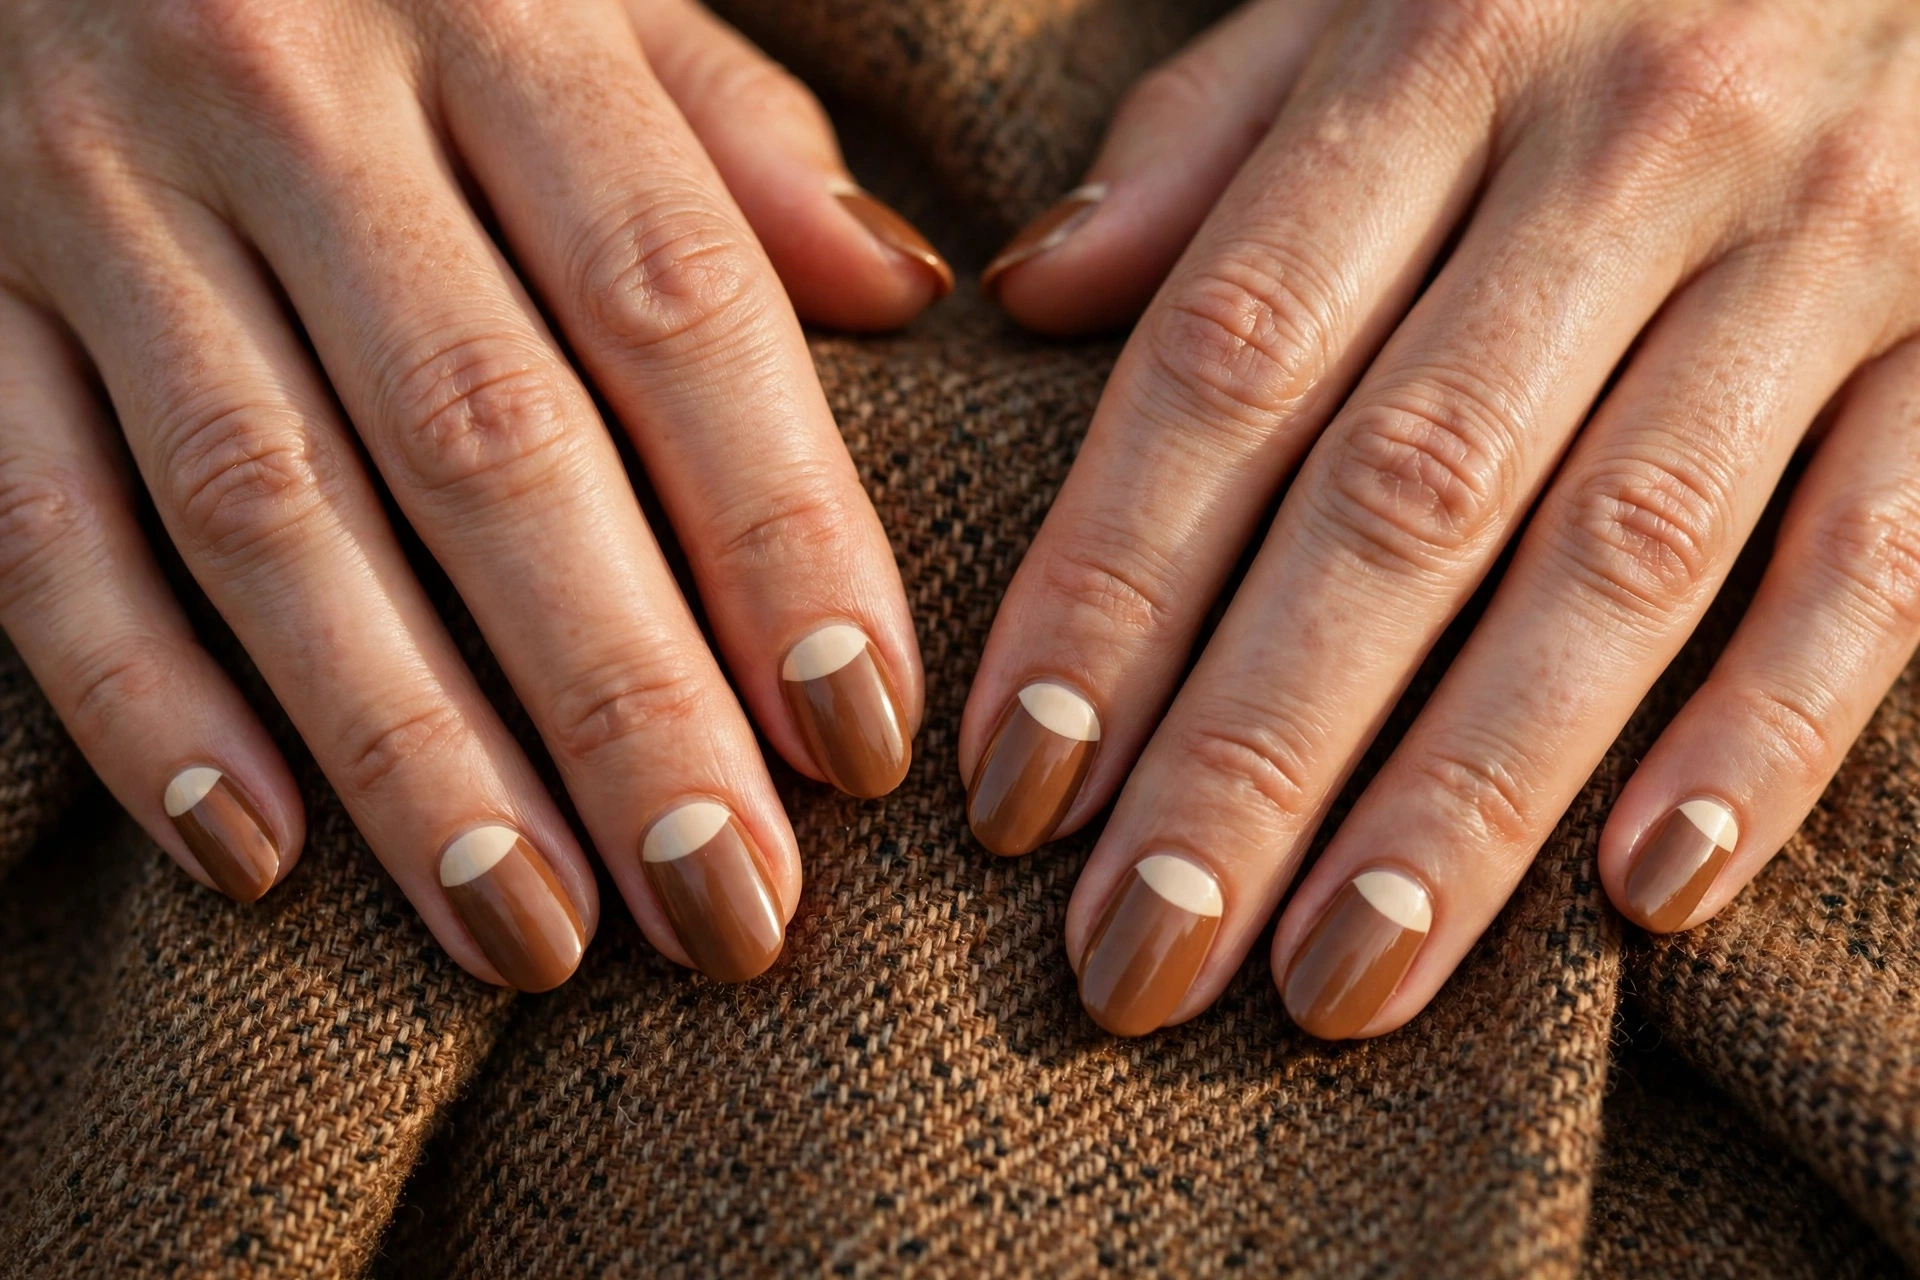
22. Acorn Brown with a Cream Moon
A warm acorn brown base with a cream half moon at the cuticle of each nail. It is the most classic design in this group, and it is the one that looks best with a brown coat or a tweed jacket, because the colours are warm and the shape is neat. It suits short nails well, because the half moon is small and the brown base keeps the hand looking clean.
How to do it: Apply a warm acorn brown base, two thin coats, and let it dry fully. Use a small round sticker or a hole reinforcement sticker as a guide at the cuticle, and paint cream polish inside the guide to make a neat half moon. Peel the guide off while the cream is still slightly wet, then clean up the edge with a small brush dipped in remover. Seal with a glossy top coat. If you do not have stickers, a steady hand with a fine brush works too, but the sticker gives a much cleaner curve.
How long it lasts: 7 to 10 days in regular polish, 2 to 3 weeks in gel. The brown base hides chips well, and the cream moon is at the cuticle where wear shows last, so it stays looking neat for the whole week.
You may also like: 22 Medium Length Hairstyles for Thick Hair That Work So Well, if you want a warm autumn look to match these nails.
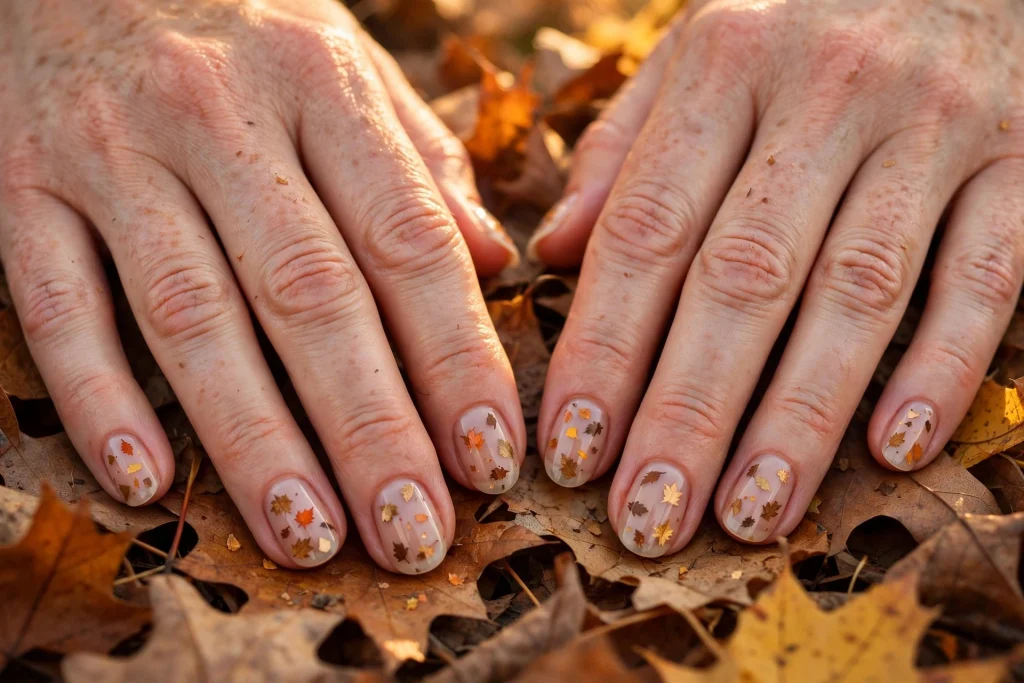
23. Falling Leaves Confetti
A sheer nude base with tiny autumn leaf confetti scattered across the nails, in orange, gold, and brown. It is the most playful design in this guide, and it is the one that looks most like November itself, because the leaves are small and scattered and no two nails look the same. It suits every nail length, and it is very forgiving: confetti covers a lot of small mistakes.
How to do it: Apply a sheer nude base, two thin coats, and let it dry fully. While the top coat is still slightly wet, use tweezers to place tiny leaf confetti on each nail, three or four leaves per nail in a loose scatter. Keep the leaves small and do not put more than four on any one nail. Seal with two glossy top coats so the confetti sits flat and smooth. If a leaf lifts at the edge, add another thin layer of top coat just over the leaf.
How long it lasts: 7 to 10 days in regular polish, 2 to 3 weeks in gel. The sheer nude base hides regrowth well, and the confetti is small enough that a tiny chip barely shows.
You may also like: Trendy April Nails That Feel Fresh and Clean, if you want the same confetti idea in a spring shade.
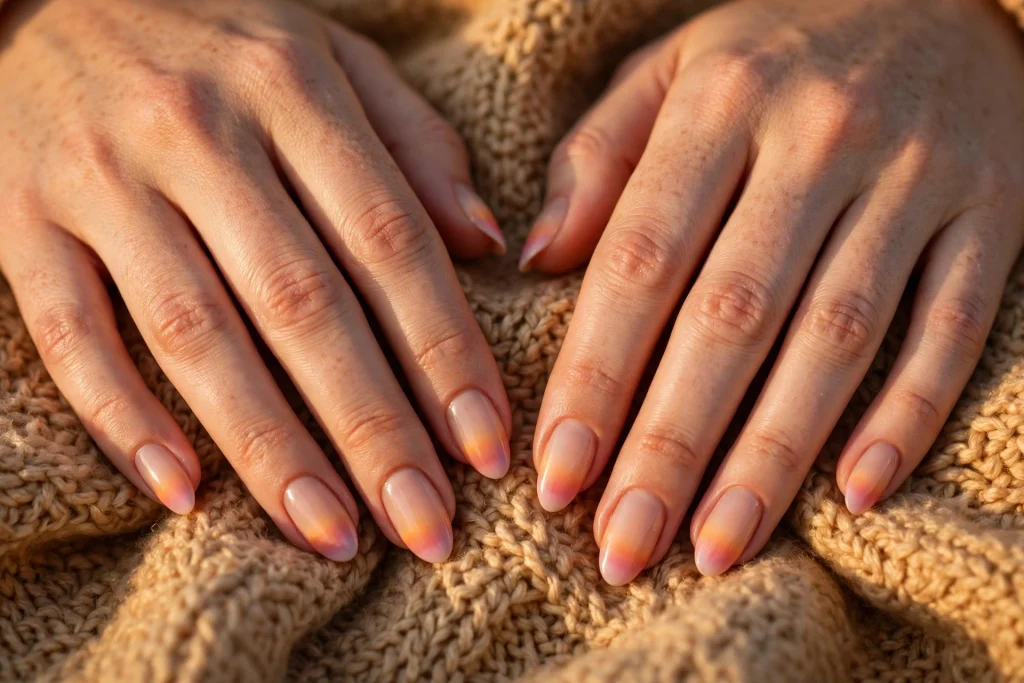
24. November Sunset Tips
A sheer nude base with sunset gradient tips that run from soft orange at the edge into pale pink, like the sky in late November. It is the last design in this guide, and it is the one that feels most like the end of autumn, because the colours are warm and the fade is soft. It suits medium nails best, because the gradient needs a little length to show, but it works on short nails too if you keep the gradient gentle.
How to do it: Apply a sheer nude base, two thin coats, and let it dry fully. Use a small makeup sponge to dab soft orange polish onto the tips, then dab pale pink just below the orange, working in short dabs until the two colours blend into each other and into the nude base. Two light layers of sponge work gives a smoother gradient. Clean up the cuticles with a small brush dipped in remover, then seal with a glossy top coat. If the gradient looks too sharp, add one more light layer of sponge work over the join: a soft blend is what makes this design look like a sunset.
How long it lasts: 7 to 10 days in regular polish, 2 to 3 weeks in gel. The sheer nude base hides regrowth well, and the gradient distracts the eye from the grow-out line.
You may also like: 22 Winter Nail Color Trends That Make Winter Feel Beautiful, if you want the same gradient idea in cooler winter shades.
The 1-2-3 Fall to Winter Method
If you remember nothing else from this guide, remember this: one prep, two thin coats, three days of care. That is the whole method.
1. One prep, done properly. Wash your hands, push the cuticles back, shape the nails, and wipe every nail with alcohol or remover so there is no oil left. A clean, dry nail is the difference between a manicure that lasts ten days and one that chips in two. Do not skip the base coat, and do not paint on damp nails. In November, rub a little hand cream in after the prep but before you paint, and wait for it to soak in: dry hands are the reason so many fall winter nails start lifting at the edges.
2. Two thin coats, never one thick one. Two thin coats of colour dry faster, look smoother, and last longer than one thick coat. Thick coats bubble, take forever to dry, and peel off in sheets. Let the first coat dry fully before the second, and wrap the tip of each nail with colour and top coat so the free edge is sealed. This matters more as the weather turns cold, because thick coats stay soft longer in a cold room and smudge easily.
3. Three days of care after painting. The first three days decide how long the manicure lasts. Wear gloves for dishes and cleaning, rub cuticle oil in every night, and do not use your nails as tools to open tape, cans, or packaging. Refresh the top coat on day two or three, and the manicure will look fresh for a full week or more. The november nails you paint in mid November need the same care as the winter nails you paint in December: the polish does not know what month it is, but your hands do, and cold dry air is harder on polish than warm air.
Before and after, the difference is plain. Before: no prep, one thick coat, no top coat, and the manicure chips by day two. After: a proper prep, two thin coats, a sealed tip, and gloves for dishes, and the same polish lasts until early December.
At a Glance
| Design | Difficulty | Time | Best for |
|---|---|---|---|
| 1. Burnt Orange Leaf Print | Medium | 35 minutes | Autumn outfits, photos |
| 2. Maple Brown to Caramel Fade | Medium | 40 minutes | Medium nails, warm jumpers |
| 3. Pumpkin Spice Matte with a Gold Leaf | Easy | 30 minutes | Short nails, cozy days |
| 4. Cinnamon Swirl Accent | Easy | 30 minutes | Coffee mornings, casual days |
| 5. Harvest Gold Leaf Tips | Medium | 35 minutes | Gold jewellery, evening outfits |
| 6. Cable Knit Texture Nails | Medium | 45 minutes | Knitwear, cozy days |
| 7. Houndstooth in Camel and Cream | Medium | 35 minutes | Tailored coats, smart outfits |
| 8. Hot Cocoa with Marshmallow Dots | Easy | 25 minutes | Every day, first timers |
| 9. Camel and Cream Colour Block | Medium | 35 minutes | Clean looks, fashion photos |
| 10. Latte Art Swirl | Easy | 30 minutes | Coffee lovers, photos |
| 11. Burgundy Velvet with a Copper Star | Hard | 50 minutes | Candlelit dinners, parties |
| 12. Forest Floor Green with Gold Veins | Medium | 40 minutes | Gold jewellery, evening outfits |
| 13. Smoky Charcoal with Amber Glitter Fade | Easy | 30 minutes | Grey days, every day |
| 14. Mulled Wine Shimmer | Easy | 20 minutes | Red sweaters, dark coats |
| 15. Toasted Almond with a Copper Line | Medium | 35 minutes | Work, short nails |
| 16. Snow-Dusted Pine Tips | Medium | 35 minutes | Photos, winter nights |
| 17. Frosted Window Effect | Medium | 40 minutes | Short nails, quiet days |
| 18. Silver Frost Ombre | Easy | 35 minutes | Silver jewellery, dark coats |
| 19. Frozen Berry with a Silver Line | Medium | 35 minutes | Pale coats, silver scarves |
| 20. Rosehip and Gold Foil | Medium | 40 minutes | Blush coats, gentle days |
| 21. Bronzed Leaf Accent on Olive | Easy | 30 minutes | Autumn walks, photos |
| 22. Acorn Brown with a Cream Moon | Medium | 35 minutes | Tweed jackets, short nails |
| 23. Falling Leaves Confetti | Easy | 30 minutes | Every day, first timers |
| 24. November Sunset Tips | Medium | 40 minutes | Medium nails, golden hour photos |
Do This Not That
| Do this | Not that |
|---|---|
| Prep the nails properly: wash, push cuticles back, wipe with alcohol | Paint on oily or damp nails, which makes polish lift in a day |
| Use two thin coats and let each one dry fully | Use one thick coat, which bubbles and peels off in sheets |
| Seal the free edge with colour and top coat | Leave the tip unsealed, which is where chips start |
| Put the design on one or two accent nails | Put a different picture on every nail, which looks busy |
| Wear gloves for dishes and cleaning, especially in cold weather | Use your nails as tools to open tape, cans, or packaging |
| Refresh the top coat every two days | Wait until the manicure chips, then try to fix it |
| Rub cuticle oil in every night in cold dry weather | Let the cuticles dry out, which lifts the polish at the edges |
| Book a gel set in mid November for early December parties | Book a gel set in early November and expect it to last until Christmas |
| Remove glitter with an acetone soak and foil | Peel or scrape glitter off, which takes layers of nail with it |
| Keep the design small and the base calm | Make the picture as big as the nail, which looks crowded |
| Practice a new design on one nail first | Try a new design on all ten nails the night before a party |
Your Fall to Winter Manicure Weekend Plan
Friday evening: prep and paint. Wash your hands, push the cuticles back, shape the nails, and wipe each one clean. Paint your design in the evening, when you have time and you are not rushing. Two thin coats, a glossy top coat, and then leave your hands alone for an hour. No dishes, no wrapping, no typing with wet nails. Put on a film, make a cup of tea, and let the polish harden properly. This is also the right time for november nails: a gel set painted in mid November still looks good for early December parties, so you can paint once and enjoy it for two weeks.
Saturday morning: check and fix. Look at the manicure in daylight. If a nail smudged, fix just that one nail instead of starting over. Add a second layer of top coat to the whole hand, and rub cuticle oil into every nail. This is the day to take your photos, because the manicure is at its freshest and the light is good. November light is low and golden in the morning, which makes fall nails look their best in photos.
Saturday evening: the party test. Wear gloves for any cooking or cleaning, and do not use your nails as tools. If a tip chips, dab a little colour on the chip and seal it with top coat. A small fix takes two minutes and nobody will notice. If you painted a gel set, you do not need to do anything at all: just enjoy it.
Sunday: rest and care. Rub cuticle oil in again, and refresh the top coat if the shine has dulled. If your manicure is regular polish, this is the day it starts to show wear, so a fresh top coat buys you two more days. If it is gel, it should still look perfect, and it will carry you into December if you keep the gloves on for dishes and the oil on at night.
Take It Further
If you liked this guide, these articles from Supliice pair with it nicely. A fresh manicure deserves an outfit that matches it, and the right jewellery finishes the look.
- 23 Christmas Nails 2026 That Feel Festive and Look So Good
- 22 December Nails That Feel Festive and Look So Beautiful
- 22 Winter Nail Color Trends That Make Winter Feel Beautiful
- 22 January Nail Colors That Make Winter Feel So Beautiful
- 22 Medium Length Hairstyles for Thick Hair That Work So Well
- Summer Work Outfits That Look Clean, Professional, and Easy to Wear
- Spring Brunch Outfit Ideas That Actually Make Getting Ready Easy
- Minimal Jewelry Ideas That Make You Look Put Together Without Trying
Stylist’s Cheat Sheet
Keep this on your phone for your appointment or your at-home manicure.
- The words to use at the salon: “I want design number [X] from the fall to winter list, [colour] base, [detail] on the accent nails only, glossy top coat.” Then show the photo.
- The finish to pick: Gel if you want 2 to 3 weeks and one set for late November and early December. Regular polish if you want to change colour mid-month. Press-ons if you are short on time.
- The booking window: Mid November for a gel set that covers late November and early December. Book 2 to 3 weeks ahead for evenings and Saturdays in November, because autumn is the busiest season for nail salons after the summer rush.
- The prep rule: Wash, push cuticles back, shape, wipe with alcohol, base coat. Never paint on oily or damp nails.
- The coat rule: Two thin coats, never one thick one. Let each coat dry fully. Seal the free edge with colour and top coat.
- The design rule: One star only. One colour, one finish, or one small picture. The rest of the hand stays calm.
- The shape to ask for: Short almond or soft square. Both are the most popular shapes for fall winter nails, and both suit short nails.
- The care rule: Gloves for dishes and cleaning, cuticle oil every night in cold dry weather, top coat refresh every two days, and never use your nails as tools.
- The removal rule: Soak glitter and gel off with acetone and foil. Never peel or scrape, or you will take layers of nail with it.
- The timing rule, said plainly: This is the November moment for fall winter nails. Fall nails peak in October and November, November nails are at their highest right now, and winter nails rise through November into January. Interest falls sharply after November and December, so if you love a design here, book it or paint it this week, while the season is still here.
Questions People Ask
Burnt orange, maple brown, burgundy, forest green, and deep plum are the colours people ask for most in autumn, with gold and copper as the favourite accents. If you want one safe choice, pick a warm brown or a deep burgundy: both suit every skin tone and go with every autumn outfit. If you want something quieter, camel, taupe, and cream all look clean and warm. Pick one colour story and one detail, and let the rest of the hand stay calm.
The best time is mid November, when fall nails are at their peak and the colours still match the season outside. Searches for fall to winter nails peak in the same November window, so the timing works for both. A gel set done in mid November still looks fresh in early December, so it covers both the autumn weeks and the first December parties. If you use regular polish, do your nails two or three days before your main event, since it chips faster. Book two to three weeks ahead for evenings and Saturdays in November, because that is the busiest time of the year at most salons.
Start with proper prep: clean, dry nails, a base coat, and two thin coats of colour instead of one thick one. Seal the free edge with colour and top coat, because that is where chips start. Cold dry air is harder on polish than warm air, so rub cuticle oil in every night and wear gloves for dishes and cleaning. Refresh the top coat every two days, and do not use your nails as tools to open tape, cans, or packaging. A little care buys you three or four extra days, even in November. For more on keeping nails healthy in cold weather, see the American Academy of Dermatology’s nail care tips.
Yes, and most of them carry over beautifully. Deep burgundy, forest green, charcoal, and warm browns all work through December and January, because they are dark winter colours as well as autumn colours. The designs that feel most like autumn are the bright oranges and the leaf pictures, so if you want a design that lasts into winter, pick one of the darker shades from this guide and pair it with a frosty accent, like a silver line or a snow speckle. That way the manicure shifts with the season instead of looking stuck in October.
A Last Word from Neuman
November is the month your hands are in every photo, from the autumn walks to the first fireside evenings, so give them a little attention and they will pay you back all month. Pick one design from this list, the one that made you smile when you read it, and book it or paint it this weekend. Do the prep properly, use two thin coats, and wear the gloves for the dishes. That is all it takes. Your nails do not need to be perfect. The best fall winter nails are the ones you actually wear and enjoy, not the ones that look perfect in a photo and chip by lunch. They just need to be yours, and done with a little care, and they will look good in every single photo, from the first fallen leaf to the first frost on the window.
And do not wait too long. These fall nail ideas are at their best right now, in the November peak, and interest falls sharply once December is underway. The season is short, and that is what makes it special. Paint the design you love this week, while the leaves are still falling.