Too Long; Didn’t Read
Christmas nails 2026 are about three things: a good red, a little sparkle, and prep that actually holds. The biggest trends this year are velvet and cat eye finishes, cranberry and oxblood reds instead of bright fire-engine red, deep forest green, and modern French tips with a festive twist. A gel set done between December 18 and 23 usually still looks fresh on New Year’s Eve, and a regular polish set lasts 7 to 10 days with a good top coat. Pick one star for your manicure, a colour, a finish, or one small design, and keep the rest simple. Below are 23 christmas nails 2026 designs, grouped so you can find your match fast, with honest notes on difficulty, time, and how long each one lasts.
What's Inside This Guide
ToggleThe Night My Sister Painted Candy Canes at Midnight
My sister decided to paint her nails the night before our family Christmas dinner. She had seen a photo of candy cane stripes online and figured it would take twenty minutes. She was wrong in the way only a first timer can be wrong. The white stripes went on too thick, the red bled into the white, and by the time she finished her left hand, her right hand looked like it had been in a fight with a peppermint. She tried to fix it with remover, which took the base coat off too, and at midnight she was sitting on the sofa with one hand painted, one hand bare, and red polish on the cushion.
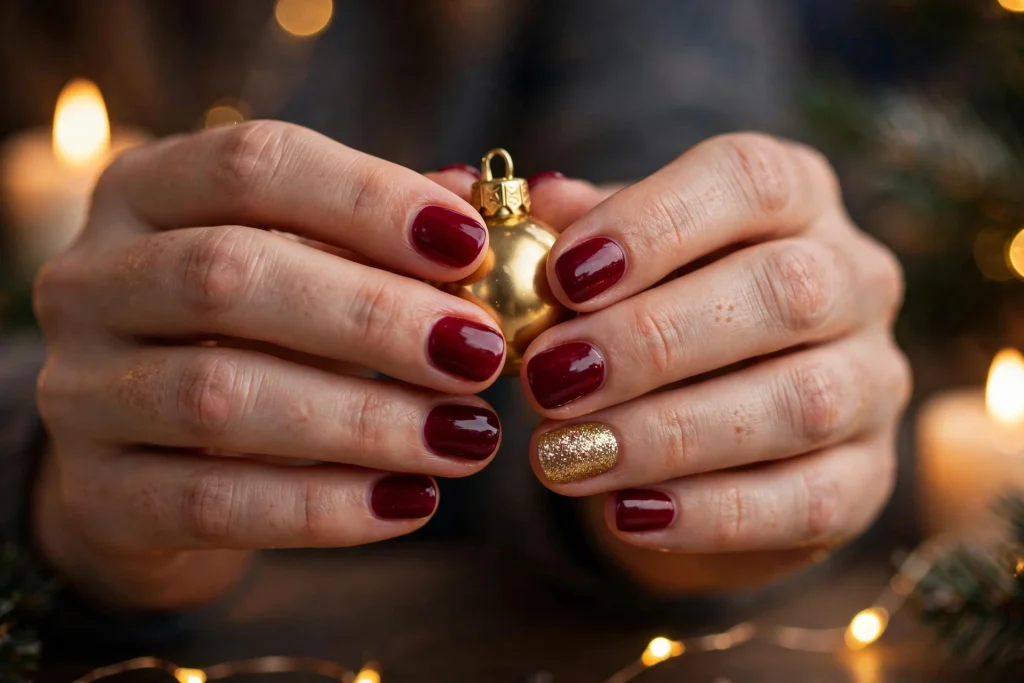
The next morning she did something smarter. She went back to the start, cleaned every nail properly, put on a base coat, and painted a simple deep red on nine nails and one gold glitter accent nail. It took her half an hour, it looked like a salon job, and it lasted until New Year’s Eve. That night taught me the lesson this whole guide is built on: the design is the fun part, but the prep is what makes it last. A perfect snowflake on a poorly prepped nail chips in two days. A plain red on a well-prepped nail still looks good a week later.
That is what these 23 designs are about. Every one of them is a real christmas nail idea you can ask for at a salon or paint at home, with the colours, the tools, and the honest difficulty level. Some take ten minutes. Some take an hour and a steady hand. None of them needs a professional artist, but a few of them do need patience and a good top coat. I have grouped them so you can pick by mood: classic reds, sparkle, cute little pictures, winter whites, and the deep greens and golds that carry you straight through to New Year’s Eve.
The christmas nails 2026 trends all point the same way. Velvet finishes, magnetic cat eye polish that moves in the light, darker reds like cranberry and oxblood, and French tips that have grown up a little. Short almond and soft square shapes are the most popular this year, and the best looks pick one detail and let it shine. If you are searching for cute christmas nails, simple christmas nails, or full christmas nail art, you will find all three here. Just remember the rule my sister learned the hard way: prep first, paint second, and never rush the top coat.
What’s Inside This Guide
- The 3 Things That Decide Whether a Christmas Manicure Lasts
- Group 1: The Classic Reds (Designs 1 to 5)
- Group 2: Sparkle, Glitter and Chrome (Designs 6 to 10)
- Group 3: Cute Christmas Pictures (Designs 11 to 15)
- Group 4: Winter Whites and Cool Tones (Designs 16 to 19)
- Group 5: Green, Gold and Party Nights (Designs 20 to 23)
- The 1-2-3 Festive Manicure Method
- At a Glance
- Do This Not That
- Your Christmas Manicure Weekend Plan
- Take It Further
- Stylist’s Cheat Sheet
- Questions People Ask
The 3 Things That Decide Whether a Christmas Manicure Lasts
Before you pick a design, these three things decide almost everything.
1. The prep. A great manicure is mostly preparation. Wash your hands, push the cuticles back gently, and wipe each nail with alcohol or polish remover so there is no oil left on the surface. Oil is the number one reason polish lifts and chips. Shape the nails with a fine file, buff the surface very lightly to take the shine off, and never skip the base coat. It protects the nail from staining, which matters a lot with red and green polish, and it gives the colour something to grip. A rushed prep means a manicure that chips in two days, no matter how pretty the design is.
2. The finish you choose. Regular polish, gel, and press-ons all behave differently over the holidays. Regular polish lasts 7 to 10 days with a good top coat and daily cuticle oil, and it is the easiest to fix at home. Gel lasts 2 to 3 weeks, so a set done between December 18 and 23 still looks good on New Year’s Eve, but it needs proper removal or it will peel layers off your nails. Press-ons last 5 to 7 days with glue and are the fastest option if you are short on time. Pick the finish that fits your week, not the one that looks best in a photo. A gel set you cannot remove properly does more damage than a plain polish set ever will.
3. One star, not five. The best christmas nails 2026 looks all follow the same rule: one star, and everything else stays quiet. One star can be a colour, like a deep cranberry red. It can be a finish, like a velvet cat eye that moves in the light. Or it can be one small design, like a single snowflake on the ring finger. When every nail has a different picture, the manicure looks busy and the eye does not know where to rest. When nine nails are calm and one or two carry the detail, the whole hand looks expensive. This is the difference between a manicure that gets compliments and one that looks like a craft project.
Keep those three in mind and every design below will make sense.
One more thing worth saying plainly. The holiday nail ideas that work best are rarely the most complicated ones. A clean red, a thin gold line, or a single hand-painted snowflake beats a busy pattern on every nail. Winter nail ideas look best when the base is smooth and the detail is small. That is the whole idea behind the 23 designs below, and it is why the simple christmas nails in this guide sit right next to the boldest ones. Pick the one that fits your week, your skill, and your plans.
Group 1: The Classic Reds
These five are the safest starting points. Red is still the queen of Christmas, but this year it comes in deeper, richer moods. Cranberry, oxblood, and velvet reds have taken over from bright fire-engine red, and they look good on every skin tone and every nail length.
1. The Classic Christmas Red
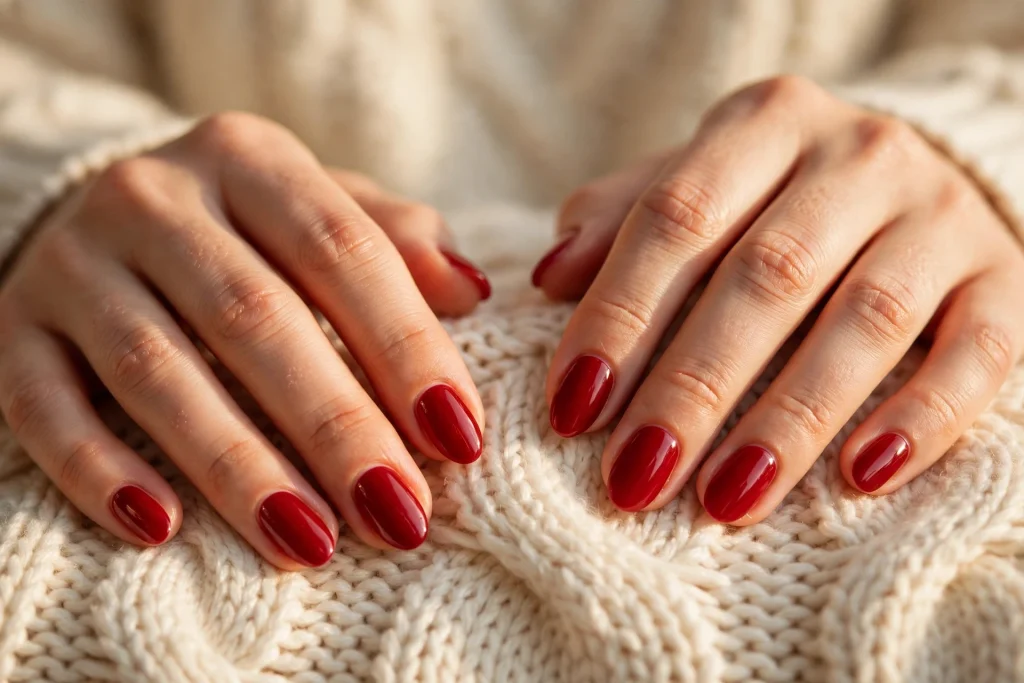
This is the one every other design is measured against. A glossy, true red on short almond nails, two thin coats, a shiny top coat, and nothing else. It suits everyone, it goes with every outfit, and it photographs beautifully against a Christmas tree. Pick a red with a blue undertone if you want it to look expensive, or a warm red if your skin has golden tones. It is the easiest design in this guide and the hardest to get wrong.
How to do it: Shape the nails into a short almond or soft square, push the cuticles back, and wipe each nail clean. Apply a base coat, then two thin coats of red, letting each coat dry fully before the next. Thin coats are the secret: thick coats bubble and take forever to dry. Finish with a glossy top coat, and wrap the tip of each nail so the free edge is sealed.
How long it lasts: 7 to 10 days in regular polish, 2 to 3 weeks in gel. Red shows chips fast, so reapply top coat every two days.
You may also like: Design 5, Cherry Red Chrome, if you want the same red with a party finish.
2. Cranberry Velvet Cat Eye
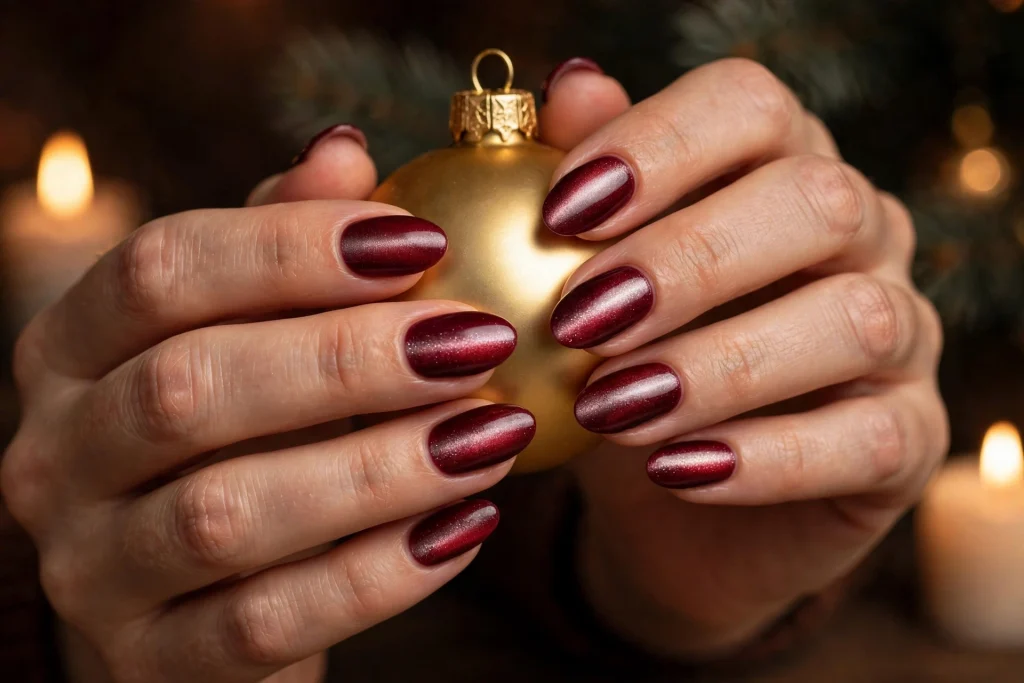
Velvet is the finish of the season. A magnetic cat eye polish in deep cranberry red, held under a magnet so the shimmer gathers into a soft band of light that moves when you turn your hand. It looks like velvet fabric in candlelight, and it is the single most complimented finish in the christmas nails 2026 trends. It is easier than it looks: the magnet does the work, not your hand.
How to do it: Apply a base coat and one coat of black or very dark red gel as a base, then a coat of cranberry cat eye gel polish. Hold the magnet just above the wet polish for 10 seconds, slowly and steadily, to pull the shimmer into a soft line. Cure under a lamp, then seal with a glossy top coat. If the line looks too sharp, hold the magnet a little further away and move it slowly for a softer glow. This one needs gel and a lamp, so it is a salon job or a home gel kit, not regular polish.
How long it lasts: 2 to 3 weeks in gel. The finish hides small chips well because the shimmer distracts the eye.
You may also like: Design 9, Champagne Cat Eye, for the same magnetic finish in a lighter shade.
3. Oxblood French Tips
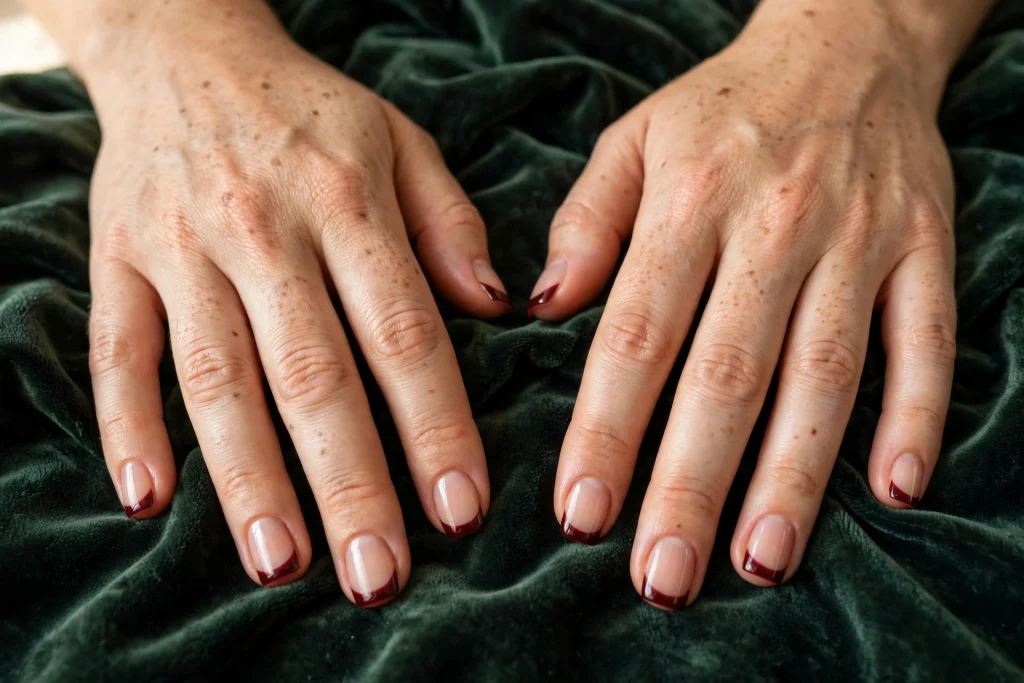
A French manicure with a dark twist. Instead of white tips, the tips are a deep oxblood red, almost brown in low light, on a sheer nude base. It is grown up, quiet, and very 2026. It suits short nails beautifully because the dark tip makes the nail look longer, and it grows out gracefully because the base is close to your natural nail colour.
How to do it: Apply a sheer nude base coat, two thin coats, and let it dry fully. Use French tip guides or a steady hand with a thin brush to paint the tips in oxblood red. Keep the line thin: a thick tip looks heavy on short nails. Clean up the smile line with a small brush dipped in remover, then seal with a glossy top coat. If you are new to French tips, practice on one hand first, or use the guides. They are cheap and they save a lot of frustration.
How long it lasts: 7 to 10 days in regular polish, 2 to 3 weeks in gel. The nude base hides regrowth, so it looks neat for longer than a full colour manicure.
You may also like: Design 17, Frosted French Tips, for the same French shape in white and silver.
4. Red Glazed French
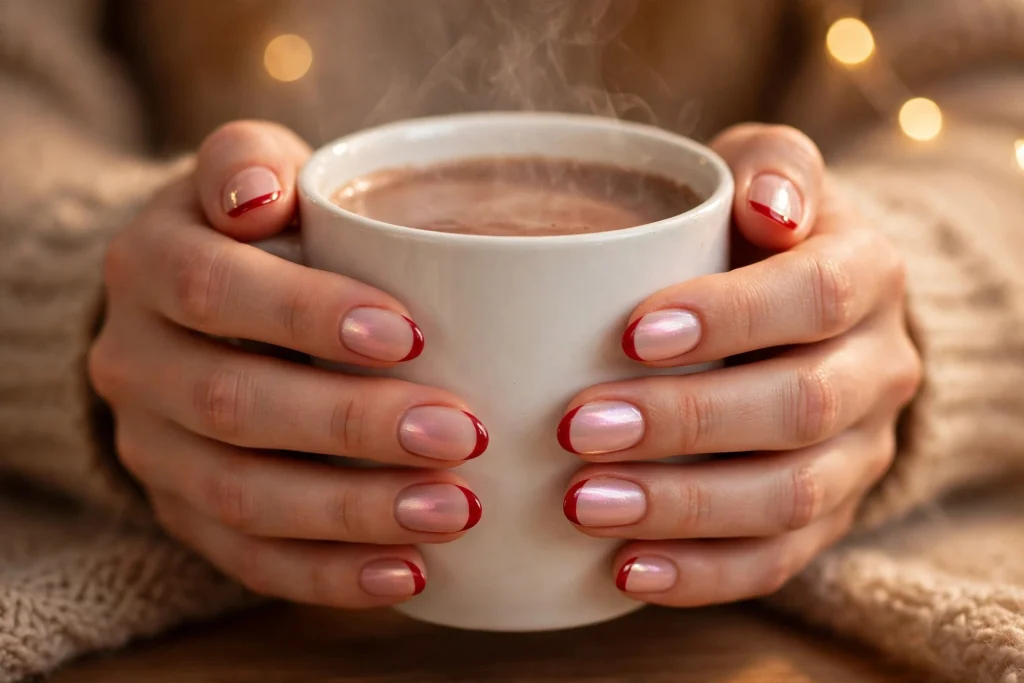
This is the French manicure that caught everyone’s eye this year. A pale rose base, a thin red line along the free edge, and a dusting of white glazed powder over the top for a luminous, almost lit-from-within glow. It is soft, it is festive without shouting, and it works for the office party as well as Christmas dinner. It is the prettiest version of a French tip in this guide.
How to do it: Apply a pale rose base, two thin coats. Use a very fine brush to draw a thin red line along the free edge of each nail. While the top coat is still slightly tacky, dust a tiny amount of white glazed chrome powder over the nail with a sponge applicator, then seal with a glossy top coat. The powder is what gives the glow, so do not skip it, and do not use too much or it turns chalky.
How long it lasts: 7 to 10 days in regular polish, 2 to 3 weeks in gel. The pale base hides small chips, and the glazed finish stays bright if you refresh the top coat every two days.
You may also like: Design 3, Oxblood French Tips, if you want a darker version of the same idea.
5. Cherry Red Chrome
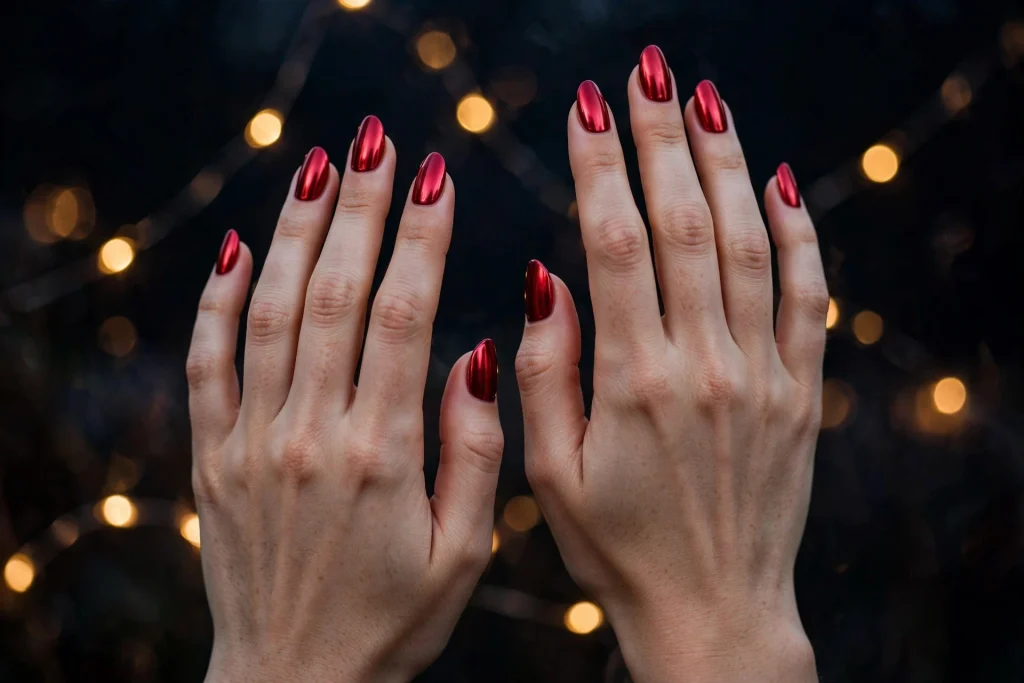
A full cherry red set with a chrome finish that looks like liquid metal. This is the party version of the classic red: same colour family, but the mirror shine makes it feel like New Year’s Eve. It is bold, it is unmissable, and it photographs like nothing else. If you only want one statement set this December, this is the one.
How to do it: This is a salon or home gel job. Apply a black gel base and cure it, then a coat of cherry red chrome gel, or a red base with chrome powder rubbed over a no-wipe top coat. The chrome needs a perfectly smooth base, so buff gently and wipe the nail completely clean before the chrome step. Any bump or speck shows through the mirror finish. Seal with a no-wipe top coat and cure again.
How long it lasts: 2 to 3 weeks in gel. Chrome can scratch at the tips if you use your nails as tools, so wear gloves for dishes and cleaning.
You may also like: Design 7, Silver Chrome Mirror, for the same mirror finish in silver.
Group 2: Sparkle, Glitter and Chrome
These five are for the party nights. Glitter, chrome, and cat eye finishes catch candlelight better than anything else, and they are the reason so many christmas nail ideas 2026 lists lead with sparkle. The trick is to put the shine where it counts and keep the rest calm.
6. Gold Glitter Fade
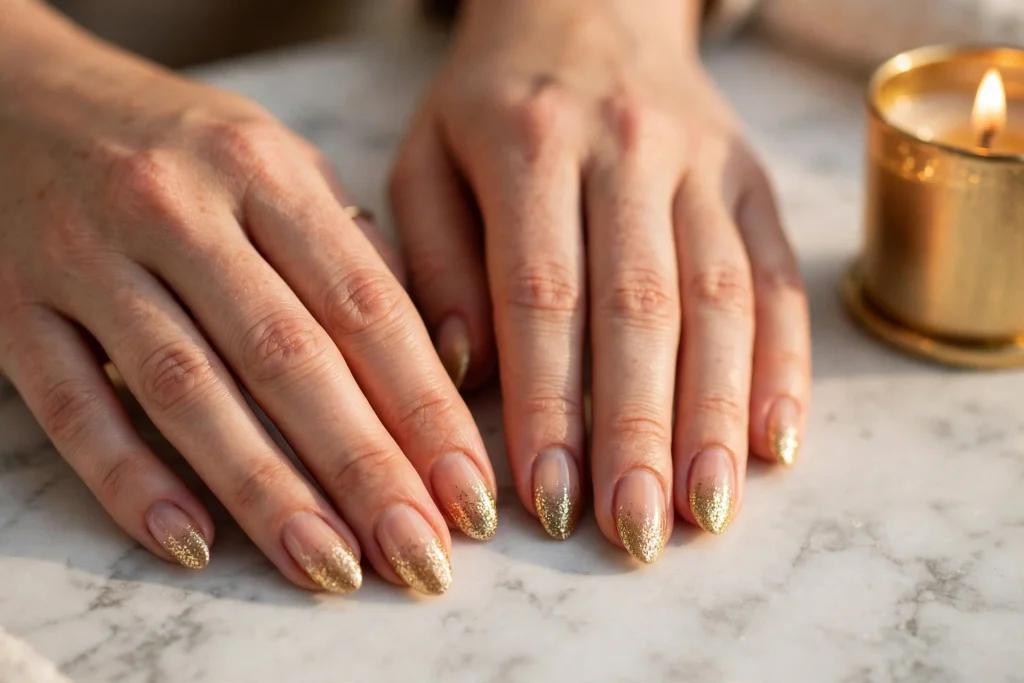
A nude or soft pink base with gold glitter that starts dense at the tip and fades toward the cuticle. It is the easiest glitter design in this guide, it hides regrowth beautifully, and it looks like fairy lights on your hands. It suits every nail length, and it is very forgiving: glitter covers a lot of small mistakes.
How to do it: Apply a nude base, two thin coats. Take a gold glitter polish and dab it on the tip of each nail with the brush, then use a small sponge to push the glitter upward and fade it out toward the middle of the nail. Two layers of glitter gives a denser fade. Seal with two glossy top coats, because glitter is rough and needs extra sealing to feel smooth. Let each layer dry fully, or the glitter will drag.
How long it lasts: 7 to 10 days in regular polish, 2 to 3 weeks in gel. Glitter is tough and hides chips well. Removal takes longer: soak cotton pads in acetone, wrap with foil, and wait ten minutes instead of scrubbing.
You may also like: Design 10, Glitter Christmas Tree Accent, if you want glitter with one small picture.
7. Silver Chrome Mirror
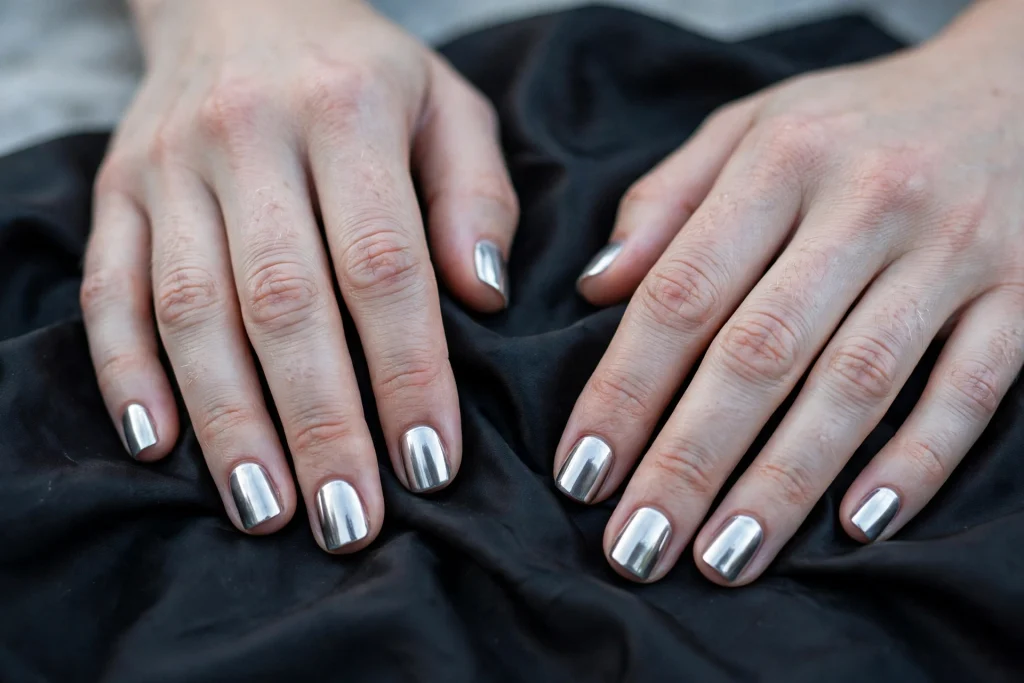
A full silver chrome set that reads like liquid metal. It is the coldest, most graphic look in this guide, and it is stunning with a black dress or a silver outfit. It is also the least forgiving finish: every ridge, bump, or speck shows through the mirror. Get the prep right and it looks like jewellery. Rush the prep and it looks like foil.
How to do it: File and buff the nails until they are perfectly smooth, then wipe each nail with alcohol. Apply a black gel base and cure it, then a no-wipe top coat and cure it. Rub silver chrome powder over the nail with a sponge applicator until it turns to a mirror, then seal with a no-wipe top coat and cure again. If any spot stays dull, it means the base was not smooth enough there. This is a salon job for most people, or a home gel kit with patience.
How long it lasts: 2 to 3 weeks in gel. Chrome can scratch at the tips, so avoid opening cans or tape with your nails, and refresh the top coat once a week.
You may also like: Design 5, Cherry Red Chrome, for the same mirror finish in a warmer colour.
8. Rose Gold Glitter Accent
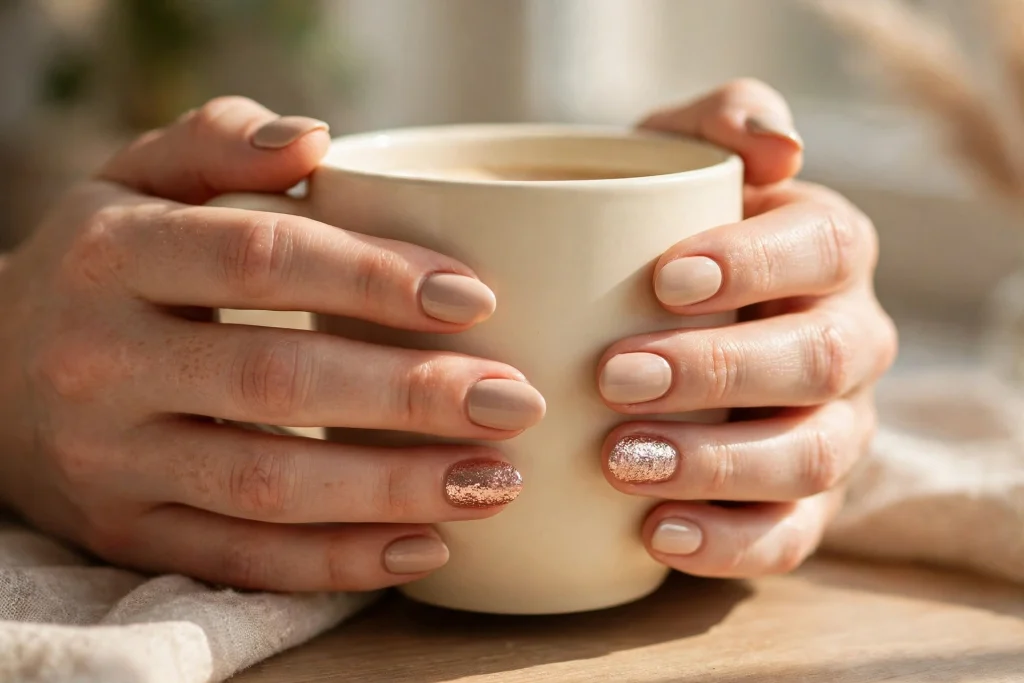
A soft nude set with one rose gold glitter accent nail on each hand, usually the ring finger. It is the quietest sparkle in this guide and the easiest to wear every day. It works for the office, for family dinners, and for parties, because the glitter is only on two nails and the rest of the hand stays calm. If you are new to glitter, start here.
How to do it: Apply a nude or pale pink base on all ten nails, two thin coats. On the ring finger of each hand, apply two coats of rose gold glitter polish instead. Seal everything with a glossy top coat, and add a second top coat on the glitter nails so they feel smooth. The key is the glitter shade: rose gold is warmer and softer than silver or gold, so it flatters most skin tones.
How long it lasts: 7 to 10 days in regular polish, 2 to 3 weeks in gel. The nude base hides regrowth, and the glitter accent hides chips on the two nails that get the most wear.
You may also like: Design 6, Gold Glitter Fade, if you want glitter on every nail instead of just two.
9. Champagne Cat Eye
A champagne cat eye that glows like candlelight. The magnetic shimmer is soft gold and silver in one, and it moves across the nail when you turn your hand. It is the lightest, most elegant magnetic finish in this guide, and it is the one I would pick for a Christmas dinner where you want to look polished without looking loud. It works on short nails and long nails alike.
How to do it: Apply a base coat and a coat of champagne cat eye gel polish. Hold the magnet just above the wet polish for 10 seconds, slowly and steadily, to pull the shimmer into a soft diagonal band. Cure under a lamp, then seal with a glossy top coat. If the band looks too sharp, hold the magnet further away. If it looks too faint, hold it closer. One practice nail tells you everything you need to know about your magnet distance.
How long it lasts: 2 to 3 weeks in gel. The light shimmer hides small chips and regrowth well, so it stays looking neat longer than a dark colour.
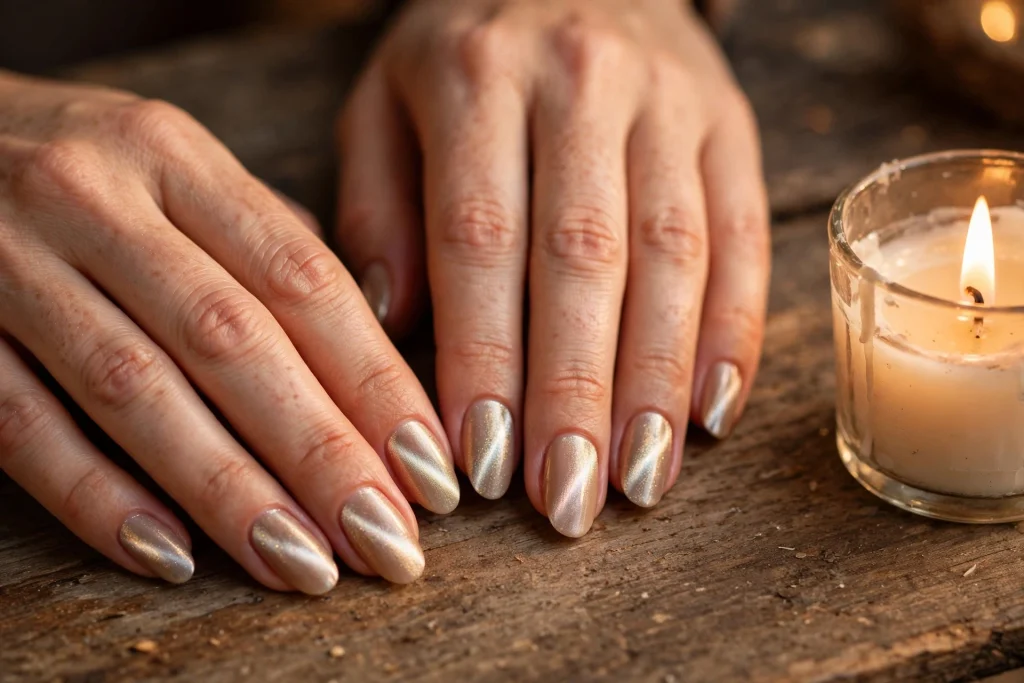
You may also like: Design 2, Cranberry Velvet Cat Eye, for the same magnetic finish in a deep red.
10. Glitter Christmas Tree Accent
A deep green or dark red base with one glitter Christmas tree on the ring finger of each hand. The tree is painted with a fine brush, or built from tiny dots of green glitter polish, and topped with a single gold star. It is the cutest design in this group, and it is the one people notice first. Keep the tree on two nails only: a tree on every nail looks busy.
How to do it: Apply your base colour on all ten nails, two thin coats. On the ring finger, use a fine brush to paint a small triangle tree in green glitter polish, or build it from three rows of dots that get smaller toward the top. Add a tiny gold dot at the top for the star, and a few gold dots as ornaments. Seal with two glossy top coats, because the glitter tree is slightly raised and needs extra sealing. If painting a tree feels hard, try the dot method first: dots are much easier than lines.
How long it lasts: 7 to 10 days in regular polish, 2 to 3 weeks in gel. The glitter tree is sturdy once it is sealed, and the dark base hides small chips.
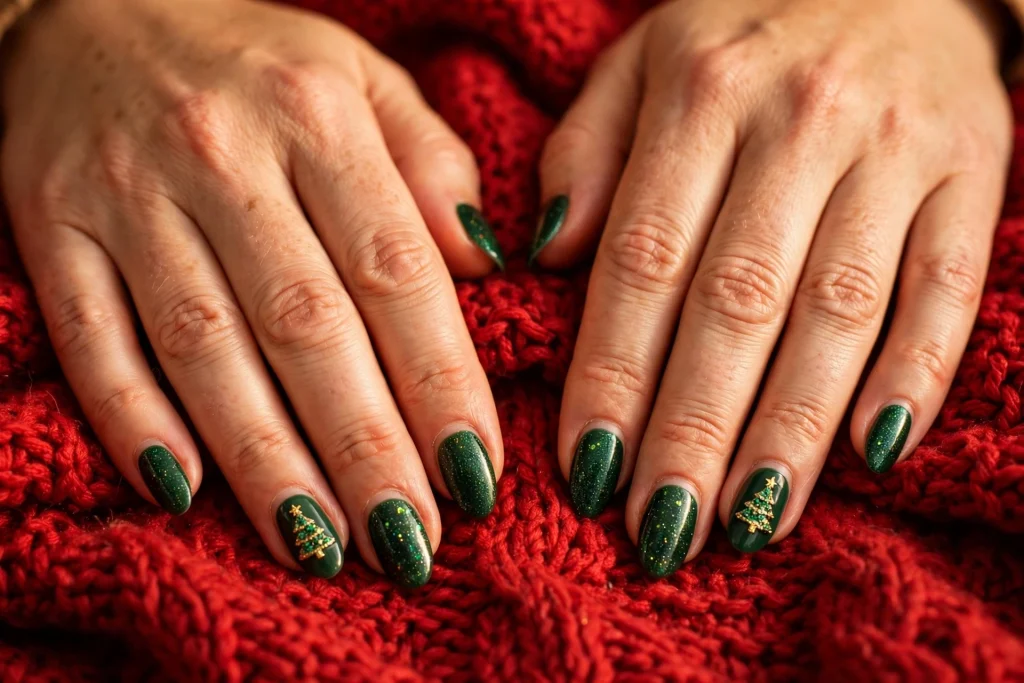
You may also like: Design 14, Tiny Christmas Trees, if you want the tree on more than two nails.
Group 3: Cute Christmas Pictures
These five are the cute christmas nails everyone saves on Pinterest. Small pictures on one or two accent nails: a snowflake, a gingerbread face, a candy cane. If you have been scrolling through christmas nail ideas 2026 lists looking for cute christmas nails, this is the group for you. They are the most fun designs in this guide, and they are also the ones that need the steadiest hand. The rule is the same for all of them: the picture goes on one or two nails, and the rest of the hand stays simple.
11. Candy Cane Stripes
Red and white diagonal stripes on the tips, like a candy cane, on a nude or pale pink base. It is the most recognisable Christmas design there is, and it is easier than it looks if you use striping tape. It suits short nails well because the stripes are only on the tips, and it looks great with a red sweater or a white shirt.
How to do it: Apply a nude base, two thin coats, and let it dry fully. This matters: if the base is even slightly tacky, the tape will pull it off. Place thin striping tape diagonally across the tips, paint red over the exposed tip, and peel the tape off while the red is still slightly wet. Clean up the edges with a small brush dipped in remover, then seal with a glossy top coat. If you do not have striping tape, a thin striping brush works too, but tape gives cleaner lines.
How long it lasts: 7 to 10 days in regular polish, 2 to 3 weeks in gel. The nude base hides regrowth, and the stripes are on the tips where wear shows first, so refresh the top coat every two days.
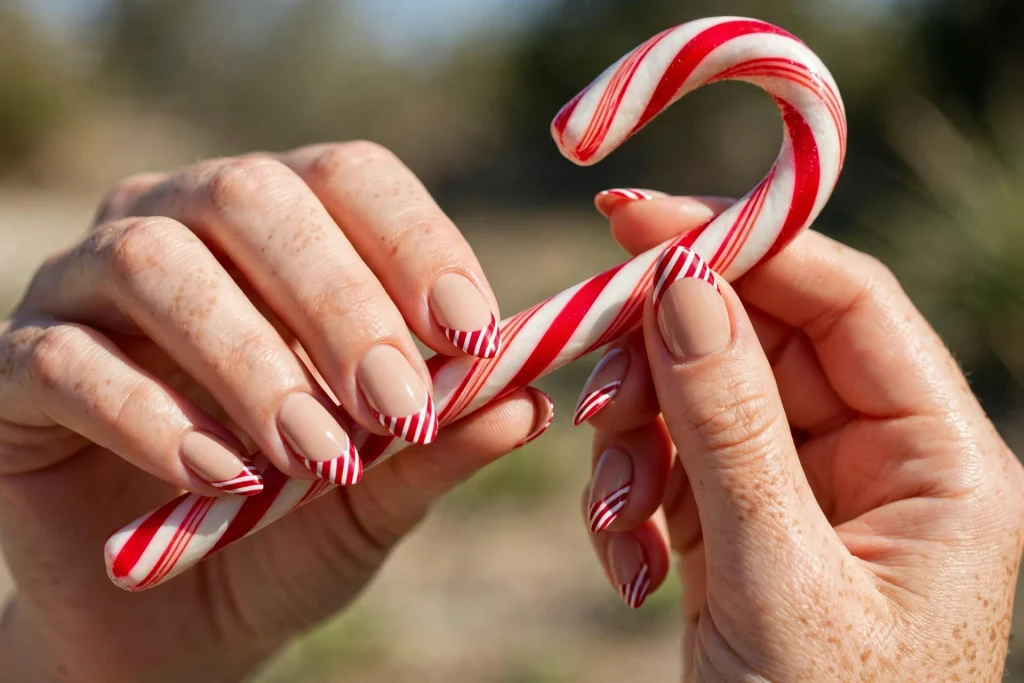
You may also like: Design 12, Snowflake Accent Nails, for another classic picture design that is easier to paint.
12. Snowflake Accent Nails
A soft nude or pale blue base with a single white snowflake on the ring finger of each hand. It is the easiest picture design in this guide, because a snowflake is just six lines crossing in the middle, and it does not need to be perfect to look good. Slightly uneven snowflakes look hand-painted in the best way. It is also the design that works best on short nails, because one small picture fits easily.
How to do it: Apply a nude or pale blue base, two thin coats. Use a fine brush or a dotting tool to draw a snowflake on the ring finger: one vertical line, one horizontal line, and two diagonal lines crossing in the middle, then tiny dots at the ends of each line. Keep the lines thin and the snowflake small, about half the size of the nail. Seal with a glossy top coat. If you are nervous, practice on a piece of paper first: three lines, six dots, and you have a snowflake.
How long it lasts: 7 to 10 days in regular polish, 2 to 3 weeks in gel. The pale base hides chips well, and a snowflake on two nails means only two nails carry the detail.
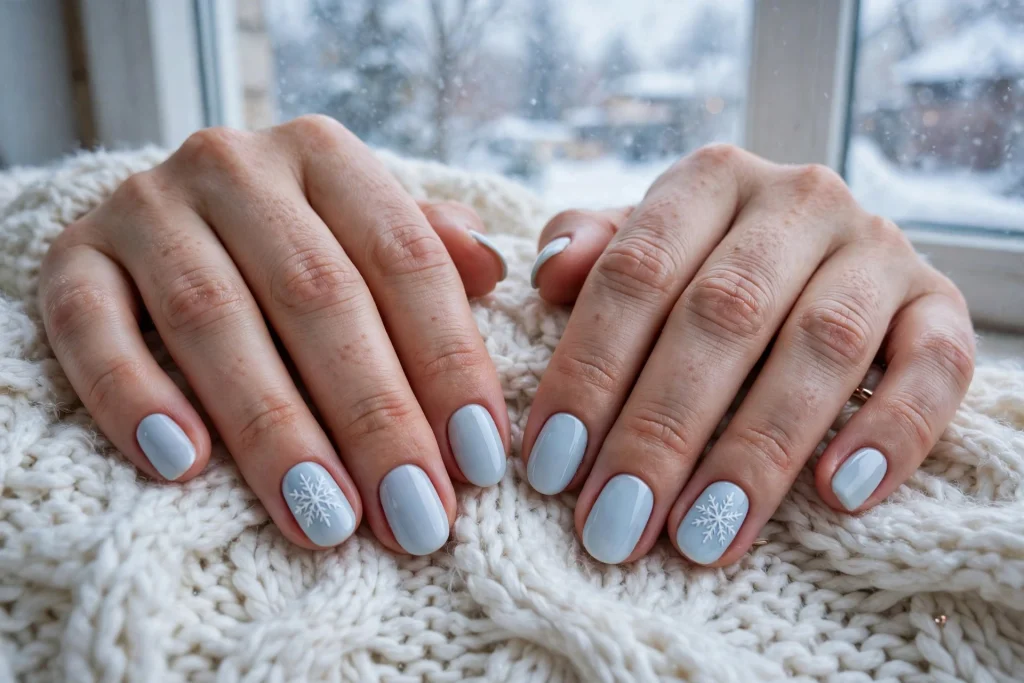
You may also like: Design 15, Holly and Berries, for another small picture that is easy to paint.
13. Gingerbread Faces
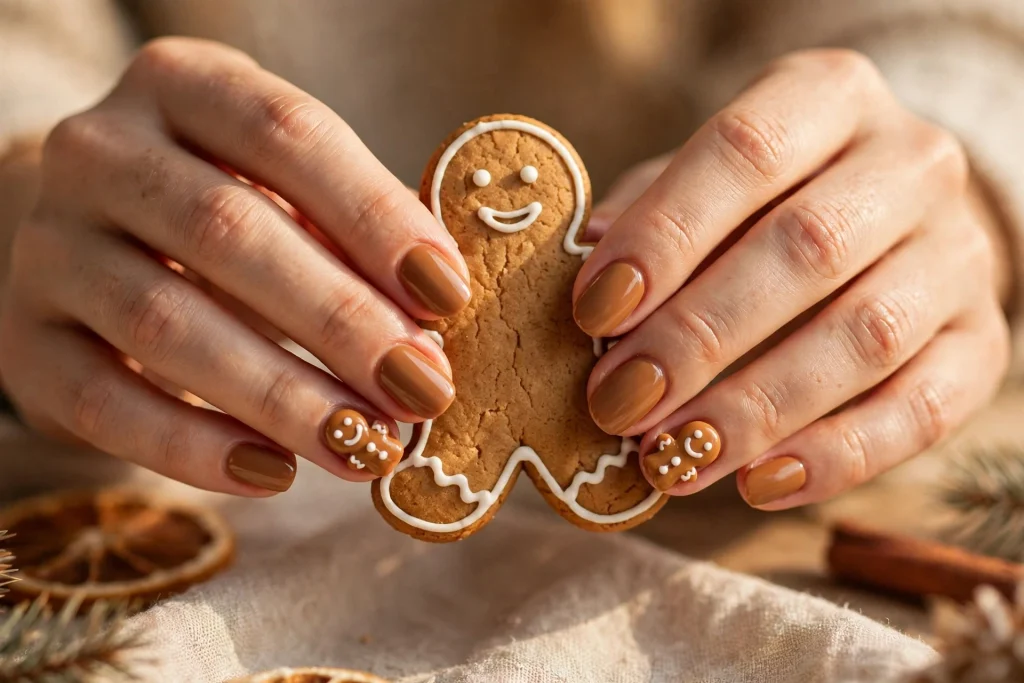
Warm caramel brown nails with a tiny gingerbread face on the accent nail: two dot eyes, a smile, and two white icing buttons. It is the sweetest design in this guide, and it makes people smile every time they see it. It suits medium nails best, because the face needs a little room, but it works on short nails too if you keep the face small.
How to do it: Apply a warm caramel brown base on all ten nails, two thin coats. On the ring finger, use a dotting tool to add two small black dots for eyes, a tiny curved smile in white or dark brown, and two white dots down the middle for icing buttons. Add a thin white line across the top of the accent nail for the icing edge if you want extra detail. Seal with a glossy top coat. The face is just dots and one curve, so it is much easier than it looks.
How long it lasts: 7 to 10 days in regular polish, 2 to 3 weeks in gel. The brown base is forgiving, and the face is small enough that a tiny chip barely shows.
You may also like: Design 14, Tiny Christmas Trees, for another cute picture design on the accent nails.
14. Tiny Christmas Trees
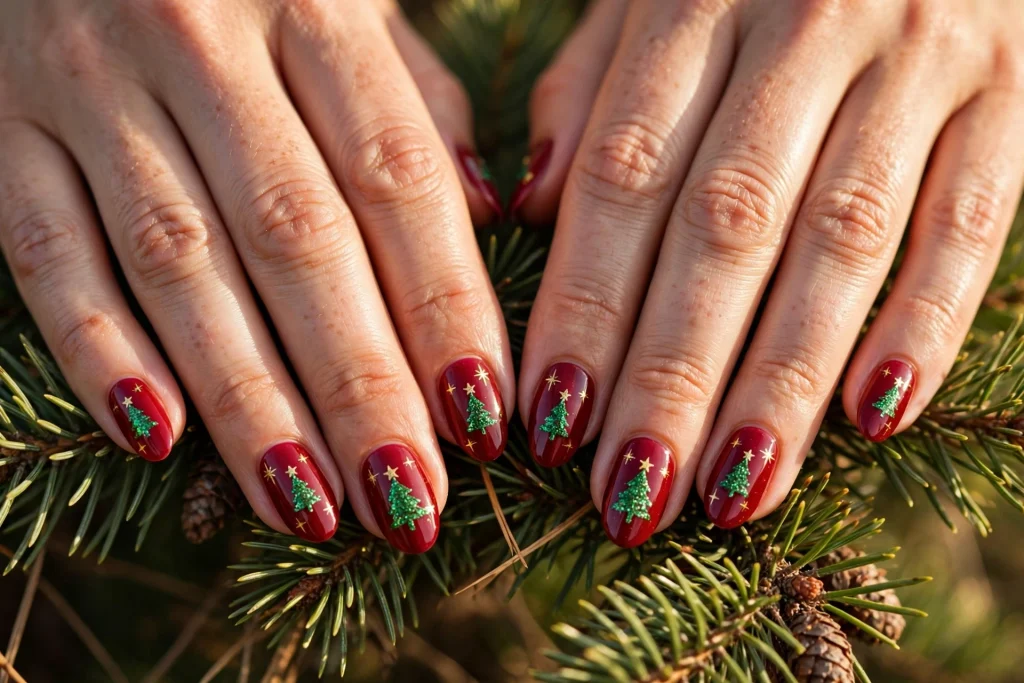
A deep red or forest green base with a tiny Christmas tree on every nail, or on the accent nails if you prefer a quieter version. The tree is a small green triangle with a gold star, painted with a fine brush or built from dots. It is the most festive design in this guide, and it is the one kids ask about first. Keep the trees small: a tree that fills the whole nail looks crowded, and a small tree looks charming.
How to do it: Apply your base colour on all ten nails, two thin coats. Use a fine brush to paint a small triangle in green glitter polish on each nail, or on the ring fingers only for the quieter version. Add a tiny gold dot at the top for the star, and two or three gold dots as ornaments. Seal with two glossy top coats. If you want the trees on every nail, keep them the same size: a row of tiny matching trees looks neat, and a row of different sized trees looks messy.
How long it lasts: 7 to 10 days in regular polish, 2 to 3 weeks in gel. The glitter tree is sturdy once sealed, and the dark base hides small chips.
You may also like: Design 10, Glitter Christmas Tree Accent, if you want the tree on two nails only.
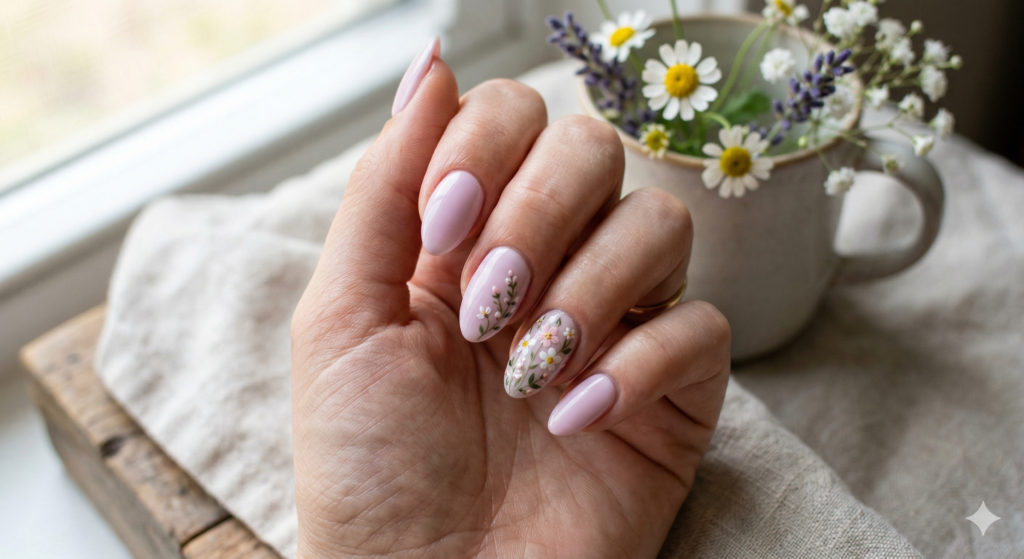
15. Holly and Berries
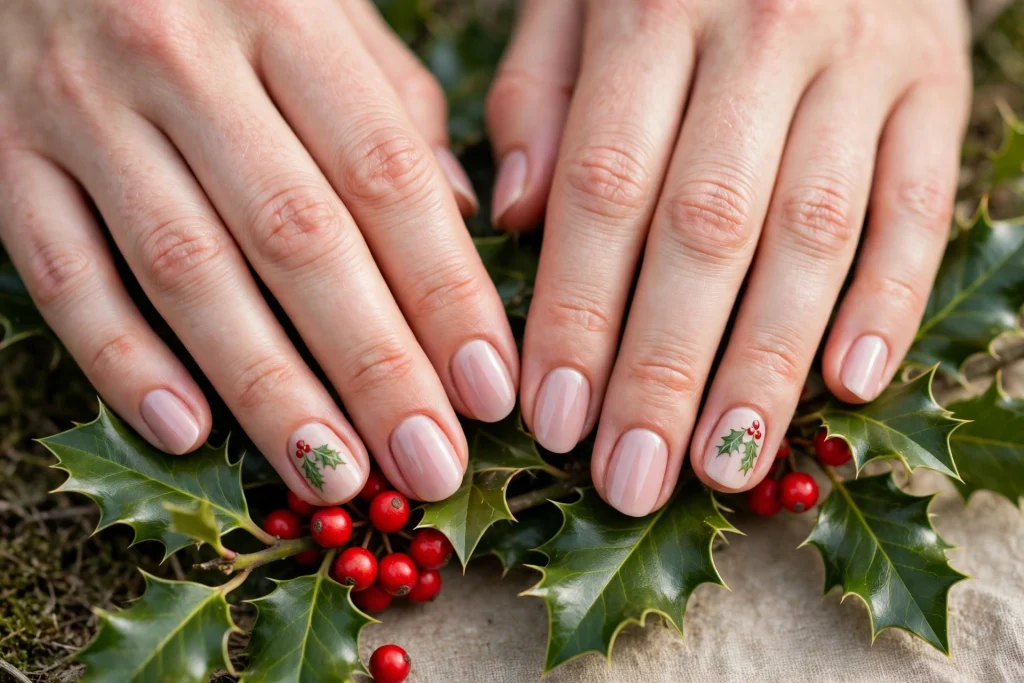
A pale rose base with a small holly sprig on the accent nail: two green leaves and three red berries, painted with a fine brush and a dotting tool. It is the most elegant picture design in this guide, because holly is simple and it never looks childish. It suits short nails well, and it pairs beautifully with a red dress or a green sweater.
How to do it: Apply a pale rose base, two thin coats. On the ring finger, use a fine brush to paint two small green leaves, then a dotting tool to add three red dots for berries. The leaves are just two curved shapes, and the berries are dots, so this is one of the easiest picture designs to paint. Add a thin gold line along the cuticle if you want a little extra shine. Seal with a glossy top coat.
How long it lasts: 7 to 10 days in regular polish, 2 to 3 weeks in gel. The pale base hides regrowth, and the holly is small enough that it stays neat for the whole week.
You may also like: Design 12, Snowflake Accent Nails, for another small picture design that is quick to paint.
Group 4: Winter Whites and Cool Tones
These four are for the quiet side of Christmas. Milky white, frosted French tips, icy blue, and silver stars. Most christmas nail ideas 2026 lists put the pale looks last, but they deserve their own group, because they are the winter nail ideas that carry you from the first snow to New Year’s Eve, and they look best on short nails with clean shapes. If red feels too loud for you, start here.
16. Milky White with Gold Flakes
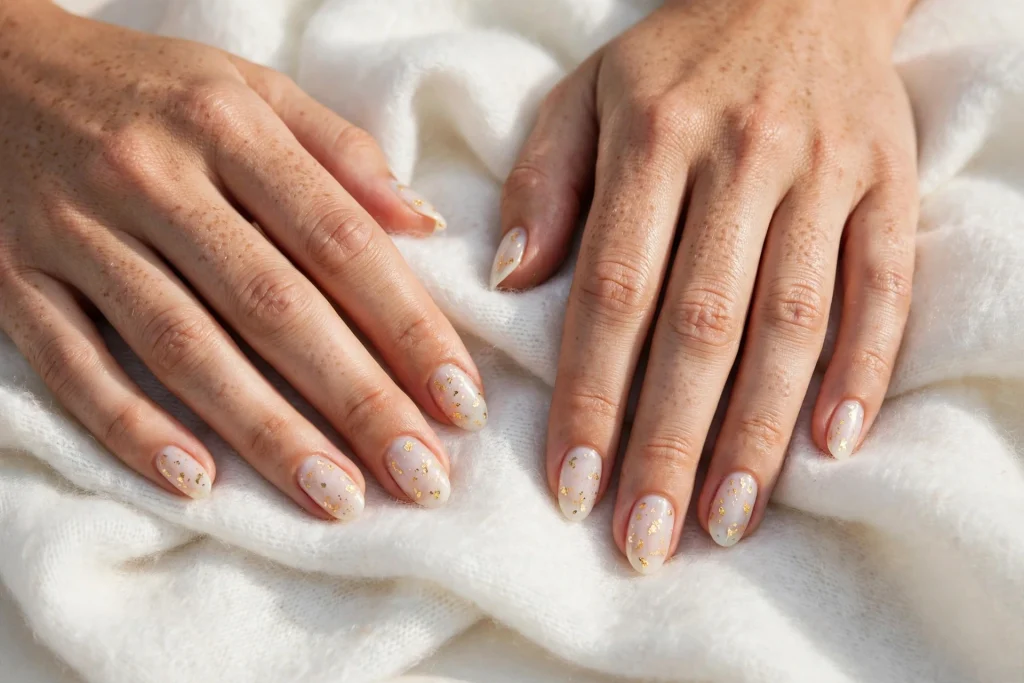
A milky white base with tiny gold flakes scattered across the nails, like snow catching the light. It is the most understated design in this guide and one of the most elegant. It suits every skin tone, it goes with every outfit, and it looks like quiet luxury rather than a holiday costume. It is also one of the easiest designs to paint at home.
How to do it: Apply a milky white base, two thin coats. While the second coat is still slightly wet, use tweezers to place a few tiny gold flakes on each nail, or dab gold flake polish randomly across the surface. Press the flakes down gently so they sit flat, then seal with two glossy top coats. The flakes need extra sealing or they will lift at the edges. Keep the flakes small and sparse: three or four per nail is enough, and more than that looks cluttered.
How long it lasts: 7 to 10 days in regular polish, 2 to 3 weeks in gel. Milky bases show regrowth faster than dark colours, so book a fill or a repaint when the cuticle line reaches about two millimetres.
You may also like: Design 19, Snowy White with Silver Stars, for the same milky base with silver instead of gold.
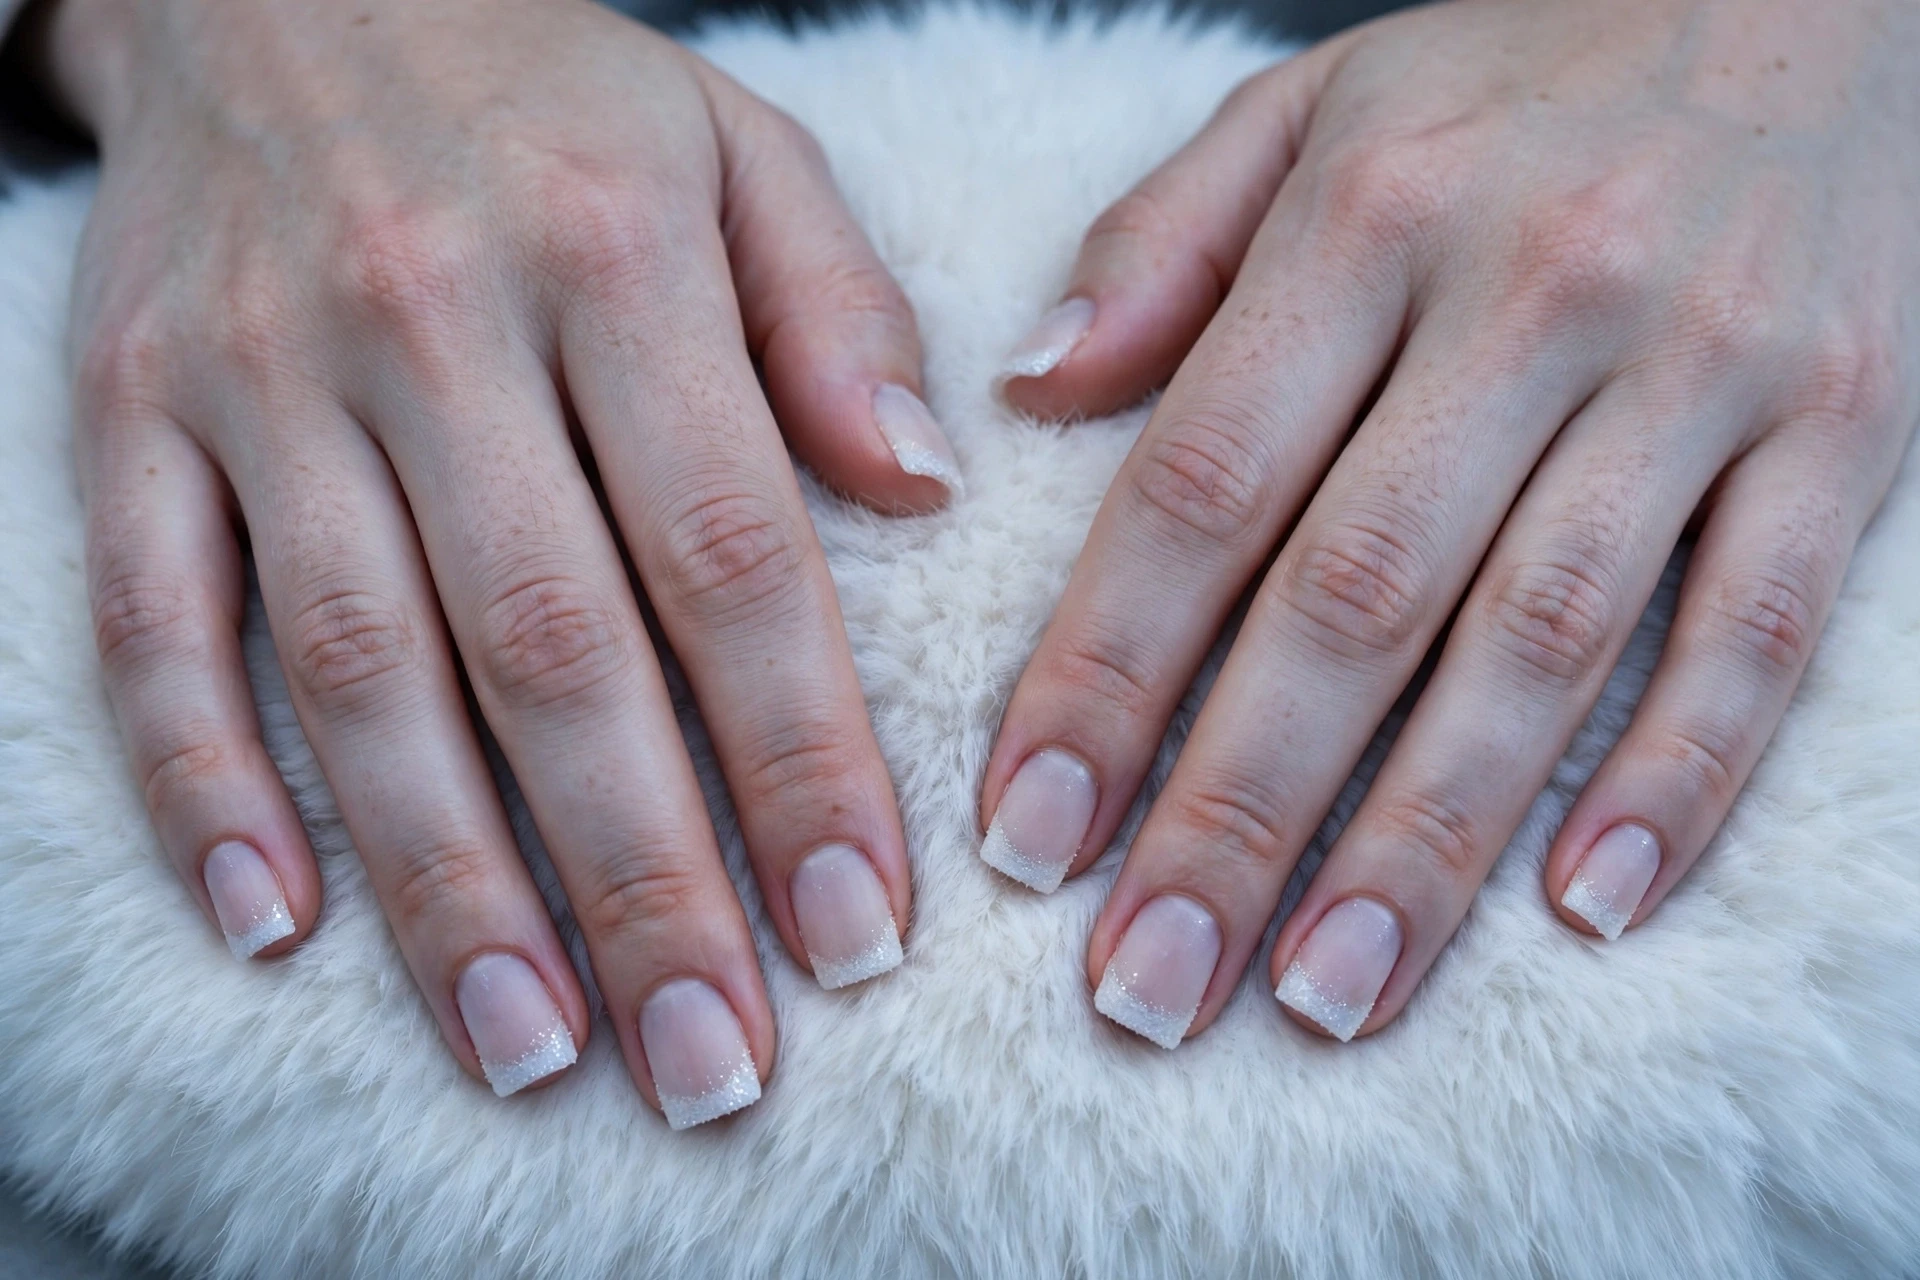
17. Frosted French Tips
A classic French manicure with frosted white tips that have a soft shimmer, like fresh snow. The base is a sheer milky white, and the tips are painted in a white polish with a fine silver shimmer. It is the cleanest look in this guide, and it is the one that works best for a work party or a family photo, because it is festive without being obvious.
How to do it: Apply a sheer milky white base, two thin coats, and let it dry fully. Use French tip guides or a steady hand to paint the tips in a frosted white shimmer polish. Keep the line thin and clean, and tidy the smile line with a small brush dipped in remover. Seal with a glossy top coat. The shimmer polish is more forgiving than plain white, because the sparkle hides small wobbles in the line.
How long it lasts: 7 to 10 days in regular polish, 2 to 3 weeks in gel. The sheer base hides regrowth well, so it stays looking neat longer than a full colour manicure.
You may also like: Design 4, Red Glazed French, for the same French shape with a red twist.
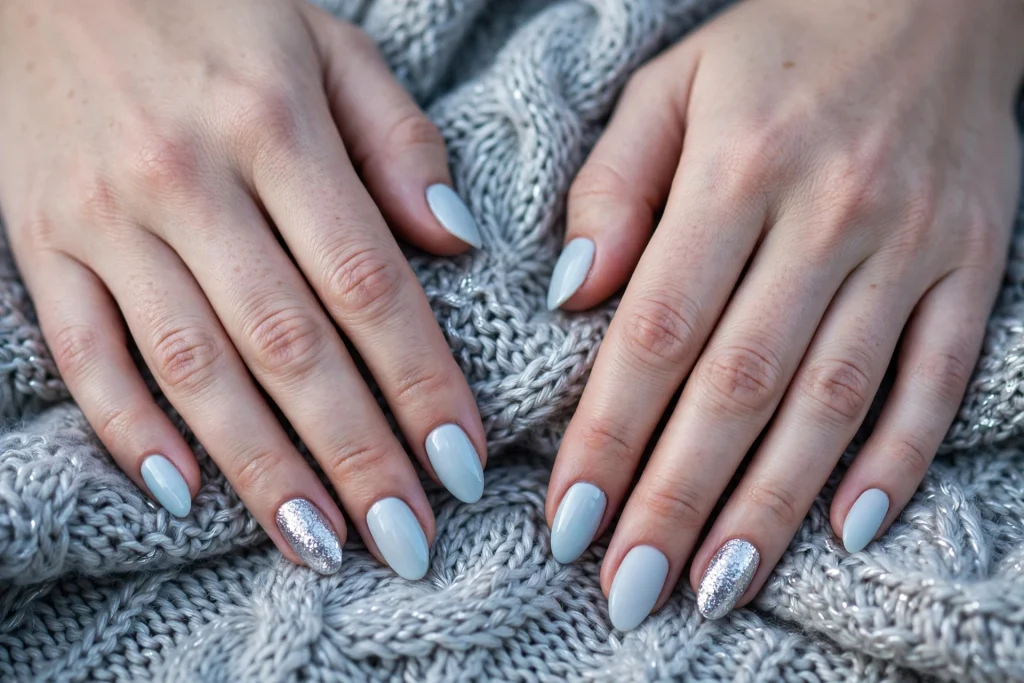
18. Icy Blue and Silver
A pale icy blue base with a silver glitter accent nail, or a silver line along the cuticle. It is the coldest colour in this guide, and it is beautiful with silver jewellery and a dark coat. It suits medium nails best, because the blue needs a little length to show its colour, but it works on short nails too if you keep the blue pale.
How to do it: Apply a pale icy blue base, two thin coats. On the ring finger, apply two coats of silver glitter polish, or paint a thin silver line along the cuticle of each nail with a striping brush. Seal with a glossy top coat. The blue is the star here, so keep the silver small: one accent nail or one thin line is enough, and more silver makes the whole hand look cold.
How long it lasts: 7 to 10 days in regular polish, 2 to 3 weeks in gel. Pale blue shows chips more than dark colours, so refresh the top coat every two days and wear gloves for dishes.
You may also like: Design 16, Milky White with Gold Flakes, for another pale winter look with a warmer accent.
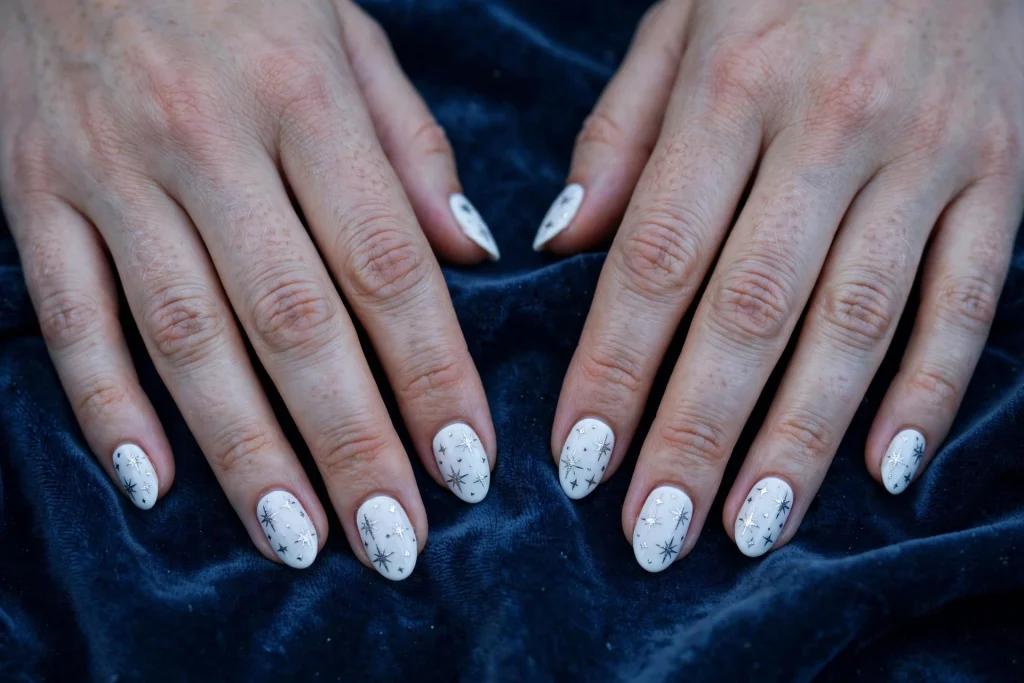
19. Snowy White with Silver Stars
A snowy white base with tiny silver stars scattered across the nails, like a night sky just before it snows. It is the most magical design in this group, and it is the one that looks best in photos, because the stars catch the light. It suits short nails well, because the stars are small and the white base keeps the hand looking clean.
How to do it: Apply a snowy white base, two thin coats. While the top coat is still slightly wet, use tweezers to place tiny silver star confetti on one or two nails, or on all ten if you want a fuller sky. Keep the stars small and do not put more than three on any one nail. Seal with two glossy top coats so the stars sit flat and smooth. If the stars lift at the edges, add another thin layer of top coat just over the star.
How long it lasts: 7 to 10 days in regular polish, 2 to 3 weeks in gel. White shows chips fast, so refresh the top coat every two days, and avoid long soaks in hot water.
You may also like: Design 16, Milky White with Gold Flakes, for the same white base with gold instead of silver.
Group 5: Green, Gold and Party Nights
These four are the deep, rich looks that carry you from Christmas dinner straight through to New Year’s Eve. Forest green, emerald and gold, midnight navy, and black and gold. They are the most grown-up designs in this guide, and they are the ones that look best with evening outfits and candlelight.
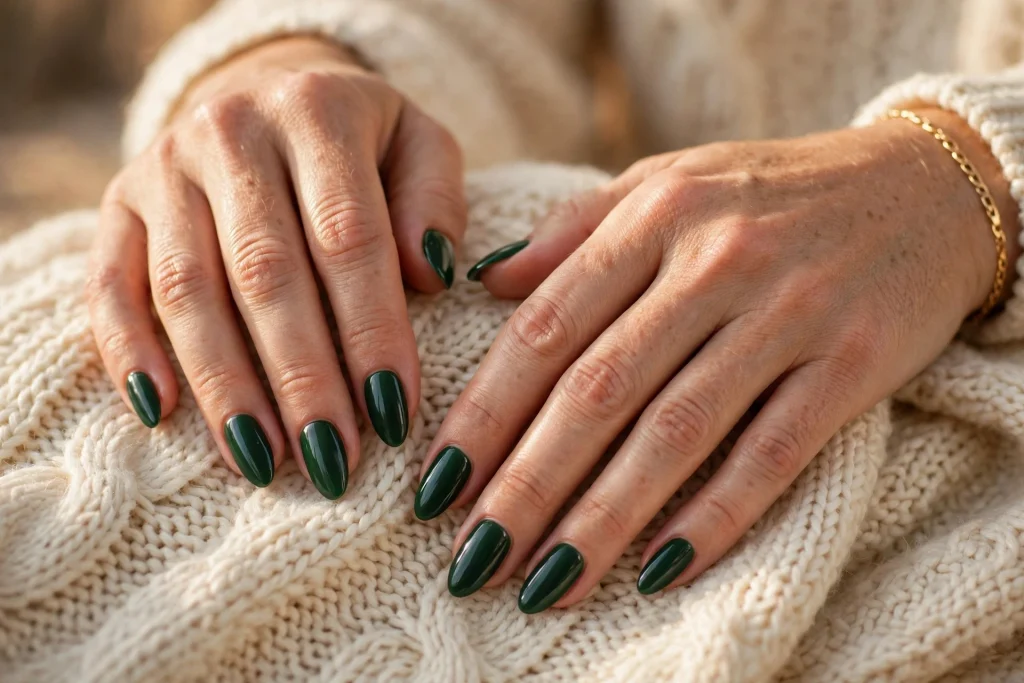
20. Deep Forest Green
A deep forest green on its own, glossy, with nothing else. It is the chic alternative to red this year, and it is the colour the style magazines keep naming as the grown-up Christmas shade. It looks like a fir tree in low light, almost black, and that is exactly what makes it sophisticated rather than novelty. It suits every nail length and every skin tone.
How to do it: Apply a base coat, then two thin coats of deep forest green, letting each coat dry fully before the next. Dark colours show every streak, so use thin coats and a steady hand, and do not flood the cuticle. Seal with a glossy top coat. If you get green on the skin, clean it up right away with a small brush dipped in remover, because dark green stains the skin if it sits.
How long it lasts: 7 to 10 days in regular polish, 2 to 3 weeks in gel. Dark colours hide chips well, and the glossy finish keeps the green looking rich for the whole week.
You may also like: Design 21, Emerald and Gold, if you want the same green with a gold accent.
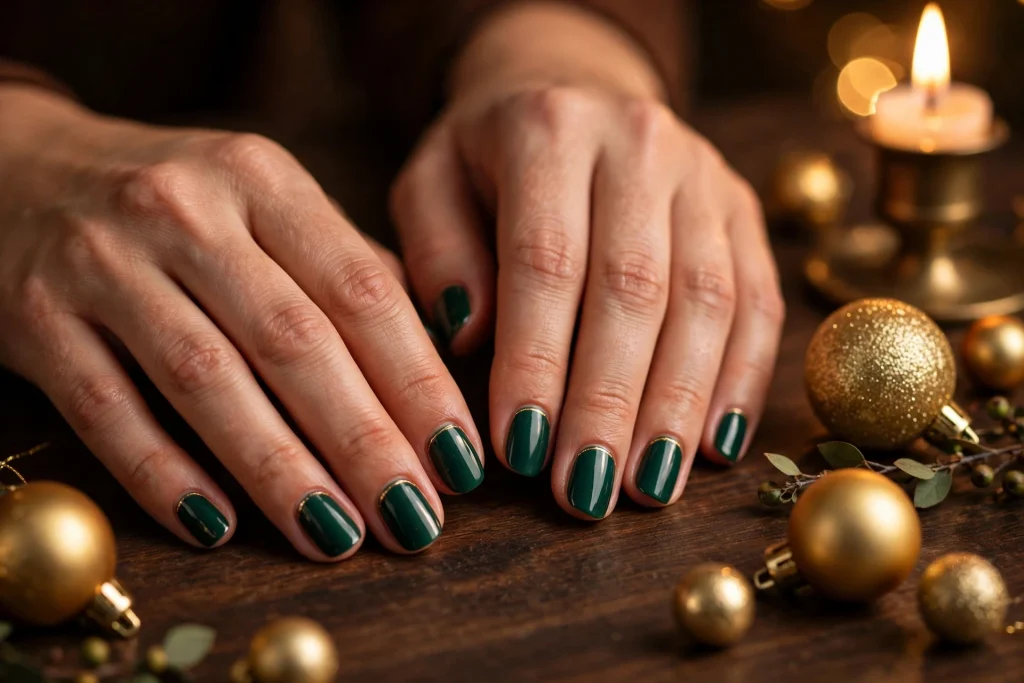
21. Emerald and Gold
A deep emerald green base with a thin gold line along the cuticle, or gold French tips. It is the most luxurious combination in this guide, and it is the one that looks best with gold jewellery. The green is rich, the gold is warm, and together they look like Christmas without a single picture on the nails. It suits medium nails best, because the gold line needs a little room to show.
How to do it: Apply a deep emerald green base, two thin coats, and let it dry fully. Use a thin striping brush to paint a fine gold line along the cuticle of each nail, or paint gold French tips instead. Keep the gold line very thin: a thick line looks heavy, and a fine line looks like jewellery. Seal with a glossy top coat. If your hand shakes, rest your painting hand on the table and move the nail, not the brush.
How long it lasts: 7 to 10 days in regular polish, 2 to 3 weeks in gel. The dark base hides chips, and the gold line is thin enough that a small chip barely shows.
You may also like: Design 20, Deep Forest Green, if you want the same green without the gold.
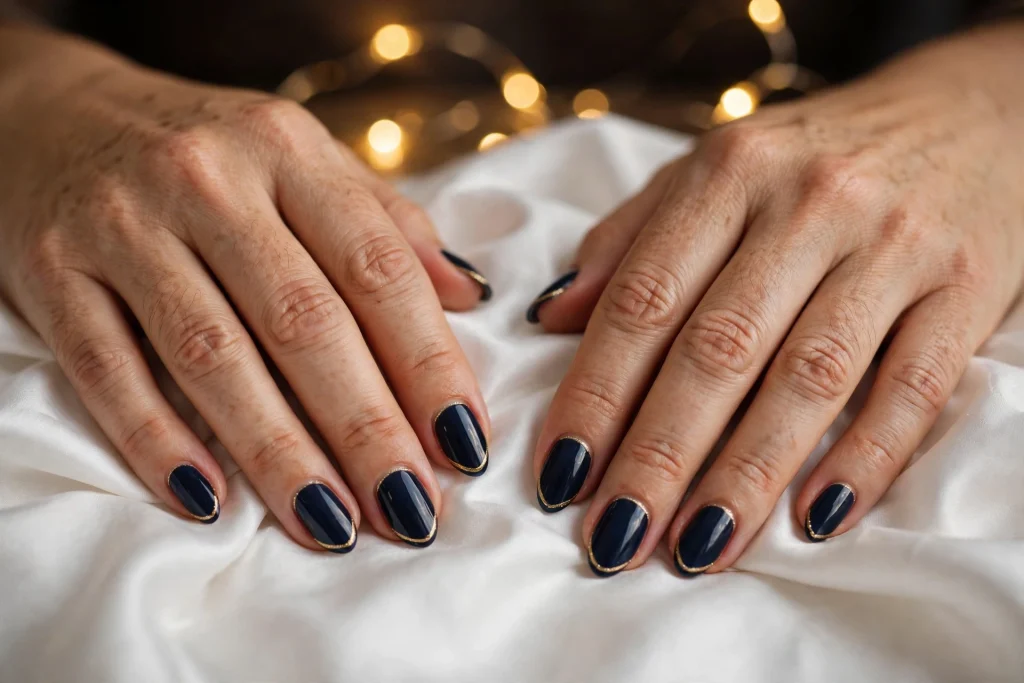
22. Midnight Navy and Gold
A midnight navy base with a gold French tip, or a thin gold line across the nail. Navy is the dark horse of christmas nails 2026: it is not a traditional Christmas colour, but it looks like a frosty winter night, and the gold makes it festive. It suits short nails well, and it is the design that works best if you want Christmas nails that do not look like Christmas nails at first glance.
How to do it: Apply a midnight navy base, two thin coats, and let it dry fully. Use a fine brush to paint a thin gold line along the free edge, like a French tip, or a thin gold line across the middle of the nail. Clean up the line with a small brush dipped in remover, then seal with a glossy top coat. The navy base is dark enough that the gold line pops, so keep the line thin and clean.
How long it lasts: 7 to 10 days in regular polish, 2 to 3 weeks in gel. Navy hides chips well, and the gold line stays bright if you refresh the top coat every two days.
You may also like: Design 21, Emerald and Gold, for the same gold accent on a green base.
23. Black and Gold New Year’s Eve
A black base with gold glitter on the accent nails, or a gold chrome line across each nail. This is the design that takes you from Christmas to New Year’s Eve without a repaint, because black and gold is a party look all year round. It is bold, it is glamorous, and it is the most dramatic design in this guide. Save it for the last week of December, and let it be the star of your New Year’s Eve outfit.
How to do it: Apply a black base, two thin coats, and let it dry fully. On the ring fingers, apply two coats of gold glitter polish, or paint a thin gold chrome line across each nail with a striping brush. Seal with a glossy top coat, and add a second top coat on the glitter nails. Black shows every ridge, so buff the nails smooth before you start, and wipe each nail clean so the black goes on evenly.
How long it lasts: 7 to 10 days in regular polish, 2 to 3 weeks in gel. Black hides chips well, and the gold glitter accent hides wear on the two nails that get the most use.

You may also like: Design 7, Silver Chrome Mirror, for another party finish that works on New Year’s Eve.
The 1-2-3 Festive Manicure Method
If you remember nothing else from this guide, remember this: one prep, two thin coats, three days of care. That is the whole method.
1. One prep, done properly. Wash your hands, push the cuticles back, shape the nails, and wipe every nail with alcohol or remover so there is no oil left. A clean, dry nail is the difference between a manicure that lasts ten days and one that chips in two. Do not skip the base coat, and do not paint on damp nails.
2. Two thin coats, never one thick one. Two thin coats of colour dry faster, look smoother, and last longer than one thick coat. Thick coats bubble, take forever to dry, and peel off in sheets. Let the first coat dry fully before the second, and wrap the tip of each nail with colour and top coat so the free edge is sealed.
3. Three days of care after painting. The first three days decide how long the manicure lasts. Wear gloves for dishes and cleaning, rub cuticle oil in every night, and do not use your nails as tools to open tape, cans, or packaging. Refresh the top coat on day two or three, and the manicure will look fresh for a full week or more. The november nails you paint in late November need the same care as the christmas nails you paint in December: the polish does not know what month it is, but your hands do.
Before and after, the difference is plain. Before: no prep, one thick coat, no top coat, and the manicure chips by day two. After: a proper prep, two thin coats, a sealed tip, and gloves for dishes, and the same polish lasts until New Year’s Eve.
At a Glance
| Design | Difficulty | Time | Best for |
|---|---|---|---|
| 1. The Classic Christmas Red | Easy | 20 minutes | Everyone, every outfit |
| 2. Cranberry Velvet Cat Eye | Medium | 45 minutes | Candlelit dinners, parties |
| 3. Oxblood French Tips | Medium | 35 minutes | Short nails, office parties |
| 4. Red Glazed French | Medium | 40 minutes | Christmas dinner, photos |
| 5. Cherry Red Chrome | Hard | 50 minutes | Party nights, New Year’s Eve |
| 6. Gold Glitter Fade | Easy | 30 minutes | Every day, all December |
| 7. Silver Chrome Mirror | Hard | 50 minutes | Black dresses, silver outfits |
| 8. Rose Gold Glitter Accent | Easy | 25 minutes | Work, family dinners |
| 9. Champagne Cat Eye | Medium | 45 minutes | Christmas dinner, quiet glamour |
| 10. Glitter Christmas Tree Accent | Medium | 40 minutes | Family parties, photos |
| 11. Candy Cane Stripes | Medium | 35 minutes | Short nails, casual parties |
| 12. Snowflake Accent Nails | Easy | 30 minutes | Short nails, first timers |
| 13. Gingerbread Faces | Easy | 30 minutes | Family parties, kids |
| 14. Tiny Christmas Trees | Medium | 40 minutes | Festive photos, parties |
| 15. Holly and Berries | Easy | 25 minutes | Short nails, elegant dinners |
| 16. Milky White with Gold Flakes | Easy | 30 minutes | Quiet luxury, every outfit |
| 17. Frosted French Tips | Medium | 35 minutes | Work parties, family photos |
| 18. Icy Blue and Silver | Easy | 25 minutes | Silver jewellery, dark coats |
| 19. Snowy White with Silver Stars | Easy | 30 minutes | Photos, winter nights |
| 20. Deep Forest Green | Easy | 20 minutes | Everyone, knitwear |
| 21. Emerald and Gold | Medium | 35 minutes | Evening outfits, gold jewellery |
| 22. Midnight Navy and Gold | Medium | 35 minutes | Short nails, evening parties |
| 23. Black and Gold New Year’s Eve | Easy | 30 minutes | New Year’s Eve, parties |
Do This Not That
| Do this | Not that |
|---|---|
| Prep the nails properly: wash, push cuticles back, wipe with alcohol | Paint on oily or damp nails, which makes polish lift in a day |
| Use two thin coats and let each one dry fully | Use one thick coat, which bubbles and peels off in sheets |
| Seal the free edge with colour and top coat | Leave the tip unsealed, which is where chips start |
| Put the design on one or two accent nails | Put a different picture on every nail, which looks busy |
| Wear gloves for dishes and cleaning | Use your nails as tools to open tape, cans, or packaging |
| Refresh the top coat every two days | Wait until the manicure chips, then try to fix it |
| Book a gel set between December 18 and 23 | Book a gel set in early December and expect it to last until New Year |
| Remove glitter with an acetone soak and foil | Peel or scrape glitter off, which takes layers of nail with it |
| Keep the design small and the base calm | Make the picture as big as the nail, which looks crowded |
| Practice a new design on one nail first | Try a new design on all ten nails the night before a party |
Your Christmas Manicure Weekend Plan
Friday evening: prep and paint. Wash your hands, push the cuticles back, shape the nails, and wipe each one clean. Paint your design in the evening, when you have time and you are not rushing. Two thin coats, a glossy top coat, and then leave your hands alone for an hour. No dishes, no wrapping, no typing with wet nails. Put on a film, make a cup of tea, and let the polish harden properly. This is also the right time for november nails: a gel set painted in late November still looks good for early December parties, so you can paint once and enjoy it for two weeks.
Saturday morning: check and fix. Look at the manicure in daylight. If a nail smudged, fix just that one nail instead of starting over. Add a second layer of top coat to the whole hand, and rub cuticle oil into every nail. This is the day to take your photos, because the manicure is at its freshest and the light is good.
Saturday evening: the party test. Wear gloves for any cooking or cleaning, and do not use your nails as tools. If a tip chips, dab a little colour on the chip and seal it with top coat. A small fix takes two minutes and nobody will notice. If you painted a gel set, you do not need to do anything at all: just enjoy it.
Sunday: rest and care. Rub cuticle oil in again, and refresh the top coat if the shine has dulled. If your manicure is regular polish, this is the day it starts to show wear, so a fresh top coat buys you two more days. If it is gel, it should still look perfect, and it will carry you through to New Year’s Eve if you keep the gloves on for dishes.
Take It Further
If you liked this guide, these articles from Supliice pair with it nicely. A fresh manicure deserves an outfit that matches it, and the right jewellery finishes the look.
- 22 Medium Length Hairstyles for Thick Hair That Work So Well
- Summer Work Outfits That Look Clean, Professional, and Easy to Wear
- Spring Brunch Outfit Ideas That Actually Make Getting Ready Easy
- Minimal Jewelry Ideas That Make You Look Put Together Without Trying
- Medium Gold Hoops with Casual Outfits That Always Look Effortless
- Trendy April Nails That Feel Fresh and Clean
- 21 Cozy Christmas Living Room Decor Ideas That Make Your Home Feel Magical
- 22 Cozy Christmas Apartment Decor Ideas for Small Spaces
Stylist’s Cheat Sheet
Keep this on your phone for your appointment or your at-home manicure.
- The words to use at the salon: “I want design number [X] from the Christmas list, [colour] base, [detail] on the accent nails only, glossy top coat.” Then show the photo.
- The finish to pick: Gel if you want 2 to 3 weeks and one set for Christmas and New Year. Regular polish if you want to change colour mid-month. Press-ons if you are short on time.
- The booking window: December 18 to 23 for a gel set that covers Christmas and New Year’s Eve. Book 2 to 3 weeks ahead for evenings and Saturdays in late December.
- The prep rule: Wash, push cuticles back, shape, wipe with alcohol, base coat. Never paint on oily or damp nails.
- The coat rule: Two thin coats, never one thick one. Let each coat dry fully. Seal the free edge with colour and top coat.
- The design rule: One star only. One colour, one finish, or one small picture. The rest of the hand stays calm.
- The shape to ask for: Short almond or soft square. Both are the most popular shapes for christmas nails 2026, and both suit short nails.
- The care rule: Gloves for dishes and cleaning, cuticle oil every night, top coat refresh every two days, and never use your nails as tools.
- The removal rule: Soak glitter and gel off with acetone and foil. Never peel or scrape, or you will take layers of nail with it.
Questions People Ask
A gel Christmas set lasts 2 to 3 weeks, so a set done between December 18 and 23 still looks good on New Year’s Eve. Regular polish lasts 7 to 10 days with a good base coat and a glossy top coat, and you can stretch it by refreshing the top coat every two days. Press-ons last 5 to 7 days with glue. Whichever finish you pick, gloves for dishes and daily cuticle oil make the biggest difference to how long it lasts.
For a gel set, book between December 18 and 23, so one set covers Christmas and New Year’s Eve. For regular polish, paint them 1 or 2 days before the event, because polish looks freshest in the first few days. If you love november nails, a gel set painted in the last week of November still looks good in early December, so you do not have to wait until Christmas week to enjoy a festive manicure. Book your salon appointment 2 to 3 weeks ahead for evenings and Saturdays in late December, because those slots go first. Never book a new design for the morning of a party: if something goes wrong, you have no time to fix it.
Start with proper prep: clean, dry nails and a base coat, because oil on the nail is the main reason polish lifts. Use two thin coats instead of one thick one, and seal the free edge with colour and top coat. After painting, wear gloves for dishes and cleaning, rub cuticle oil in every night, and do not use your nails as tools to open tape or cans. A fresh layer of top coat every two days keeps the shine up and stops small chips from spreading.
Do not peel or scrape it off, because that takes layers of your nail with it. Soak cotton pads in acetone, place one on each nail, and wrap the fingertips in foil for about 10 minutes. The glitter should lift off easily after that, and you can wipe it away with the cotton pad. Once the polish is gone, massage cuticle oil or a rich moisturiser into your nails and hands, because acetone dries the skin out. If it is a gel glitter set, let a professional remove it, or use the same soak-off method and be patient.
A Last Word
Christmas nails are a small thing, but they are the kind of small thing that makes the whole season feel different. You see them every time you hold a mug, wrap a present, or reach for a glass at dinner. A good manicure does not need to be complicated or expensive. It needs a clean prep, two thin coats, and one detail you love. That is it.
Pick one design from this list, the one that made you smile when you read it, and start there. If you are new to nail art, try the snowflake or the holly: they are just lines and dots, and they look hand-painted in the best way. If you want something bold, try the cranberry velvet or the cherry red chrome. And if you want a set that carries you from Christmas to New Year’s Eve without a repaint, book a gel set between December 18 and 23 and pick the black and gold.
Then come back and tell me which one you picked. I read every comment, and I love hearing which design finally made it onto your nails this Christmas.